Ender 3 Top Mount Extruder/BTT Filament Sensor v2 brackets
thingiverse
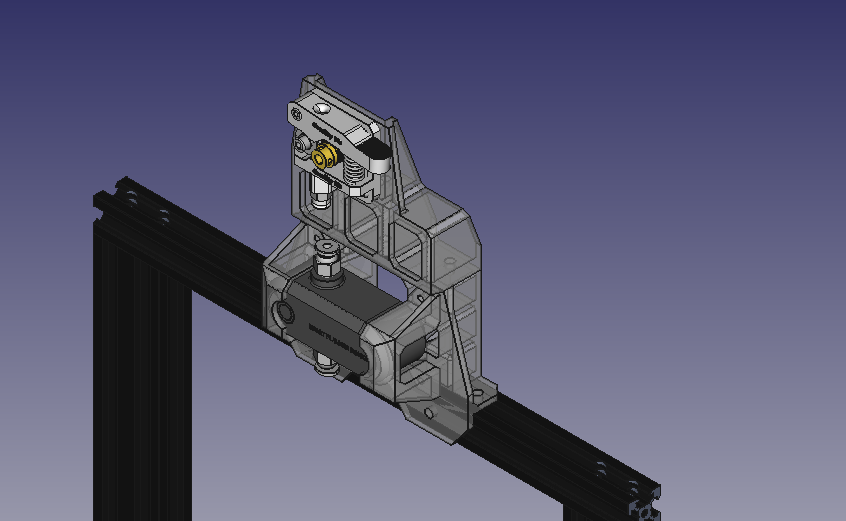
Ender 3 (or any 2020 top rail printer) top mount extruder and BIGTREETECH Smart Filament Sensor v2 brackets. No need to open up your Smart Filament Sensor. This bracket set is designed to mount the sensor in a non-invasive manner. *****POWER OFF YOUR PRINTER BEFORE REMOVING OR ATTACHING ANY CABLES. Failure to do so can blow up your controller board!***** Parts needed: 8X 5MM screws, 5MM flat washers, 5MM lock washers, 5MM t-nuts. 8X 3MM screws, 3MM flat washers, 3MM lock washers. 1M stepper motor cable for your controller board. *NOTE* BE CAREFUL TO GET THE CORRECT CABLE, YOU CAN POTENTIALLY BURN UP YOUR BOARD. Look and see if your existing cable has the center two wires swapped at the stepper motor connector. If so, get a 1M cable with the same swapped wires or swap them yourself. A roll of Bowden tubing of your choice. Zip ties (cable ties) Print the parts: 1X lower bracket, 1X upper bracket, 2X sensor clamps, 1X extruder filler, 3X 2020 slot covers. Print the upper and lower brackets with the FRONT facing DOWN. Print the clamps with the FLAT SIDES facing down. Remove your existing extruder and its stepper motor. Save all hardware. To install: (Refer to the included photos) Post-process the printed parts as required: clean up any stringing, blobs etc. Make sure all holes are clear. Carefully tap the three holes in the top of the lower bracket using a 5MM tap. Make sure the holes are sized correctly before tapping to avoid cracking. (*ALTERNATE TOP BRACKET MOUNTING: simply bolt and nut the upper bracket to the lower bracket if you wish, be advised - you will need to enlarge the 3 holes) Tap the four holes in the lower bracket for the sensor clamps using a 3MM tap. Tap the four mounting holes in the extruder filler using a 3MM tap. Install the filler into the hole left by your extruder using four 3MM screws, flat and lock washers. Mount your existing extruder stepper motor and extruder to the upper bracket using the factory hardware. Mount lower bracket to the top rail using five 5MM t-nuts, screws, flat and lock washers. Roughly center the bracket on the top rail. Do not fully tighten the screws yet. Mount left hand sensor clamp to lower bracket using two 3MM screws, flat and lock washers. Place filament sensor in left hand clamp. Attach right hand sensor clamp with two 3MM screws, flat and lock washers. Cut a 75mm long piece of Bowden tubing and insert it into the extruder coupling until it fully seats. Carefully remove the TOP Bowden coupler from the Smart Sensor. Holding the upper bracket with the extruder attached, place the bottom of the extruder Bowden tube all the way down into the Smart Sensor hole and gauge the distance between the upper and lower bracket. Trim the extruder Bowden tube as needed so the upper bracket sits nicely on the lower bracket. CAREFULLY reinstall the upper Bowden tube coupler into the Smart Sensor. DO NOT OVERTIGHTEN. Just above "hand tight" is fine. Holding the upper bracket and extruder assembly, insert the extruder Bowden tube into the Smart Sensor coupler until it seats all the way down. Mount the upper bracket to the bottom bracket using three 5MM screws, flat and lock washers. Slide the entire extruder and sensor assembly left-right as needed to center the Smart Sensor lower Bowden coupler on the top rail left-to-right. Tighten the three rail mount screws. Check and see if your existing hotend Bowden tube is sufficiently long enough to reach the Smart Sensor coupler with the hotend HOMED. If so, great. If not - replace it. -Install a new length of Bowden tubing from the lower Smart Sensor coupler to your hotend with the hotend in HOME POSITION. (important!) Leave a slight amount of slack, but not so much that the tube becomes unmanageable at high Z-heights. Trial and error on this: run your Z axis up and down and check how the Bowden tube behaves. Creative placement of zip ties (to the hotend wiring harness) will help manage the Bowden tube behavior. Zip tie the hotend wiring to the extruder filler. Plug in and route your 1M stepper motor cable and Smart Sensor cable from the control board to the extruder stepper motor and Smart Sensor. Use the 2020 slot covers to protect the wiring from moving parts. Setup of the Smart Filament Sensor is beyond the scope of this document. Reddit, Youtube and Google are great resources for walkthrough and how-to videos on the subject. Here's some links to get you started: https://www.youtube.com/watch?v=9gLSJIxiuwo https://www.reddit.com/r/BIGTREETECH/comments/n9a0nj/btt_smart_filament_sensor_guide/
With this file you will be able to print Ender 3 Top Mount Extruder/BTT Filament Sensor v2 brackets with your 3D printer. Click on the button and save the file on your computer to work, edit or customize your design. You can also find more 3D designs for printers on Ender 3 Top Mount Extruder/BTT Filament Sensor v2 brackets.