Ender 3 Trianglelab Bondtech BMG + E3D V6 Direct Drive Mount System
thingiverse
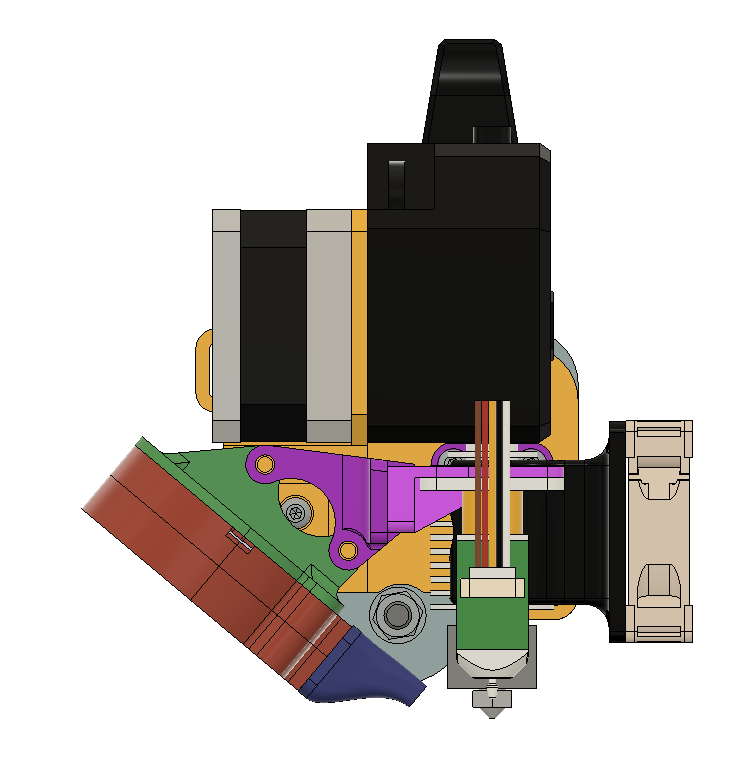
UPDATES: 30/10/2020 - Added mount and duct designs for a 4020 blower fan in case someone prefers that size. Let me know how they work in the comments. #Design Information: This is my attempt at a super simple mount assembly for a Bondtech BMG (or clone) with E3D V6 hot end in direct drive configuration. I tried to strip everything down to the bare essentials. Nothing fancy but it works great. No modifications needed to the printer other than wiring up the new components. **Notes:** - I designed the BLTouch mounts but have not yet tested because I don't have one yet. Please let me know in the comments if you've tried it out and what your experience is. - I think this would also work on CR-10 (and maybe other Creality printers) but I haven't tried it. If you have success (or failure) on other printers let me know in the comments. #Fabrication and Installation: - All parts print easily with no supports. I used PLA for rigidity it has been holding up well so far. - Print the main mount part with relatively high infill to stop the portion between the extruder and stepper motor from getting crushed as the motor heats up. - I recommend using an M3 tap to clean out an thread the holes for the fan mount. It makes it easier and more reliable to thread in the screws. Let me know if you'd like to see a version with inset nuts instead of threading directly into the plastic. - I included a couple loops on the edges of the mount plate to tidy your cables using cable ties - The bondtech extruder runs in reverse to the stock extruder so you'll have to reverse the wiring if you are using the stock extruder motor and cable. The small motor I bought with mine plugged directly into the main board without modification. Your mileage may vary. - Hardware Required: - 2 pcs - M3x6 mm bolts from original fan shroud - must be used in old hot end mount holes - 6 pcs - M3x8 bolts (M3x6 will work too) - 2 pcs - M4x20 bolts - 2 pcs - M4 nuts #Extruder and Hot End Details: - All the upgrade parts were purchased from TriangleLab here: [TriangleLab on AliExpress](https://trianglelab.aliexpress.com/store/1654223?spm=2114.12010612.100004.2.77ec1a6cNH5nae) - **Make sure to get the 24V version for Ender 3.** - The parts generally seem to be good quality and perform well. I've printed PLA, PETG, and TPU so far with no issues. The only exception is the 5015 cooling fan - it has stopped functioning unless I give it a little boost to get it started. # Slicing and Firmware: This modification places the nozzle exactly 11.5 mm in the -Y direction (toward the front of the printer) from the original nozzle location. This means that the nozzle will be too far forward when the printer homes. It also means that the nozzle will not be able to reach the back of the bed before it runs out of travel ( you will lose 11.5 mm of Y print area). 1. When slicing, avoid placing anything within the first ~15 mm of the front of the bed. 2. **If you use Mesh Bed Levelling" you will need to change the following line in the Marlin FW configuration_adv.h file to limit the probe area: - **FROM** "//#define MESH_MIN_Y MESH_INSET" - **TO** "#define MESH_MIN_Y 25" 3. I recommend modifying the custom start G-Code in your slicer to make sure the purge line starts and ends at Y=15 mm. Default in my slicer was Y=10 mm and it printed slightly off the end of the bed. 4. Adjust your E-Steps to account for the 3:1 gear ratio on the extruder. Recommended starting value is 415 steps/mm. After calibration I ended up at 425 steps/mm. 5. During your first test print, check the extruder stepper motor to ensure that it isn't either skipping (current too low) or overheating (current too high). - I'm using a 23 mm thick "pancake" motor (1A max rated current). I had to turn Vref way down on the main board to keep it from overheating. - For my setup (Ender 3 with TMC2208 stepper drivers) I set Vref to 0.8 V. - You will need to find the right setting for your specific controller - Google is your friend.
With this file you will be able to print Ender 3 Trianglelab Bondtech BMG + E3D V6 Direct Drive Mount System with your 3D printer. Click on the button and save the file on your computer to work, edit or customize your design. You can also find more 3D designs for printers on Ender 3 Trianglelab Bondtech BMG + E3D V6 Direct Drive Mount System.