Ender 3 V2 bed leveling (also for Voxelab Aquila)
thingiverse
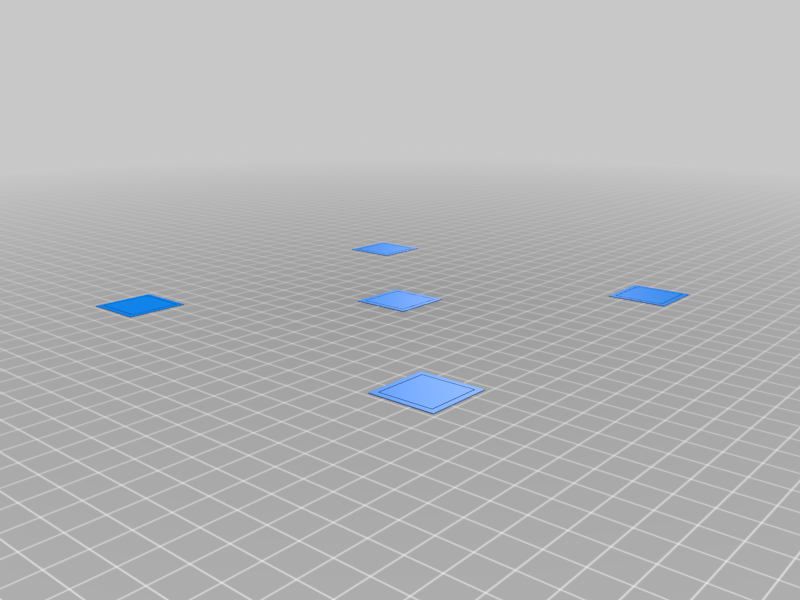
After having a lot of problems with leveling my bed for the Ender 3 V2 because I was a noob this bed leveling test was very helpful for me. (Precise pictures will follow when I get a Camera) <font color='red'>Note: Cura 4.11 has a bug that does not allow you to slice this file. Install Cura 4.10 and slice at 0.2 </font> #### Included Files: 1. Ender_3_V2_bed_leveling_fast: Use this file for the course of action (I Recommend using this one) 2. Ender_3_V2_bed_leveling_slow: If you need extreme precision use this as the last touch up 3. Ender_3_V2_bed_leveling_super_fast: If you already leveled your bed you can use this file to check if it is still level. ### The course of action: 0. (Use the paper method to get close enough to the bed where the filament sticks but the nozzle does not scratch the bed. Don´t waste too much time on this! Leveling is much easier while printing) 1. Clean the bed of debris and if needed with rubbing alcohol (don't use Windex) 2. Preheat the bed for about 5 minutes 2. Now start printing at the temperatures you would normally print. Use the skirt line that is created by your slicer to further adjust the distance so that the skirt lines do not have gaps between them (You can just cancel the print if you weren´t fast enough) 3. Let the printer finish and look at the squares: 3.1: Try getting the distance dialed in so that the square is connected to its frame 3.2: Increase the distance in very small steps until the frame starts to disconnect 3.3: The distance where the frame starts to disconnect very slightly or starts to connect slightly should be a good beginning. For more bed adhesion decrease the distance to the nozzle or increase bed temperature. Some PLAs even need the frame and the square to connect for good adhesion. 4. If you want to be very precise you can print the last run with the slow .stl file 5. Now start printing a test object such as 3DBench and check if bed adhesion is good. If not go back to 3 but now decrease the distance to the nozzle #### Additional tips if you still have problems: 1. Take breaks if you are frustrated trust me :) 2. Always level your bed! 2. Use the old squares as a scraper to remove new ones 2. Buy new precision springs (cheap fix) 2. Buy a second z-axis motor kit (more expensive but extremely helpful. Especially when you move the printer often)
With this file you will be able to print Ender 3 V2 bed leveling (also for Voxelab Aquila) with your 3D printer. Click on the button and save the file on your computer to work, edit or customize your design. You can also find more 3D designs for printers on Ender 3 V2 bed leveling (also for Voxelab Aquila).