Ender 3 V2 CoreXY V1.2
prusaprinters
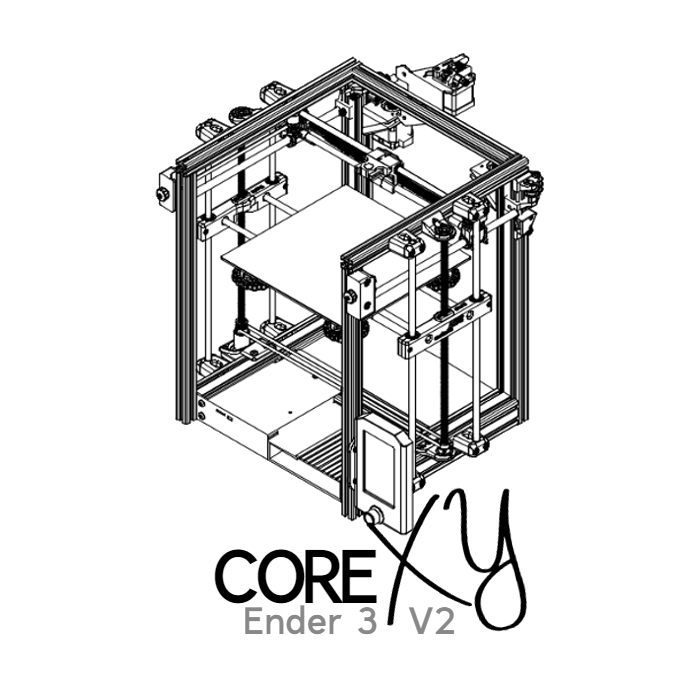
<p>The Aim of this project was to build a <strong>converter kit for my V2 model into a Core YX printer</strong> and by reusing as many <strong>original parts </strong>of <a href="https://www.amazon.com/Official-Creality-3D-Removable-220x220x250MM/dp/B07K3SZBHJ?dchild=1&keywords=ender+3&qid=1612857257&sr=8-1-spons&psc=1&linkCode=ll1&tag=thingiverse09-20&linkId=5419ace64a5f58b068a896710257ed13&language=en_US&ref_=as_li_ss_tl">Ender 3</a> v2 as possible. The second goal of this build was to keep the possibility of converting back the coreYX<strong> to </strong><a href="https://www.amazon.com/Official-Creality-3D-Removable-220x220x250MM/dp/B07K3SZBHJ?dchild=1&keywords=ender+3&qid=1612857257&sr=8-1-spons&psc=1&linkCode=ll1&tag=thingiverse09-20&linkId=5419ace64a5f58b068a896710257ed13&language=en_US&ref_=as_li_ss_tl"><strong>Ender 3</strong></a><strong> V2 </strong>and here we are.</p><p>The benefits of CoreXY system is that your ender 3 v2 doesn’t have to move the heavy glass plate anymore, so by addressing this issue now you can start to increase the printing speed with less impact on print quality.</p><p><strong>build volume of 220 x 220 x 250 mm</strong></p><p><strong>Last news: </strong></p><figure class="media"><oembed url="https://www.youtube.com/watch?v=qT6yU-IORVw"></oembed></figure><p> </p><p><a href="https://www.youtube.com/channel/UCf1VbcoQWdtFyrIUo0VsSJg">https://www.youtube.com/channel/UCf1VbcoQWdtFyrIUo0VsSJg</a></p><p>This project took me 1 years to finish and <strong>I’m sharing with you all STL, bom list to build</strong> this CoreXY machine.</p><p>Before you start this project I would like to highlight some details about this conversion:</p><p>Several steps require modification of original parts like wiring electric components, drilling holes and threads tapping and those changes require a level of expertise.</p><p>Keep in mind that the consequence mentioned in the first paragraph is that you will lose the original machine warranty.</p><p>I personally suggest this project for those people who have a good understanding on 3D printing working principle and working.</p><p> </p><p><strong>FAQ:</strong></p><p>Q: what's the cost of this convertion?<br>A: At the bottom of this page “Other files” you will find will find a PDF of "My Cost of Ender 3 v2 CoreXY"</p><p> </p><p><strong>Updates:</strong></p><p>16.11.2022 Enclosure project ongoing</p><figure class="media"><oembed url="https://youtu.be/wYzPFijU5_I"></oembed></figure><p><br>16.11.2022 - STL ADDED -Tensioner prototype for Ender 3 and Ender 3 Pro<br>16.10.2022 - New X-carriage (modular modell) and new Creality Hotend evolution available .<br>30.18.2022 - Improved Z axis for bed stability<br>27.08.2022 - New mod has added for both hotend<br>27.08.2022 - SKR1.4 Turbo Motherboard case added.<br>10.08.2022 -New photos was uploaded.<br>13.08.2022 - some STL was fixed (see V1.1).</p><p><br><strong>3D Printed parts: </strong><i>(for bom list and my cost see attached PDF)</i><br><i>1 pc - Left upper belt guider</i><br><i>1 pc - Right upper belt guider</i><br><i>1 pc - Left lower belt guider</i><br><i>1 pc - Right lower belt guider</i><br><i>10 pcs - 1mm washer</i><br><i>2 pcs - Spacer</i><br><i>1 pc - Left front tensioner</i><br><i>1 pc - Right front tensioner</i><br><i>1 pc - Stepper motor holder A</i><br><i>1 pc - Stepper motor holder B </i><br><i>1 pc - X-carriage left </i><br><i>1 pc - X-carriage right</i><br><i>1 set - Customized holder</i> <i><strong>(see STL folder) </strong> </i><br><i>1 pc - XY left slider</i><br><i>1 pc - XY right slider</i><br><i>8 pcs - Z holder lower</i><br><i>8 pcs - Z holder upper</i><br><i>2 pcs - Z axis slider</i><br><i>2 pcs - Z lead upper guider</i><br><i>1 pc - Z lead lower guider</i><br><i>1 pc - Z stepper holder</i><br><i>1 pc - Y endstop body</i><br><i>1 pc - X endstop part1</i><br><i>1 pc - X endstop part2</i><br><i>4 pcs - Bed holder</i><br><i>1 pc - Motherboard support base</i><br><i>1 pc - display support base</i><br><i>1 pc - 3 mm drill guide</i><br><i>1 pc - 3 mm drill guide mirror</i><br><i>1 pc - 5 mm drill guide</i><br><i>1 pc - 5 mm drill guide mirror</i></p><p><strong>Frame parts:</strong><br><i>2 pcs - 2020 V. SLOT 400mm</i><br><i>2 pcs -2020 V. SLOT 330mm</i><br><i>1 pc - 2020 V. SLOT 290mm</i></p><p><strong>Hardware parts:</strong><br><i>16 pc - M3x10mm socket button head screw</i><br><i>4 pcs - M4x15mm SH (socket head) screw</i><br><i>4 pcs - M4x20mm FH (Flat head) screw</i><br><i>4 pcs - M4x10mm SH (socket head) screw</i><br><i>4 pcs - M5x35mm FH (Flat Head) screw</i><br><i>14 pcs - M5x35mm SH (socket head) screw</i><br><i>18 pcs - M5x30mm button head screw</i><br><i>4 pcs - M5x30mm Hex head screw</i><br><i>2 pcs - M5x30mm SH (socket head) screw</i><br><i>4 pcs - M5x25mm SH (socket head) screw</i><br><i>21 pcs - M5x10mm SH (socket head) screw</i><br><i>6 pcs - M5x10mm FH (Flat head) screw</i><br><i>12 pcs - M4 nuts</i><br><i>8 pcs - M5 nuts</i><br><i>49 pcs - T-nuts M5</i><br><i>12 pcs - ID Ø3mm washer</i><br><i>4 pcs - ID Ø4mm washer</i><br><i>18 pcs - ID Ø5mm washer</i><br><i>8 pcs - GT2-6mm no teeth (ID 5mm)</i><br><i>2 pcs - GT2-6mm T20 (ID 5mm) </i><br><i>2 pcs - GT2 1520mm belt (6mm width) (not loop)</i><br><i>1 pc - GT2 800mm Timing Belt Continuous Loop (close loop) (6mm width)</i><br><i>2 pcs - GT2 T20 Ø8mm (ID)</i><br><i>3 pcs - 608zz bearing</i><br><i>2 pcs - F624zz bearing</i><br><i>2 pcs - LM10UU linear bearing</i><br><i>5 pcs - LM8UU linear bearing</i><br><i>1 pc - LM8LLUU linear bearing</i><br><i>2 pcs - Ø10x290mm linear rod</i><br><i>1 pc - Ø8x350mm linear rod</i><br><i>1 pc - Ø8x305mm linear rod</i><br><i>6 pcs - Ø8x400mm linear rod</i><br><i>1 pc - Lead screw T8x400mm</i><br><i>1 pc - Lead screw nut T 8x8mm</i><br><i>4 pcs - Zip tie 2,3mm x >50mm</i></p><p><strong>Electric parts:</strong><br><i>1 - pc BL touch wtih cable extension</i><br><i>1 - pc 0,5m endstop wire (optional or original ender 3 cable can be extended</i></p><p>Do you want some help to build this machine or receive news?</p><p>Check my <strong>assembly guideline</strong> here: <a href="https://payhip.com/b/f2IrD">https://payhip.com/b/f2IrD</a></p><p> </p><p>Email: sra3dsolutions@gmail.com</p><p><br> </p>
With this file you will be able to print Ender 3 V2 CoreXY V1.2 with your 3D printer. Click on the button and save the file on your computer to work, edit or customize your design. You can also find more 3D designs for printers on Ender 3 V2 CoreXY V1.2.