Ender 3 V2 Silent Pack
thingiverse
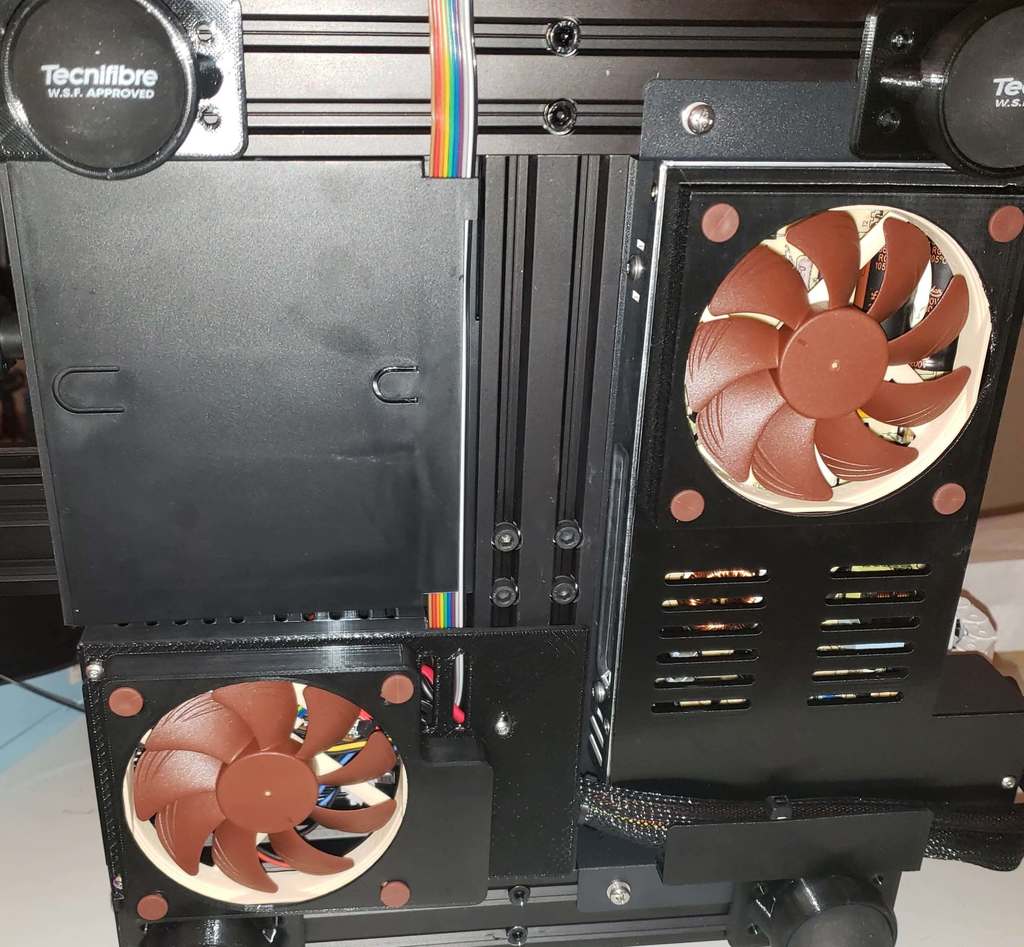
EDIT (11/30/20): The mobo cover was remeasured, any issues with the buck converter mount, hole spacing, and hole size should be resolved. INTRODUCTION: Do you keep your printer in your bedroom? Maybe near your office or where you relax? Tired of hearing that PSU fan screaming through the walls? Maybe you just found out that the mainboard fan is only on when the part fan is on...? YES! IT'S TRUE! Then do I have the solution for you! After trying to silence my own v2, which I have to keep in my bedroom, I noticed that first of all, there are few mods for it and even fewer that make it quiet. With some technical know-how, patience, and a bit of cash, you can half the noise from your printer! In this pack is a complete file list that you'll need to silence that noisy PSU fan, replace the mainboard fan, and raise the printer to improve airflow. This list is all thanks to creators @TerraVestra, @chilluniverse, @picsnapr, and @fonsuak! PARTS LIST: Download the feet here: https://www.thingiverse.com/thing:3044013 You can get alternate feet here: https://www.thingiverse.com/thing:4665097 Download the PSU cover here: https://www.thingiverse.com/thing:4567153 2 X Noctua A9x14 (PWMS are the quietest although we aren't using the PWM wire). https://www.amazon.com/Noctua-NF-A9x14-Premium-Quiet-92x14mm/dp/B009NQM7V2 1 X DC to DC voltage converter. https://www.amazon.com/LM2596-Converter-Module-Supply-1-23V-30V/dp/B008BHAV4Y/ref=sr_1_3?dchild=1&keywords=LM2596+Buck+Converter&qid=1614206676&sr=8-3 4 X Squash balls. https://www.amazon.com/gp/product/B01NBLQ12U/ref=ppx_yo_dt_b_asin_title_o02_s00?ie=UTF8&psc=1 This costs about $52 from Amazon. You will also need a short amount of wire to connect the mainboard fan to the converter and the converter to the mainboard. 24 Gauge is what is already being used for the fans so I'd recommend using that, but anything that fits will work. You may need other tools, i.e. multimeter, wire strippers, flush cutters, zip ties, soldering iron, solder, flux... etc. If you don't have most of these, hopefully, you know someone who does or you're willing to get some new tools and learn how to use them (yes it is a significant undertaking). If you want to go all out (<30dB whisper-quiet) read below. NOTE: Going this route will double the cost of the parts to $100 I suggest also replacing the hotend fan with either a Noctua A4x10 or A4x20. https://www.amazon.com/gp/product/B072JK9GX6/ref=ppx_yo_dt_b_asin_title_o03_s00?ie=UTF8&psc=1 If you're upgrading to a new print head or maybe just feel like swapping the part fan out for a better quality one, try these 4010 blowers. I use two with a Hero Me gen 5 print head. https://www.amazon.com/dp/B07RNPJ1YS/ref=cm_sw_r_cp_apa_fabc_gmfSFb5NSYKQX?_encoding=UTF8&psc=1 If you have a BLTouch I strongly recommend getting JST connectors to properly terminate your new fans and also fix the loose DUPONT connectors that came with it. I'd also pick up some more wire so that you can create your own wire bridges. You'll also need a crimper to crimp the connector pins onto the wires. https://www.amazon.com/gp/product/B015Y6JOUG/ref=ppx_yo_dt_b_asin_title_o05_s00?ie=UTF8&psc=1 https://www.amazon.com/gp/product/B087TJNJZS/ref=ppx_yo_dt_b_asin_title_o05_s00?ie=UTF8&psc=1 https://www.amazon.com/gp/product/B00OMM4YUY/ref=ppx_yo_dt_b_asin_title_o05_s01?ie=UTF8&psc=1 CONFIGURATION: You'll use the DC converter to power the mainboard fan and also the hotend fan if you got the A4x10/20. The PSU fan (should) be 12 volts... Meaning all you have to do is splice the old fan wires with the new. The squash balls just pop into the feet. There is a modified version along with the standard feet. The modification allows the foot to slip over the PSU tray for a seamless look. You'll need to mirror it so that way you can use a foot for either side of the PSU tray. When you go to attach the modified PSU feet, you'll leave two of the screws out (one on either side) so that the feet can slide over their holes. Two screws alone are plenty to hold the PSU in place, but with the feet also supporting it you don't have to worry about it going anywhere. The feet may be slightly wider than the rail when printed, meaning it might rub against either the mainboard cover or PSU cover. Don't be afraid to take a file or some sandpaper to them if this happens. If you are going full silent mode: Cut the fan connectors off the fans and use your crimper to attach JST connectors. You can use the additional wire you bought to make an extension through the wiring loom. This way you don't have to pull out your fan wires, simply unplug them at either end and done! (I would practice putting the connectors on before moving onto the fans) This might be a good time to upgrade your hotend ducts with either manta or hero me. Just be sure to pick quiet parts fans or you'll be back to square one! You can use one of the 5 pin JST connectors to get a proper fit on your BLTouch. All of the fan wires should be shortened to improve airflow. TIPS: PAY VERY CLOSE ATTENTION TO WIRE POLARITY! IT VARIES THROUGHOUT THE MACHINE! For Noctua's PWM fans the positive wire is yellow and the ground is black. For Noctua's FLX fans the positive wire is red and the ground is black. The mainboard tray tolerances are tight, you may need to modify yours to get the holes to line up properly. Before connecting the mainboard fan to the buck converter, connect it to the 24V rail on the mainboard and turn it on, then using a voltmeter, adjust the output voltage with the screw on the top until you read 12V across the output terminals. A solid 24V supply can be found where the PSU connects to the mainboard. You'll see two 12 gauge wires coming in from the PSU and if you use a voltmeter on the terminals you'll see a healthy 24V DC as soon as the power is on. I recommend soldering your DC converter input wires to those before putting them back into their terminal. You can use the rubber inserts from your Noctua fans instead of screws. Heatshrink can be used near the connectors (if you added any) to stiffen the wire and keep it from being crushed when you plug something into them. Included are some pictures of my own work where I mimicked the stock look of the fan wiring.
With this file you will be able to print Ender 3 V2 Silent Pack with your 3D printer. Click on the button and save the file on your computer to work, edit or customize your design. You can also find more 3D designs for printers on Ender 3 V2 Silent Pack.