Ender 3 X and Z linear rods conversion
thingiverse
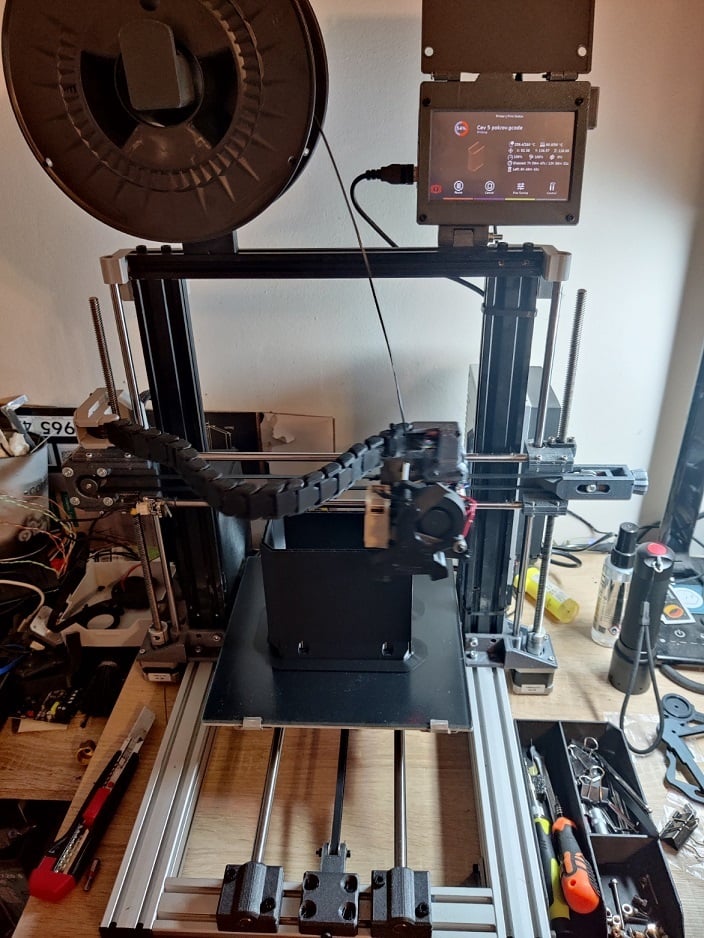
Conversion of Ender 3 to X and Z linear rods Conversion of Y linear rods is to be found here:https://www.thingiverse.com/thing:4794519 I will soon clean and merge those two threads. *Edit: Added BMG extruder for Dragon hotend step file. *Edit2: Added stls for Dragon extruder. Extruder has 2/4mm tube inserts (bowden tube) for easier glide. Can be converted to 2mm hole without tube in step file. *Edit3: Added Matrix (Hemera) extruder *Edit4: Used 5" Touch screen with Raspberry pie 3B+. Housing fits HDMI U connector. (my design) https://www.thingiverse.com/thing:4737534 Edit5: Since last 4 months I am on Klipper. Speeds stated on the bottom and test pieces are from Marlin. With Klipper I have 1500-2500 acceleration and speeds 150mm/s for technical parts and 50-100 for organic. Edit6: I am using cheap POM Z rod nuts instead of brass. No free play, no need for any backslash solution, no cleaning needed, only here and there some lube. 5 months of Z axis maintenance free! Edit 7: I didn't like how I had to disassemble entire hotend to service anything and I lost 10mm on right side of X, so I redesigned hotend carrier. Now sliding part and carriage are separated, slides into place and fixed with screws. It took me 20 min to change carriage due to slightly to high BL touch :). BL touch is hidden behind extruder, this way it is as close to the nozzle as possible (minimum offset) and entire front of extruder is free to mount any cooling solution you want. Cable holder is moved to front, it was also one of the factors that contributed to limit X axis. It has enough space inside to hide connectors, if your cables are split, like mine. For heater cartridge I use XT30 connector and still fits inside. Cables for heater, thermistor and BL touch are hidden in channels between carrier and extruder. I order to do that, I had to move electronic box to the side, or cables would probably be to short.I had a plan to do it anyway, so why not now? Electronic box distance goes between box and vertical frame, rude solution, but I did'n have time to play with it (better solution here: https://www.thingiverse.com/thing:4794519). USB cable and SD card slot have space at the bottom. Fan used is 6020 24V, hooked on same bulk converter as Noctua on extruder, so it runs on half the RPM and is quiet. If you squeeze a piece of foam between fan and fan mount, annoying low frequency hum will go away. My fan is much quieter now. I suggest you buy a box of screws M3 6-25mm long, they are cheap on Aliexpress. Top rail holders will have to be replaced, I needed clearance in front. All holes where nuts should be are M3 threaded. Offsets for Klipper: [stepper_x] position_endstop: -18 position_min: -18 [bltouch] x_offset: 7 y_offset: 24 z_offset: 1.08 ; Cooling solution: https://www.thingiverse.com/thing:4042492 by Hangtight or https://www.thingiverse.com/thing:4121546 by Redangel1984 Since I solved babystepping problem with Octodash, I got rid of stock LCD sceen. All parts in this update are marked as V2. *End of update I couldn't find any rods conversion for Ender 3 so I had to design it myself :( I was not satisfied with V slot rails having to carry extra weight after direct drive upgrade and slight rippling (not ghosting), so I installed dual 8mm rods to carry X gantry. While doing that I also installed Z on rods and put second motor for Z. Board is SKR E3 Mini, so I had to make Z connector splitter. Before complaint about round rods, if they are good for Prusa, they are good for me too. Besides, this way I got 50mm wide base for hooking up ~350-400g heavy extruder. E3D V6: All 4 bearings are Brozzl LM8LUU (long) BMG extruder is integrated into carriage, basically you only need internal parts of extruder. Motor on extruder is 22mm pancake. IMPORTANT! Use 4020 fan or X limit switch has to be moved 10mm to the right! Dragon: I had to drill fi 3mm holes in dragon to mount it on extruder, provided M2 screws were to short. I choose this way and not to use E3D V6 mount adapter because adapter still rotates inside extruder and that somehow cancels one of main Dragon features, non rotating heatsink. Most of airflow is channeled through narrow heatsink gap. Matrix (Hemera): (obsolete, use V2 instead) Center of mass and nozzle are as close to rails as possible. One 20-30mm M3 screw is to be used on the left side to trigger X-limit switch. All holes are M3 threaded. I have to find efficient part cooling solution, this one does not cool enough with speeds I am printing now. VERRY IMPORTANT! Use correct lenght screws for motor mount. Slightly too long and mount points will be ruined! Parts needed: 2x 445mm X and 2x 415mm Z 8mm rods 400mm threaded rod + brass nut (or two POM plastic nuts, they are excellent) 22mm stepper motor+ cable M3x50 screw 3x M5x10 screw + T20 nuts 14x Bunch of shorter M3 screws and nuts 4pin Y splitter for Z motors(or you can make one) small zip ties Printed PETG, 4 walls, 5 top/bottom 20% infill Test benchy layer hight 0.24, speeds from 40 to 80 and 150% (I would guess that would be 120mm/s) Accelerations 500 and 1000mm/s Rippling was back at 80/500 150% speed. Hard to see but it is there. Pic with a lot of stringing (0,12 layer, 80mm/s and 1000mm/s acceleratrion) was run out of filament and I used some very old one sitting on bench for over 9 months... I guess filament moisture is not a myth.... Still need to tweak FW a bit. Extruder redesigned https://www.thingiverse.com/thing:3028303 from g_tobet Y rail my design https://www.thingiverse.com/thing:4239029 (obsolete, I'm on dual 10mm rods now https://www.thingiverse.com/thing:4794519)
With this file you will be able to print Ender 3 X and Z linear rods conversion with your 3D printer. Click on the button and save the file on your computer to work, edit or customize your design. You can also find more 3D designs for printers on Ender 3 X and Z linear rods conversion.