Ender 3 X axis right limit switch holder (CC-BY-NC-SA)
thingiverse
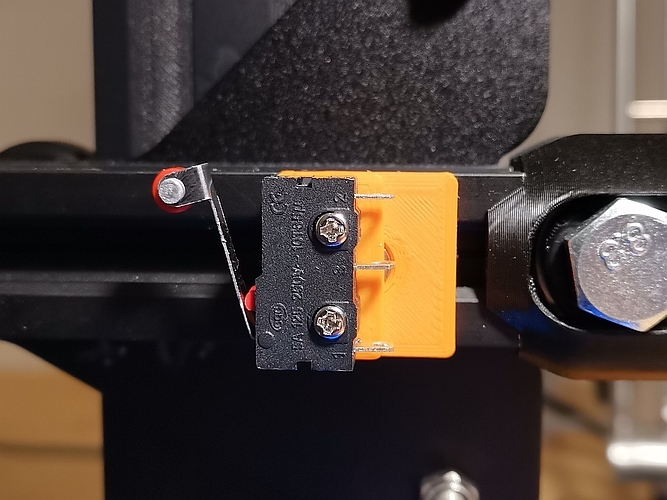
Limit switch mount for left side of 'Ender 3 X-axis rail. For default cooling fan housing. If a different cooling fan housing is used, proper function is not guaranteed. Shallow base and shims for adjustment are included. ## Design Details Designed in preparation for an auto-off (auto shutdown) function. Can be used for other things, too (like a trigger for a timelapse). The general idea is that the carriage is able to push this switch at the end of program runtime. Can probably be used for all 2020 profile or similar machines. ## Why The my 24V PSU is quite loud and I don't want to rework my machine for the quiet PSU. So I wanted a way to switch it off. I chose the left x-axis limit because the 'Ender 3 heat bed ends at about X+220 but the head can go to X+235 (for my firmware, at least). This position is probably never used during a print and at least very rarely during regular operation (never in my case) since the reference position is the lower left corner. That's what makes the right X limit an ideal place for such an auxilliary switch. This Thing keeps the switch arm at the distance of the default cooling fan housing. If a differnt cooling fan housing is used, proper function is not guaranteed. If In case the position is different I added a few shims in 0.5mm, 1mm, 2mm for adjusting the position. This Thing cannot take the standard 'Creality 'Ender limit switch. Just the displayed roller arm switch. #### What files do you need to print? If you use the default part cooling fan, then print either <i>roller_regular_down.stl</i> or <i>roller_regular_up.stl</i>, depending on your preferred switch orientation. If the distance is different, then the <i>shim base</i> is probably better, together with a few shims in fitting combination. ## Print Instructions ### Measuring the needed distance <ol> <li>Disable all motors.</li> <li>Move carriage to far left by hand.</li> <li>Hold limit swich to carriage where is should switch. </li> <li>Measure or guess the distance (with caliper or ruler).</li> <li>If distance is about 5 mm (±1mm), then use <i>regular part</i>.</li> <li>If distance is different than 5 mm (±1mm), then use <i>shim base</i> and <i>shims</i> in fitting amount.</li> </ol> ### Printing Based on carriage distance, print either <i>regular part</i> xor <i>shim base</i> and a fitting combination of <i>shims</i>. Print the M3 nut for 2020 profile from [Thing 3050607](https://www.thingiverse.com/thing:3050607). Alternatively, can also use a profile nut that doesn't need a metal nut (e.g. [Thing 4822612](https://www.thingiverse.com/thing:4822612/)). Use whatever floats your Benchy. Unmodified print head can use standard part. Print low infill since the parts are so tiny. Use default printing settings or adjust to personal experience. Might need removing of burrs. ## Materials needed * 1x screw M3x8 countersunk head for base fixing * 2x screw M2x10 for roller arm sensor. * 1x roller switch. * (optional) M2 tap to make threads for screws. Maybe the screws can make their threads. ## Assembly Instructions Assumed preparation that is not described here: End switch already wired to the relay (or wherever the signal should go). ###Mechanical <ol> <li>Home machine and use machine controls (terminal commands or display controls) to drive carriage to X positive limit all the way to the right. The exact value can be seen on the display.</li> <li>Drive 10mm back. (to give a little bit of room for adjustments)</li> <li>Mark this position with e.g. a pen or guess later by eye.</li> <li>Write down this X position value. Later needed for GCODE modification. This will be the trigger position.</li> <li>At this position the nozzle should be out of the used printing area. If nozzle is inside the printing area, then this limit switch concept might make some problems on larger prints.</li> <li>Make M2 thread in base part. Sometimes, the screw can make the thread themselves, if no tap is available.</li> <li>Insert M3 nut into 2020 profile nut and insert into profile and fix on profile. </li> <li>Adjust position with the help of the mark or adjust by eye.</li> <li>Attach switch with 2x M2x15 to base.</li> </ol> ###Modify GCode Modify the slicer settings by adding a command to drive to the right X limit position at the desired moment (e.g. the end of the print). Test trigger position by using machine controls (terminal commands or display controls) to drive carriage to previously written down X positive positon. Adjust switch position if needed. Example GCODE to insert into slicer to use at end of program (actually taken from CURA): M106 S0 ;Turn-off fan M104 S0 ;Turn-off hotend M140 S0 ;Turn-off bed G1 X220 Y{machine_depth} F3000 ;Present print. ; MODIFY X POSITION WITH PREVIOUSLY WRITTEN DOWN POSITION MINUS 10 MILLIMETERS G1 X235 ; Drive fully into right end stop ; MODIFY X POSITION WITH PREVIOUSLY WRITTEN DOWN POSITION M84 X Y E ;Disable all steppers but Z. Lets axes be loose when power comes back. <ol> <li>Copy and paste the line "G1 X0 Y{machine_depth}" from the unmodified GCODE.</li> <li>Delete the Y position at the seconds G1 line. "{machine_depth}" is a variable that is different from printer to printer and is replaced by CURA.</li> <li>Modify the first X position to the written down position minus 10 millimeter.</li> <li>Modify the second X position to the written down position that makes the carriage go right into the switch. Adjust position if necessary.</li> </ol> Dec 03, 2021
With this file you will be able to print Ender 3 X axis right limit switch holder (CC-BY-NC-SA) with your 3D printer. Click on the button and save the file on your computer to work, edit or customize your design. You can also find more 3D designs for printers on Ender 3 X axis right limit switch holder (CC-BY-NC-SA).