Ender 3 Z axis top bar extender-spacer for DDE kits and linear rail mods (Updated! 06/2021)
prusaprinters
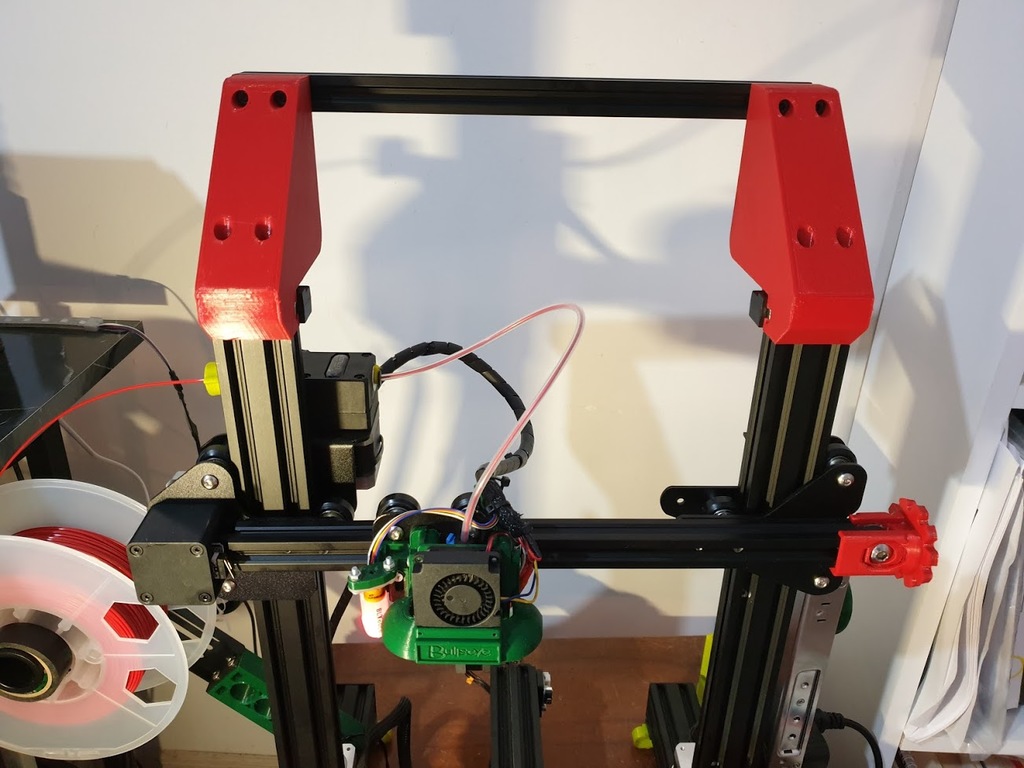
<p>Update: 29/06/21 New flashed version added for who has on backside DD stepper cooler or wide stepper that can hit the z axis extender.(beta042 new file) Names can be confusing I use onshape to design my needs and on onshape free account, every design open to everyone so I use different names for the models.</p><p>**PLEASE SHARE YOUR PRINT I WONDER IF IT HELPS YOU,<br>in the future I will design a z axis extender about 60-75 mm it will be in bottom of the z axis profiles and I need feedback.</p><p>I was about to upgrade my hotend and extruder with dde kit and also go for axis to linear rail than research a bit lots of people complain about they loose z height so I design a part that re-align the upper bar which both relieves the stress on hotend cables and bowden tube also it doesnt collapse with DDE kits.</p><p>First after cleaning the part install all spring washers to holes and then tighten with one of the m5 screw and nut combo to make sure it fully sit in the hole, outer hole 9 mm and inner one 5.5 mm diameter so it should be tighten all the way to the start of 5.5 mm.</p><p>I suggest you to install top bar first but leave loose the nuts so you can adjust the rigidity after connect the z coulombs and the tighten the nuts, nuts should be on the metal side. When you finish you can force a little bit to test, it shouldn't be bent.</p><p>Most important thing you shoukd place the part just like in glass (ref:pictures), both 45 degree to x and y axis for homogen strength. Good luck :) and [I am not a native English speaker please forgive me for my grammar errors]</p><p>-What you need:<br>8 x M5*40<br>12 x M5 Spring Washer<br>4 x M5 Nut</p><h3>Print Settings</h3><p><strong>Printer Brand:</strong></p><p>Creality</p><p> </p><p><strong>Printer: </strong></p><p>Ender 3 Pro</p><p><strong>Rafts:</strong></p><p> </p><p>No</p><p> </p><p><strong>Supports: </strong></p><p>Yes</p><p><strong>Resolution:</strong></p><p> </p><p>0.28</p><p> </p><p><strong>Infill: </strong></p><p>min %50 not more than %80</p><p><br><strong>Filament:</strong><br>ABG PETG <br> </p><p><strong>Notes: </strong></p><p>-Support angle %45 should be enough, use supports only on z rod holder slots others are not needed.</p><p>-I strongly advise you to use<i>PETG</i> or abs not sure pla could hold its rigidity in time passed.</p><p> </p><p>-Also keep coolling off or max %30 for better layer stickness.</p><p>-<strong>While printing the Parts place just like in the pictures and choose infill pattern cubic or honeycomb</strong>.</p><p>-4 walls or more would be good</p><p>"<i>My Settings: %60 cubic infill, 4 walls, 0.28mm layer height 232C print temp with no cooling</i>"</p><p> </p><p> </p><p> </p><p>Category: 3D Printer Parts</p>
With this file you will be able to print Ender 3 Z axis top bar extender-spacer for DDE kits and linear rail mods (Updated! 06/2021) with your 3D printer. Click on the button and save the file on your computer to work, edit or customize your design. You can also find more 3D designs for printers on Ender 3 Z axis top bar extender-spacer for DDE kits and linear rail mods (Updated! 06/2021).