Ender 5 Allen Key Bed Leveling Bracket
thingiverse
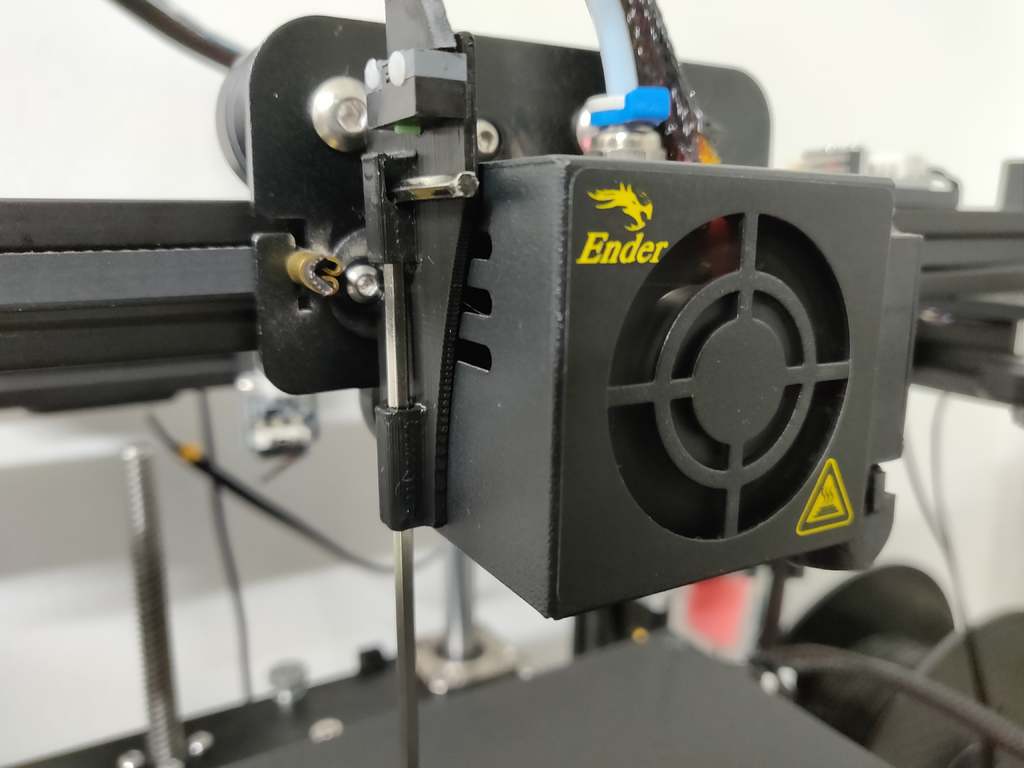
This is a simple, yet effective auto leveling bracket for the stock Ender 5. It uses the supplied 2.5mm hex/allen key as the probe, and a microswitch I salvaged from an old computer mouse. The bracket is very compact and very light, designed to be printed without supports on the flat bottom side. If you have problems with adhesion, use a brim. <b> Thanks to the original designer for the idea and the bracket for the Ender 3: https://www.thingiverse.com/thing:3903271 </b> <h1> Installation </h1> # !! IMPORTANT !! # <b>AFTER UPLOADING THE FIRMWARE MAKE SURE TO TEST THE AUTO LEVELING WITHOUT THE ALLEN KEY! CHECK IF THE SWITCH WORKS BY MANUALLY TRIGGERING IT AND MAKE SURE THE OFFSETS ARE CORRECT AND YOUR ALLEN DOESN'T CRASH INTO ANYTHING!</b> The microswitch I used is a HUANO microswitch with a 2mm holes, 6.5mm apart (center to center). If you're going to use a different sized switch and/or the hex key rotates when probing, make sure the hex key can fall into the slot, and make sure it takes *a tiny bit of force* to get it there to prevent the key from rotating out when the bed raises up. Alternatively, a limit switch or a flat ended allen key would solve this problem too. The switch is attached with 2 PLA pieces I've cut to length, heated the ends and pressed in, making a rivet. I then added some superglue to prevent it from wobbling. If you have bolts that'll fit, use them. I've attached the design files and dimensions if you need to make any changes :) <b> Wiring </b> For the wiring, solder 2 wires between the Normally Closed (NC) connections. (Common and NC) I recommend using a twisted pair for the wires to mitigate any electrical noise and make it look cleaner in terms of wire management. Then you can either attach it in series with the existing endstop and follow the tutorial of the original designer (https://www.thingiverse.com/thing:3903271) or *if you have a different control board with a PROBE connection, you can use what I used.* <b> THE WIRING AND SETTINGS BELOW ARE ONLY FOR NON-STOCK CONTROL BOARDS </b> I've got an SKR Mini E3 DIP, and I've attached the two wires to the PROBE connection on the board (See picture). That's all the wiring you'll need if you've attached it to the dedicated PROBE connection :) <b> Marlin configuration </b> I'm using Marlin bugfix 2.0.x and those are the settings I've used for the ABL: * configuration.h <pre><code> #define AUTO_BED_LEVELING_BILINEAR #define FIX_MOUNTED_PROBE #define RESTORE_LEVELING_AFTER_G28 #define LCD_BED_LEVELING // If you have the program space, it'll help manually level the bed with the 4 screws #define LEVEL_BED_CORNERS #if ENABLED(LEVEL_BED_CORNERS) #define LEVEL_CORNERS_INSET 30 // (mm) An inset for corner leveling #define LEVEL_CORNERS_Z_HOP 4.0 // (mm) Move nozzle up before moving between corners #define LEVEL_CORNERS_HEIGHT 0.0 // (mm) Z height of nozzle at leveling points #define LEVEL_CENTER_TOO // Move to the center after the last corner #endif // I use 5x5 points, you can use less if you want #define GRID_MAX_POINTS_X 5 //#define Z_MIN_PROBE_USES_Z_MIN_ENDSTOP_PIN // Disabled this because we use a dedicated PROBE connection //You'll have to figure out the Z offset yourself. For my setup, around -28.2mm is the sweet spot, but yours may differ! #define NOZZLE_TO_PROBE_OFFSET { -45, 2, -Z } #define MIN_PROBE_EDGE 5 // You don't have to use multiple probing if you don't have to, but it improves accuracy #define MULTIPLE_PROBING 2 // You'll have to change those clearances if you're planning on using a different switch and/or hex key #define Z_CLEARANCE_DEPLOY_PROBE 10 // Z Clearance for Deploy/Stow #define Z_CLEARANCE_BETWEEN_PROBES 6 // Z Clearance between probe points #define Z_CLEARANCE_MULTI_PROBE 1 // Z Clearance between multiple probes //#define Z_AFTER_PROBING 5 // Z position after probing is done // For M851 give a range for adjusting the Z probe offset #define Z_PROBE_OFFSET_RANGE_MIN -30 #define Z_PROBE_OFFSET_RANGE_MAX -25 // Very useful feature, it'll pause and wait for your confirmation to insert/remove the key // Will prevent you from forgetting to take it out and crashing into your heatbed #define PAUSE_BEFORE_DEPLOY_STOW </code></pre> * configuration_adv.h <pre><code> // Will help you adjust the Z for the perfect first layer, then you can use that value as the Z probe offset :) #define BABYSTEPPING #define BABYSTEP_ZPROBE_OFFSET </code></pre> To make sure every print is using the leveling mesh generated, add this line to the start of the G-code in your slicer: M420 S1 And that's about it :) # !! IMPORTANT !! # <b>AFTER UPLOADING THE FIRMWARE MAKE SURE TO TEST THE AUTO LEVELING WITHOUT THE ALLEN KEY! CHECK IF THE SWITCH WORKS BY MANUALLY TRIGGERING IT AND MAKE SURE THE OFFSETS ARE CORRECT AND YOUR ALLEN DOESN'T CRASH INTO ANYTHING!</b> Happy printing!! ;)
With this file you will be able to print Ender 5 Allen Key Bed Leveling Bracket with your 3D printer. Click on the button and save the file on your computer to work, edit or customize your design. You can also find more 3D designs for printers on Ender 5 Allen Key Bed Leveling Bracket.