Ender 5 CoreXY Linear Rail Wham Bam Mutant 2 tool change
thingiverse
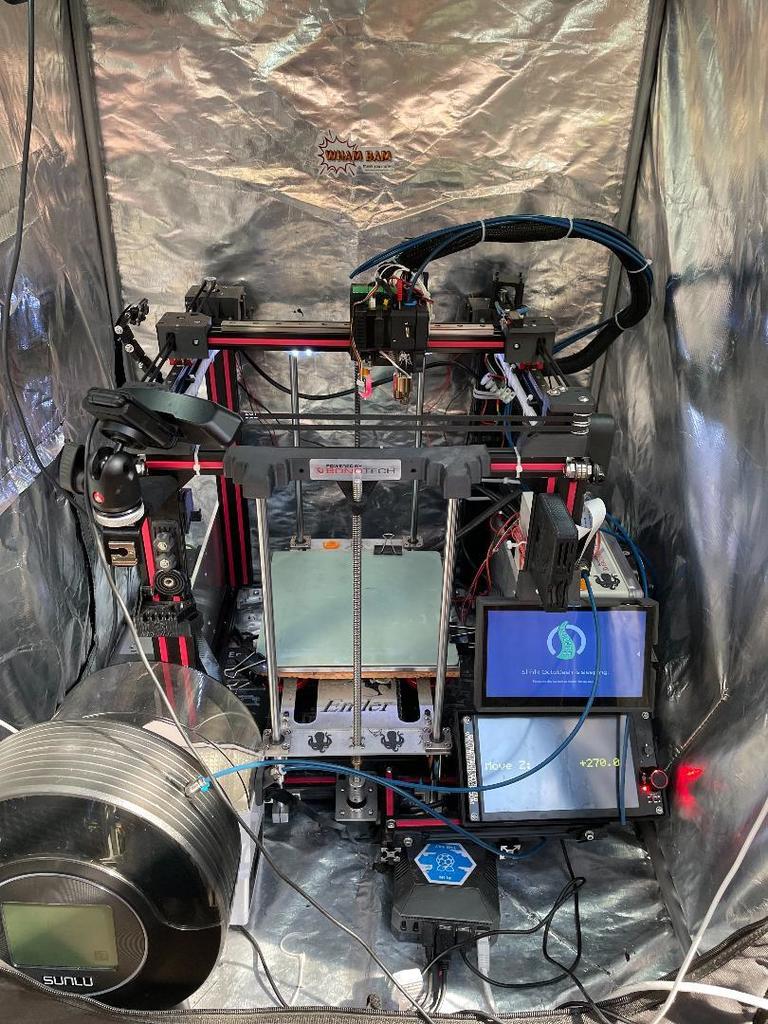
This is a remix of the Ender 5 COREXY design by FPV_Pilot https://www.thingiverse.com/thing:4577975 This remix allows you to mount the Mutant 2 manual extruder changer (from Wham Bam) directly to the X gantry. Also, I inverted and completely changed the motor mounts for extra access to the back of the bed as extruders tend to stick out more when attached to the Mutant 2. These motor mounts can be fitted internally with a 4010 cooling fan. Overall, you'll have to work out the M3, M4, M5 bolts, etc, as I did. The original creator did a great job but he seems to be offline in terms of communication at the moment. You'll need the following from his design: Front right bottom idler.stl front right top idler.stl left front bottom idler.stl left front top idler.stl X left bottom.stl X Left Top.stl X right bottom.stl X right top.stl belt clamp.stl x 2 bottom plate.stl MGN back plate.stl X Rail block mount.stl From this remix you will need: Mutant 2 backing plate.stl Core XY left Motor Mount with 4020 fan.stl Core XY right Motor Mount with 4020 fan.stl GT2 Timing Idler washer.stl x8 I added the cone washers to the front to separate the front idlers as they were binding. You only need 2 for each side in the middle with each placed so the cone faces the centre of the each bearing. The other 4 can be used on X left and right carriage holders where needed. I have included step files for my parts. This is installed and working on my printer. I highly recommend Nema 17 42-60 motors with 0.8Nm torque otherwise you will need to restrict speed for travel moves (in my case 200 mm/s for 0.55 Nm torque 42-48) to avoid missed steps. With this larger motor, I can run at travel speeds at 300mm/s and because I am using a Slice Engineering mosquito Magnum Plus with 100W heater I have no issue going even faster with a 0.4mm nozzle . It has a flow rate capacity of 60-92 mm3/s (6-9 times higher than a standard ender 5). PLEASE NOTE: The STL and STEP files included are the latest update. The pictures show an older prototype design with the hole locations for bolts incorrectly located. Also shown are Omron Limit switches on the X-carriage and on the left motor mount. I made a simple plate on the X-carriage to hold the switch and the left motor mount has holes that can be tapped to M3 in the correct position for the sensor. This is the sensor that I used: https://www.homanndesigns.com/index.php?main_page=product_info&cPath=55_17&products_id=246 Anyway Enjoy!
With this file you will be able to print Ender 5 CoreXY Linear Rail Wham Bam Mutant 2 tool change with your 3D printer. Click on the button and save the file on your computer to work, edit or customize your design. You can also find more 3D designs for printers on Ender 5 CoreXY Linear Rail Wham Bam Mutant 2 tool change .