Ender 5 Dual 5015 Fan Mount
thingiverse
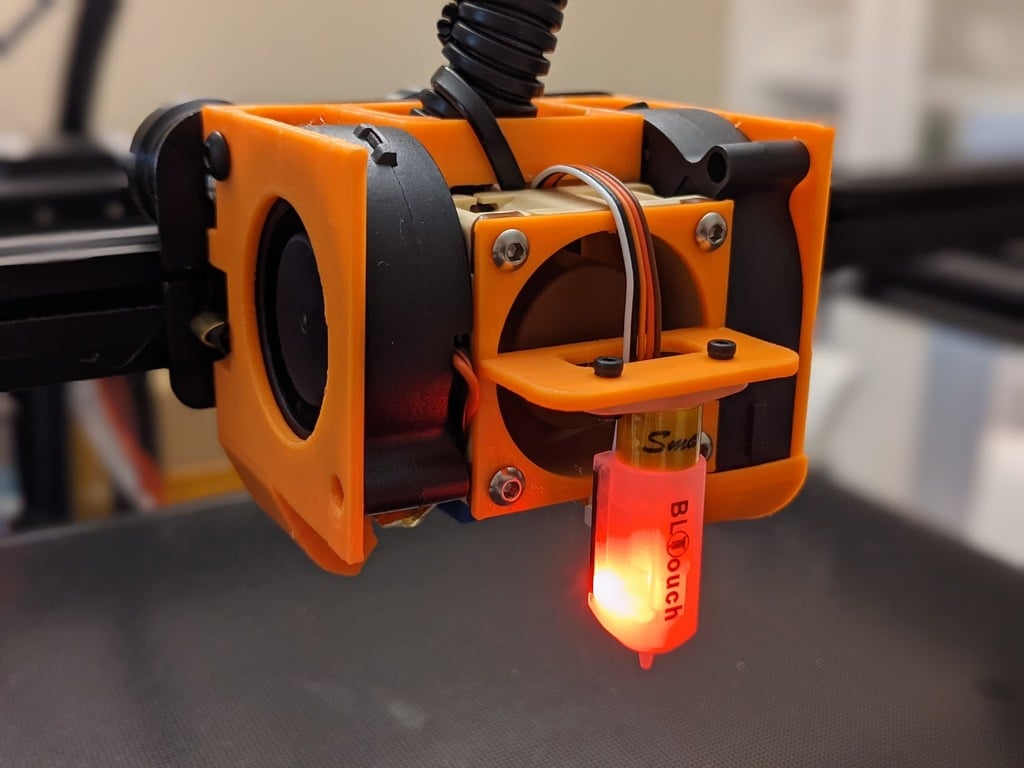
Dual 50x15mm blower fan mount for Ender 5, Ender 5 Pro, and Ender 5 Plus. Compatible with stock or Micro Swiss Direct Drive gantry. Fast print and does not require supports. ** Slicing/printing: ** * Load model in your favorite slicer, align the flat gantry-side of model to the bed. * Slice with typical settings, preview and make sure that the bridges are printing in bridge mode (long horizontal lines across the full bridge on the first bridge layer)--this should be default for most slicers. * Print the model. ** Preparation ** * Make sure that all the bolt holes are large enough for your bolts to pass through (minor variations in printers may require you to drill the holes a little bigger to make it easy to insert the bolts). * Clear the captive nut slots of any debris. * Insert m3 nuts into the 4 captive nut slots for the 40x40 heatsink cooling fan. Use needle-nose pliers to pinch them into place if necessary. * Insert m4 nuts into the 2 captive nut slots for the 50x15mm fans. You can either use pliers to pinch them into place, or put the fans in temporarily and tighten bolts to pinch them into place. * Fully assemble hotend if not already assembled. If possible, I suggest moving the heater cartridge to insert from the left side instead of the right side--the thermistor is fine how it is typically installed. This is easy with microswiss all metal hotends, as the silicon sock has cutouts on both sides. Stock silicon socks may require cutting if you do this. You can skip this step, but installation will be a bit more difficult. ** Installation ** * Install the mount to the gantry and secure with 2 m3 screws for stock. If you're using a micro swiss direct drive gantry, you can further secure the mount using two additional screws on the right side of the mount. * Place the right-side 50x15mm fan wire through the hole provided, and pull it up and out of the way, install the fan and put the back bolt through (the one with the captive nut in place). Depending on bolt-length, this may require washers or spacers to prevent the bolt from extending too far into the area of the hotend--there isn't much room on this side of the hotend, so you'll want to make sure that the bolt doesn't extend past the nut. * Install the left side 50x15mm fan--for neater cable management, you can wrap the wire with kapton tape or other heat shielding and run it down and back up with the other cables next to the hotend, but be sure to keep it away from the hotend. Otherwise, you can just run the wire over the top of the fan itself. Secure with one bolt. * Place the hotend through the center of the mount from above, if you didn't move the heater cartridge, you'll need to make sure its wires are in the slot provided. Install the two screws to attach the hotend directly to the gantry. * If using BLTouch, attach it to the mount, and run the wires through the slot provided. For improved cable management, make sure you don't have the wire twisted--put a couple m3 bolts through the mount and through the 40x40mm fan; then tuck the bltouch wire over the fan, then back down, under and around the top-front bar of the mount. Secure the fan to the mount using the m3 bolts. * Suggestion for cable management: wrap two zip ties around just the top-front bar of the mount, loosely. put a zip-tie through those two zip ties, and around your cable-wrap, and tighten it. Then slightly tighten the two original zip-ties. This will provide good strain relief for the cables (I will update pictures to show this method, soon). ** Post-Installation ** * Update your BLTouch probe offset and align the z-offset. * Slowly move your nozzle to the extremities of its range to check for possible collision points and update your bed size to account for them. You will definitely lose a few mm's of space on the Y axis if you're using the BLTouch mount. If you're not, then you shouldn't lose any space if your endstops are properly aligned.
With this file you will be able to print Ender 5 Dual 5015 Fan Mount with your 3D printer. Click on the button and save the file on your computer to work, edit or customize your design. You can also find more 3D designs for printers on Ender 5 Dual 5015 Fan Mount.