Ender 5 dual z axis
thingiverse
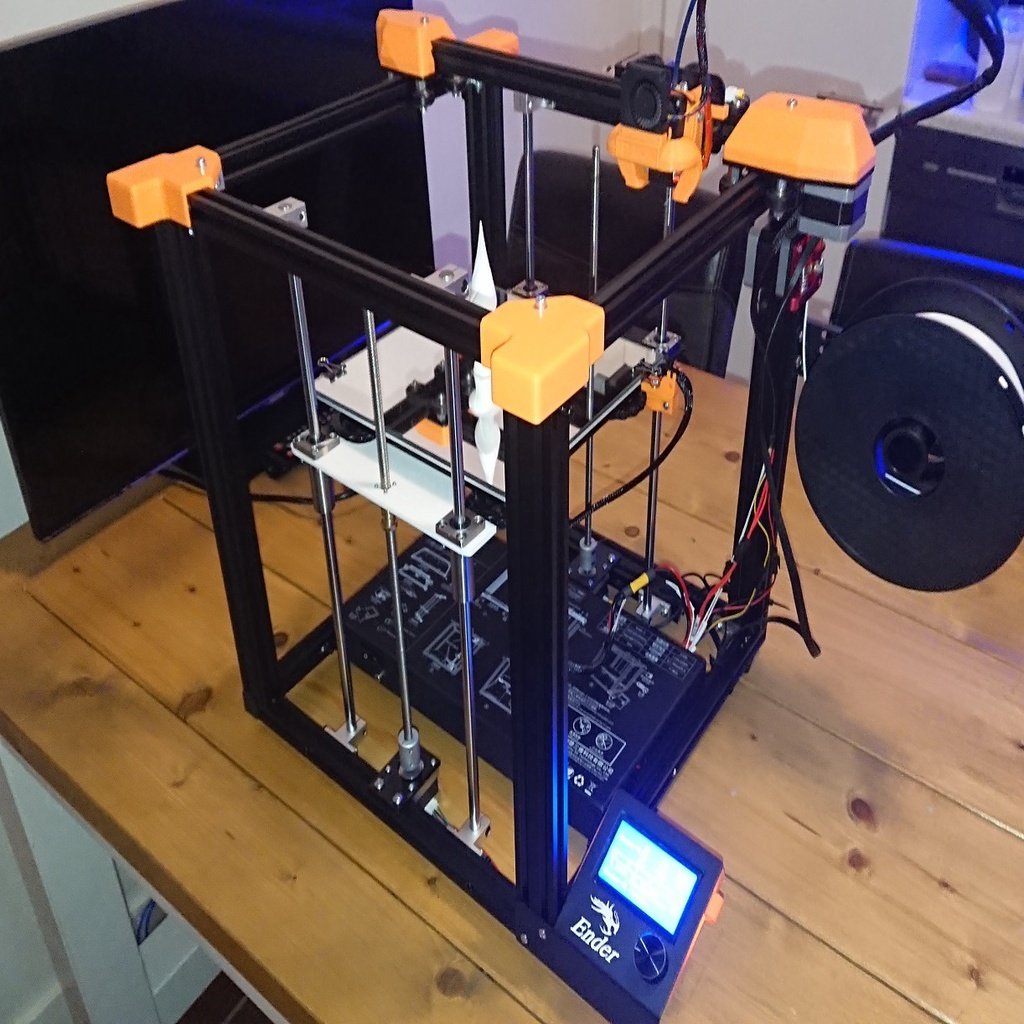
Hi, If you download and use this, please give it a like and/or a collect! If you print it, please post a make with pictures of the end result! Thank you!! -------------------------------------------------------------------------------- Update 20 june 2020, I'm busy with a little upgrade, to get the full y axis. This upgrade will work for everyone that did this mod and doesn't need any extra parts other then one extra thing. Stay tuned... --------------------------------------------------------------------------------- -------------------------------------------------------------------------------- I am very proud to share my ender 5 dual Z-axis mod, it took me 4 weeks to transform my ender 5 into a dual z-axis ender 5! (that includes waiting for alixpress shipping) I wanted to mod my ender 5 dual Z-axis with the same parts and sytem as the original without using any printed plastic parts. I made a exact copy of the z-axis system on the back. Everything is mounted on the existing frame without using any printed parts, for all the frame mounting i used m5 T-nuts! I think this is the best modification out there, since it uses the same parts, has dual z-axis motors and is very stable and also looks like a original stock factory ender 5 (pro). You can bring the CNC file for the bracket to a cnc machine workshop to cut out a 4 mm thick metal bracket, or (i would not advice this) 3d print your own bracket, for that i included a 4 mm thick bracket. You need to set the vref voltage on the z driver a little higher (you do this by adjusting the potmeter next to the z-axis driver), monitor this adjusting with a multimeter measuring the voltage and test the bed movements. Original z-vref on my ender 5 was 0.573 volts, i set the vref on the z-driver to 0.949 volts and with this voltage the motors feel strong and don't skip. Important note: i have the Original 1.4 board with A4988 stepper drivers, if you have the silent 1.5 board with tmc 2208 drivers or a custom board with your own picked drivers you need to calculate your vrefs!!! Also, i didnt CNCed my own metal bracket, i still use the 3d printed bracket so i'm not sure if the metal CNC files are good since i don't have experience with cnc machines and files! You need to cut the rods and lead screw to the correct length, the original lead screw = 368 mm the original lineair rods = 435 mm All the parts (except bolds and nuts) will cost you arround 50 dollar/euro when bought in sales on ali. That does not include a CNCed bracket! -------------------------------------------- Important notes: New ender 5 printers are shipped with a less steep lead screw witch has a 4 mm lead (you can check this in your settings: it uses 800 e-steps instead of 400 e-steps) to prefent the bed from falling when the motor is not active. If you have a later ender 5 with this lead screw then ofcourse you need to buy a lead screw with 2 mm pitch 4 mm lead and also a anti backlash nut with 2 mm pitch 4 mm lead! My ender 5 which i got on 20 november 2019 didn't have this update and did come with a 8 mm lead so its a really recent design change) The linear rods and lead screw should be perfect straight, also the linear bearings should fit the rods tight without a wobble. If not your rods are not exactly 10.00 mm thick. Meassure them with a calipers, you don't want to introduce z-wobble/z-banding! ------------------------------------------- ------------------------------------------- So here it is. The BOM list: Linear rod brackets SK10 x 4 Linear rods 10mmx500mm x2 Linear bearings LMK10LUU x 2 Nema 17 stepper motor bracket x 1 Stepper motor 42/34 x 1 Motor/screw coupler x 1 T-slot nuts M5 x 100 pieces Dual motor parallel cable x 1 Lead screw 400mm pitch 2mm lead 8mm x 1 Anti backlast scew 2mm pitch 8mm lead x 1 Or in case of a new revision ender 5 (after december 2019) * Lead screw 400mm pitch 2mm lead 4mm x 1 * anti backlast scew 2mm pitch 4mm lead x 1 Instead of the dual motor cable you can go this route, * Dual splitter board parallel x 1 * Pack (5x) stepper motor wires nema 17 XH2.54 Connector x 1 (I tested this route now, you need to rewire the connectors on both the short wire mainboard/splitterboard and the motor wire. There not right wired for creality boards/motors. Better go for the creality dual motor cable!) Or instead of the parallel splitter board or you can go this route with a serial splitter board. * Dual splitter board serial x 1 -------------------------------------- The ali links Linear rod axis brackets SK10 x 4 https://nl.aliexpress.com/item/32320538181.html?spm=a2g0s.9042311.0.0.27424c4dqMKEnn Linear rod axis 10mmx500mm x2: https://nl.aliexpress.com/item/32332798910.html?spm=a2g0s.9042311.0.0.27424c4duA6OOC Linear bearings LMK10LUU x 2: https://nl.aliexpress.com/item/32777385754.html?spm=a2g0s.9042311.0.0.527a4c4dqiwKuw Nema 17 stepper motor bracket: https://nl.aliexpress.com/item/33007642870.html?spm=a2g0s.9042311.0.0.27424c4dqMKEnn Stepper motor 42/34: https://nl.aliexpress.com/item/32799106868.html?spm=a2g0z.12010615.8148356.13.68225ffcewEWeq Motor/screw coupler: https://nl.aliexpress.com/item/32837194895.html?spm=a2g0s.9042311.0.0.27424c4duA6OOC T-slot nuts m5 (pack of 100 pieces) https://nl.aliexpress.com/item/32815322093.html?spm=a2g0s.9042311.0.0.27424c4duA6OOC Dual motor cable: https://nl.aliexpress.com/item/33005145783.html?spm=a2g0s.9042311.0.0.27424c4duA6OOC Lead screw 400mm pitch 2mm lead 8mm*: https://nl.aliexpress.com/item/32695606914.html?spm=a2g0z.12010615.8148356.15.2d035960r6tvXM anti backlash screw pitch 2mm lead 8mm (choose option "lead 8mm")*: https://nl.aliexpress.com/item/32732443617.html?spm=a2g0s.9042311.0.0.42b14c4d541OzP Or in case of a new revision ender 5 (after december 2019): * Lead screw 400mm pitch 2mm lead 4mm: https://nl.aliexpress.com/item/32822552886.html?spm=a2g0s.9042311.0.0.42b14c4d541OzP * anti backlash screw pitch 2mm lead 8mm (choose option "lead 4mm"): https://nl.aliexpress.com/item/32732443617.html?spm=a2g0s.9042311.0.0.42b14c4d541OzP Here are the links for a alternative dual cable, this dual splitter board, (but you have to rewire the connectors the right way ) : https://nl.aliexpress.com/item/32870988156.html?spm=a2g0s.9042311.0.0.27424c4duA6OOC And a pack of motor wires (also rewire the connectors the right way) : https://nl.aliexpress.com/item/1000005760517.html?spm=a2g0s.9042311.0.0.27424c4duA6OOC And here is the link for the alternate serial splitter board: https://www.ebay.nl/itm/Dual-Z-Axis-Series-Adapter-for-3D-Printer-Double-Z-Motors/192721514609?_trksid=p2485497.m4902.l9144 ---------------------------- And the bolts, nuts and washer BOM list: Z-as motor section Z-axis motor bracket needs: 2 x m5x8mm ballhead allen bolt (inbus) + spring washers Mounting the motor needs: 4 x m3x8mm ballhead allen bolt (inbus) + spring washers Lead anti backlash needs: 4 x m3x10mm ballhead allen bolt (inbus) + spring washers Linear rod bearings section: Mounting the SK10 rod brackets needs: 8 x m5x12mm ballhead allen bolt ( inbus) + spring washers Mounting the liniare bearrings needs: 8 x m4x12mm cilinder head allen bolts or 8 x m4x16mm allen bolts for a thicker bracket. Bed bracket section: Bed bracket needs: 6 x m4x16mm cilinder head allen bolts + spring washer rings + washer rings + locknuts Relocating the power supply/mainboard housing: Moving the power supply/mainboard housing needs: 4 x m5x8 mm cilinder head allen bolts (inbus) + washer rings and 4 x M5 t-nuts (You can use 2 Original black bolts to hide the front holes of the power supply case) you need to drill the 4 original side holes in the case with a 5 mm drill to get rid of the tapped wire. Then mount the power supply/mainboard housing with the m5x8mm from the inside of the case and M5 t-nuts in the frame. You can now slide the case back and forth and fasten it. -------------------- Note: This bolts and nuts list is based on a steal 4mm thick CNC machined bed bracket with m4 tapped holes for fasten it to the bed! If you 3d print the bed bracket then you need ofcourse longer bolts, washer rings, spring washer rings and nuts or locknuts instead. I didnt put any bolts and nuts shopping links cause well, you should buy them local. ----------------------------------------------------- ----------------------------------------------------- Take a look at my other project/things: Raspberry Pi camera night vision case: https://www.thingiverse.com/thing:4227360 Lab power supply DSP3005: https://www.thingiverse.com/thing:4136930 Ender 5 y axis cover & silent switch: https://www.thingiverse.com/thing:4078810 Ender 5 dual z axis rod cover: https://www.thingiverse.com/thing:4079406 Ender 5 bullseye base: https://www.thingiverse.com/thing:4128233 Smart home lenovo P10 wall frame: https://www.thingiverse.com/thing:4125996 ----------------------------------------------------- -----------------------------------------------------
With this file you will be able to print Ender 5 dual z axis with your 3D printer. Click on the button and save the file on your computer to work, edit or customize your design. You can also find more 3D designs for printers on Ender 5 dual z axis.