Ender 5 enclosure for IKEA Lack
myminifactory
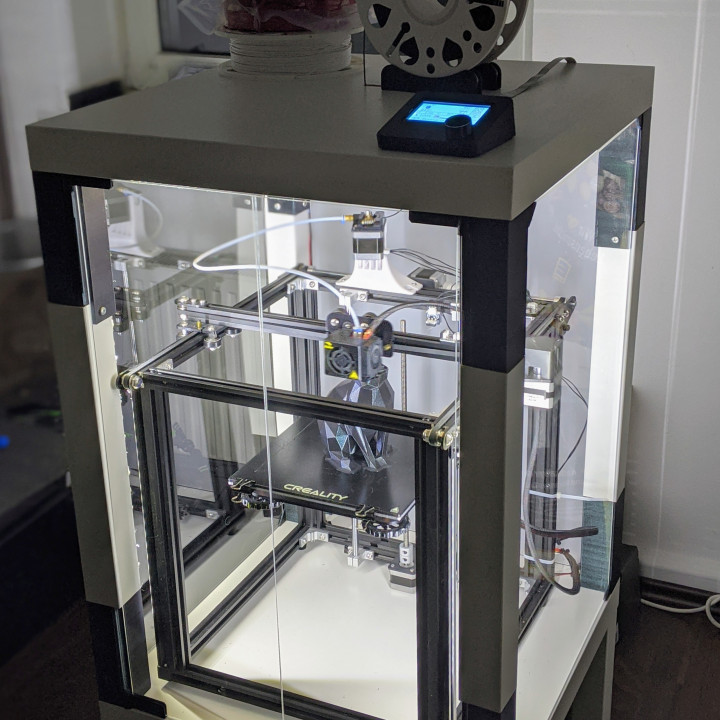
This is a Re-Remix of the Ender 3 resized original Prusa i3 MK3 enclosure to fit the Ender 5. The spacers have been resized to 150mm each so they will give you an additional clearance of 300mm. Overall height of the enclosure is 120cm with a chamber height of 70cm. In addition to that I added rails for two LED strips that perfectly fit over the spacer elements. I bought a cold white 24V LED strip, cut it and glued it to the rails, soldered some cables on them and connected that right to the mainboard. I also added a mount for the electronics box, so it can be mounted under the lower Lack table. What you get in the package:* Top and bottom spacers with 150mm height each* Feet elements to lock the tables in place on top of each other* Door hinges and handles* Electronics Box mounting set For a detailed parts list and building instructions please look here: https://blog.prusaprinters.org/cheap-simple-3d-printer-enclosure/ I used the following acrylic glass dimensions:* 2 pieces of 696mm x 440mm x 3mm for left and right walls (clear)* 1 piece of 696mm x 440mm x 3mm for back wall (frosted)* 2 pieces of 696mm x 220mm x 3mm for left and right door (clear) Cost of acrylic glass was around 70 Euros. Due to repositioning the electronics box I had to make custom cables with an increased length. You might be able to buy prebuilt extensions, but in case you want to build them on your own, here is what I used. No warranty that this is all correct. Proceed at your own risk. If you don't feel comfortable handling wires and current, don't do it. Ender 3 Wiring: https://github.com/Creality3DPrinting/Ender-3/tree/master/Ender-3%20Wiring/PDF Heatbed: 14 AWG black and red with XT60 connectorFans: 22 AWG black, red, yellow, blue with JST-SM connectorThermistor: 24 AWG white with JST-SM connectorNozzle Heat: 18 AWG red with JST-SM connectorStepper motors: 24 AWG black with JST-XH and JST-PH2 connectorsDisplay: IDC 10 Pin 2,54mm ribbon cable JST connector sets and tools (Amazon Partner Links)* JST-XH for stepper motors with crimping tool* JST-SM for cables* JST-PH2 for mainboard connections* XT60 connectors for heatbed Additional stuff I used in my build and what you see on the pictures:* LCD Case: https://www.thingiverse.com/thing:3711912* Spool Holder: https://www.thingiverse.com/thing:2047554* Extruder Arm: https://www.thingiverse.com/thing:3595328* Low poly easter bunny: https://www.thingiverse.com/thing:3562478 Please keep in mind that this is re-remixed, so I had to model based on stl files. It might not be waterproof, but it printed fine for me. You will need a long screwdriver (>150mm) or some kind of slim extension to attach the spacers to the table legs. Remix based on this Remix: https://www.thingiverse.com/thing:3598219Original build: https://www.thingiverse.com/thing:2864118
With this file you will be able to print Ender 5 enclosure for IKEA Lack with your 3D printer. Click on the button and save the file on your computer to work, edit or customize your design. You can also find more 3D designs for printers on Ender 5 enclosure for IKEA Lack.