Ender 5 Fixed Purge Bucket
prusaprinters
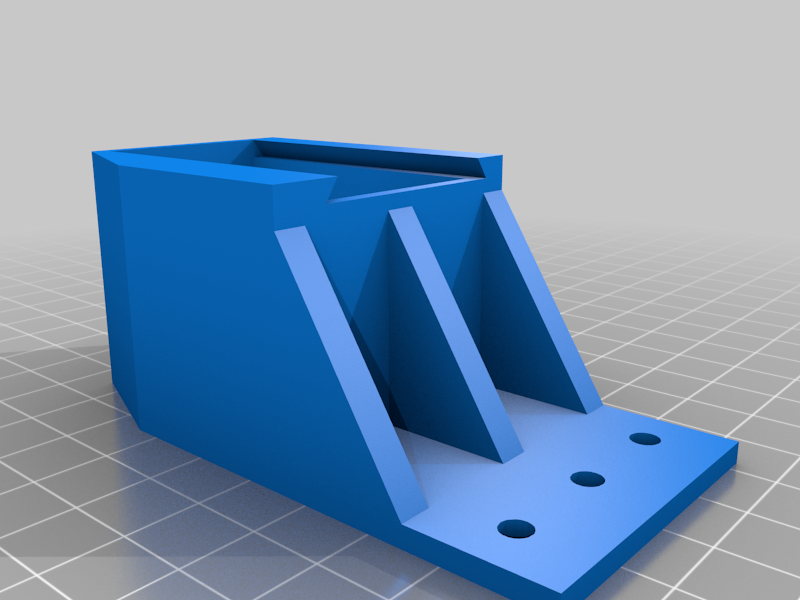
<p>I didn't want to change my printer's bed configuration so the X mounted purge bucket didn't work for me. ( <a href="https://www.thingiverse.com/thing:3366791">https://www.thingiverse.com/thing:3366791</a> )</p> <p>Print the Bucket with the Top Down (should be how the model is oriented)</p> <p>M3 x 12mm Bolts (two is sufficient, three holes so you can pick placement)</p> <p>Trap Door from Original Design</p> <p>Aluminum or Kapton tape for the inside ramp and wall to prevent the hot filament from melting the bucket (which I printed in PLA)</p> <p>Depending on your nozzle style, you'll need a spacer of some height.</p> <p>For the standard Creality nozzle (MK8?), I put a 3mm Spacer in between the bucket and the 2020.</p> <p>For an E3D (MK6?) style, it might be something different. Z Scale (only) the part to your specific height.</p> <p>For the Silicone to wipe the nozzle, https://www.amazon.com/gp/product/B00LNE8VD0. Mine is cut to 45mm x 8mm. There is a solid thunk as it moves across, I think 7.5 or 7 might be better.</p> <p>Use the combination of the spacer and the silicone wipe to fine tune where the nozzle contacts the wipe to be effective</p> <p>I moved my X Endstop as far right as possible and reconfigured my Firmware to allow the carriage to move out that far. I got it to be about 239mm. During testing, I moved the carriage to 237mm.</p> <p>purge.gcode is a simple routine I wrote to move the PRE-HEATED hotend into the purge bucket and push 50mm of filament out and do a little dance to try and wipe the head a bit.</p> Category: 3D Printer Accessories
With this file you will be able to print Ender 5 Fixed Purge Bucket with your 3D printer. Click on the button and save the file on your computer to work, edit or customize your design. You can also find more 3D designs for printers on Ender 5 Fixed Purge Bucket.