Ender 5 plus enclosure
thingiverse
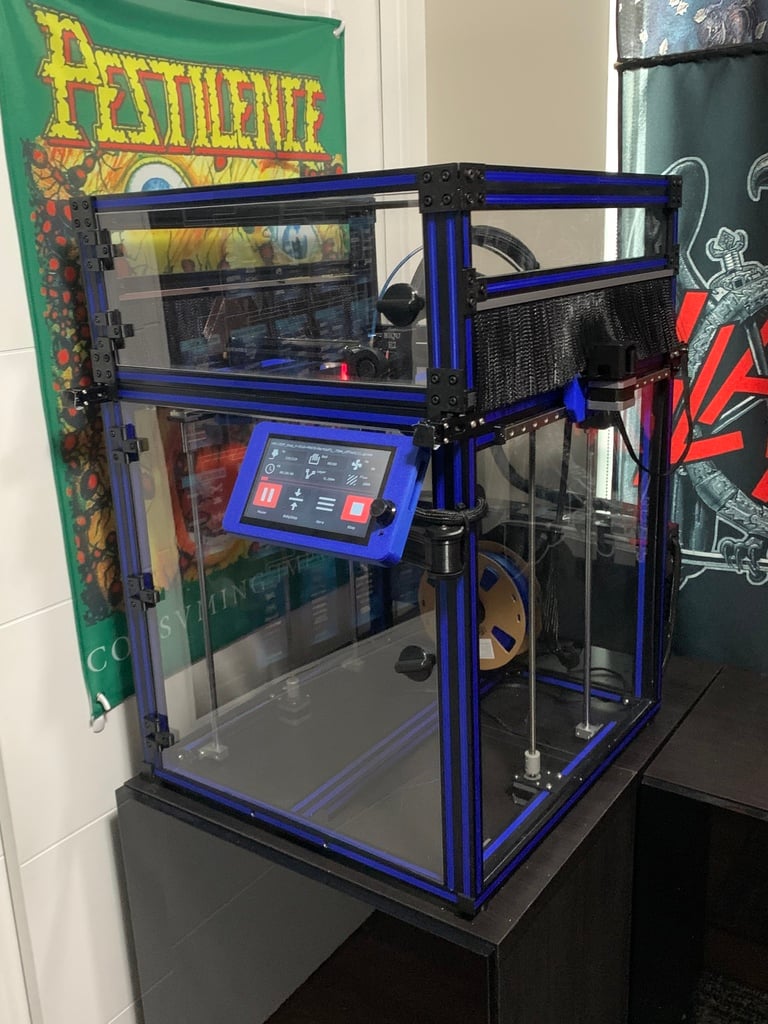
This is a page for my Ender 5 plus enclosure, this is still a work in progress. But the bulk of the work is done, other then finalizing the x gantry setup. If I can't get the brushes to work long term I'll probably just drop the sides down to just above the X gantry. I don't recommend using any of the strip brushes on Amazon as I found them too flimsy and probably wouldn't last. And at least a 4" strip brush is recommend. Full printer build page, https://www.thingiverse.com/thing:5918002 **All measurements are for reference only, please measure your own printer before cutting. I used three sheets of 24"X48" 2mm thick acrylic (2 for main frame and 1 for top enclosure) and 600mm extrusions.** Feel free to remix or use what you need, just beware these parts are made to work together so be careful the first time homing your printer and adjust as necessary. This is influenced by Youtuber Teaching Tech, check his channel out for a video of him installing a similar enclosure on an Ender 5 pro. His build is here: https://www.thingiverse.com/thing:3862902 Link to hinges I used, I went with three hinges top and bottom 2" from the frame and one in the middle of the door at 10" to be right across from the door latch. Also found that I had to use the flat hinges as the tabbed ones for V slots didn't work with my T nuts that also have a tab and thus the part would be loose. https://www.thingiverse.com/thing:2518879 Link to door latch I used, its designed for 3mm acrylic. I used 2mm acrylic so I had to modify it for it to work for me. https://www.thingiverse.com/thing:3862902 All brackets for the top enclosure use M4 bolts and T nuts, I also tapped the ends of the 20x20 extrusions to M5. And the hinges and door latch us M3 bolts and T nuts. Main frame: I would double check measurements on your machine, but these are my measurements. Sides acrylic measurements - 20 1/2" X 19 5/8" Rear acrylic measurements - 18 1/4" X 20 3/8" From door acrylic measurements - 17 3/4" X 20" Also I put a 20x40 513mm long extrusion in place of the stock electronics enclosure. This is where I remounted the stock spool holder, though beware it needs to be under 85mm in length which fits pretty much all 1kg spools for the bed to clear it at around 350mm on the Z axis. You will need to drill holes for wiring to be run into the printer frame on the back acrylic panel. I put one just below the Y stepper motor for the hot end wiring loom to run through, another in the top right corner for the filament runout sensor and Y axis end stop (you can also run the filament sensor with the hot end wiring. And lastly one in the bottom right for the heated bed wiring. Top Enclosure: Extrusion Measurements: 4X - 20x20 - 536mm --> These are the top and bottom of the front and back. 4X - 20x40 - 175mm --. These are the sides of the front and back sets height of top enclosure. I found with rough mesurements about 6" is needed for the bowden tube/wiring loom while homing in the rear corner. 175mm is about 7" as I wanted a bit more room for doing minor hot end work. 2X - 20X40 - 513mm --> these are the top of the sides, you could use 20x20 if you want but I went with 20x40 for more strength. 2X - 20x20 - 513mm ---> These are the lower extrusion of the sides used to set the height of the strip brushes. Acrylic Measurements: Top - 20 1/2" X 19 3/4" Front door - 6 7/8" X 17 3/4" Rear - 7 1/8" X 18 1/4" Sides - 3 1/2" X 20 1/2" Printed parts: 40x40 bracket - 10 required 40X40 Front Tabbed bracket - 2 Required --> These work with my Y axis belt tensioners to hold the enclosure in place. Can use the regular 40x40 brackets if you want to, or add a tab to fit your tensioners. T Brackets - 4 Required Corner brackets - 4 required go in the top four corners of the top enclosure. (Not installed in pictures as I ran out of M4 bolts for T nuts). Rear bracket - 1 required --> This is the rear positioning mount for the enclosure fits over the Y stepper motor mount. Extrusion covers - 2 sets required --> These go on the bottom 20x20 extrusion to act as a buffer so the top Enclosure isn't sitting on aluminum and provides protection for the Y axis belts. X axis covers - One set, the winged version is for those using strip brushes to guide the brush around the X axis. The non winged version does work but no as well, mostly provides a clean look. Limit switch covers - one set, the X cover protects from the strip brush and the Y cover keeps the wiring off of the back extrusion so it doesn't get pinched when putting the top enclosure on. Any 2020 extrusion endcap to cover the ends of the top and bottom extrusions on the front and back of the enclosure. I also used these corner 2040 brackets to brace the inside of the mount for the extrusions the strip brushes are mounted to. https://www.thingiverse.com/thing:2300758 Strip Brushes: Measurements - 513mm for brush and mounting bracket (Can use a H or F type bracket) I went with 3" brushes but found that they might be too short, a 4" would probably allow for smoother travel. Also printing or finding a bigger diameter washer for holding the mounting brackets would help as the stepper side of the X gantry likes to push the brush out as the brackets are flimsy. Also found that leaving the printer parked over night leaves an impression in the brush. I'm going to keep trying to get the brushes to work as I like the idea in principle, but whether or not I can get it to be practical is to be determined. Included are covers for the ends of the X gantry to cover the X belt, these are desinged to work with the Y axis linear rail mounts I use. I'm sure they could be adjusted to work with a set of rollers, the thickness of the linear rail mount that the covers sit on is 4mm.
With this file you will be able to print Ender 5 plus enclosure with your 3D printer. Click on the button and save the file on your computer to work, edit or customize your design. You can also find more 3D designs for printers on Ender 5 plus enclosure.