Ender 5 Plus Linear Rail Kit
thingiverse
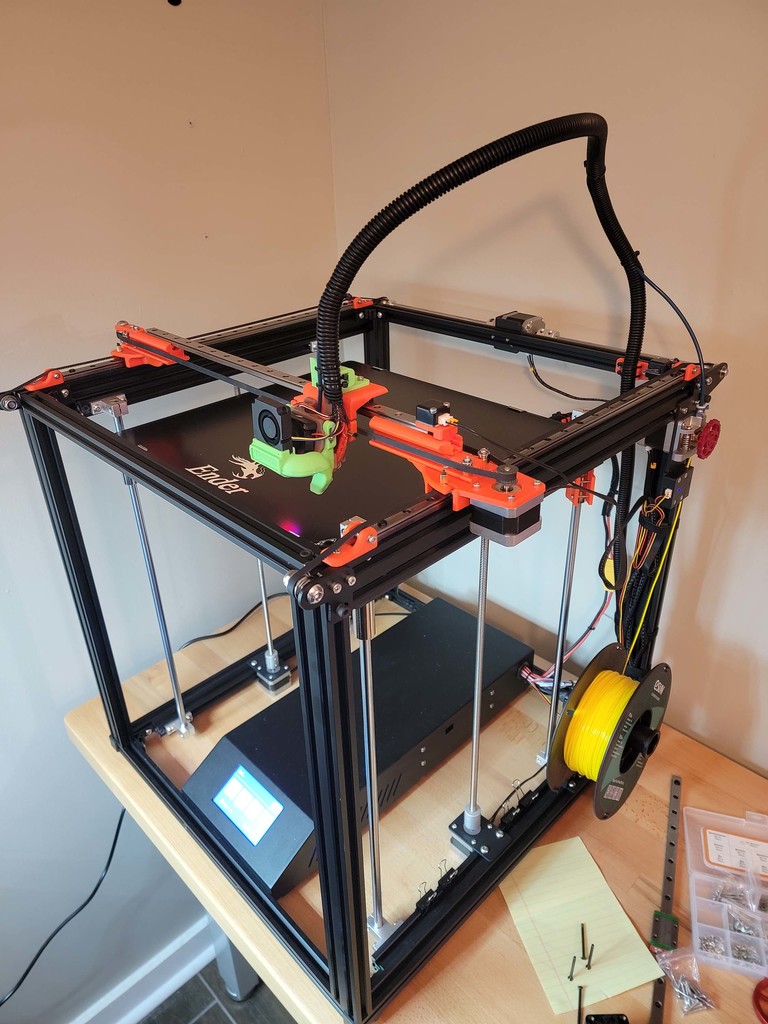
I was looking around for a kit I could download and print that would allow me to install linear rails on my new Ender5 plus, but the only one's I found were for the CoreXY conversion or with Y rails mounted on the side of the frame instead of on top. I wanted to be able to use most of the original hardware but have the rails mounted on top so it created a more even distribution on the rail for the bearings. So kinda similar to the CoreXY, but using the original motors and belt path. As so I created this monstrosity over the past few weeks... I'll get a list of all the screws and nuts needed. But this should start it out. Some stock screws can be used 6x - brass embeded nuts - https://smile.amazon.com/gp/product/B087NBYF65 2x M3 brass standoff for hotend 21x - M3 T-Nuts - https://smile.amazon.com/gp/product/B07SDFCTD4 21x - M3 8mm screws - https://smile.amazon.com/gp/product/B08R3GJGWT 3x - MGN12 450mm Linear Rails - https://smile.amazon.com/gp/product/B08JYC1XFK assorted M3 button screws/nuts/washers/lock nuts - https://smile.amazon.com/gp/product/B08H24W42K 16x F693ZZ Flanged Ball Bearing 3x8x4mm - https://smile.amazon.com/gp/product/B07Z3D32WJ I'll also create and update with a guide on putting it together, but the pics should fill in some blanks for now Extra parts needed that I didn't create, but had to modify slightly. -- Bullseye hot end mount and duct : thing:2759439 -- BB_Stk.BASE.5plus.8.23.21.stl E3Pro.Bullseye.Duct.stl ALL_BLT_LEFT_X-48_Y-10_3.29.stl You can swap the duct out with one that fits the dual fan if that's your jam. I was just making it use as much stock parts as possible. For printing, obviously,, more infill produced stronger parts, but takes hella lot longer to print. I used 30% for most parts. The pully stl could stand a bit higher since it will have the most strain on it. The bottom motor piece might need a bit more to keep the motor part from flexing too bad. everything else seems pretty solid at 30% Edit: 9/6/21 - Added Petsfang modified base stl. Also included stls for the single/dual duct and wire strain that came with it. Source same thing page as Bullseye from above Edit: 01/19/22 * Added a jig so you can drill holes in the original motor bracket to attach it directly to the rail, and still use the original 20x20 bar. Or use the Upper parts to the current setup, which is what I'm using now since I butchered my orig 20x20 rail. You'll still need to cut a little off the 20x20 bottom near the screw holes for the rail so it sits flat. you can technically use this if you're only upgrading the sides to rails and leaving the X using the wheels, for a gradual upgrade. Because lets be real, if you've gone this far, the X is getting a linear rail too. * Added an updated pully bracket that should be a little stronger and not bend under tension. * Added a small trigger plate for if you decide to use the original metal plate for the motor so it will strike the limit switch. it's made for a 3mm screw and nut.
With this file you will be able to print Ender 5 Plus Linear Rail Kit with your 3D printer. Click on the button and save the file on your computer to work, edit or customize your design. You can also find more 3D designs for printers on Ender 5 Plus Linear Rail Kit.