Ender 5 Plus Z Lead Screw Linear Rail
thingiverse
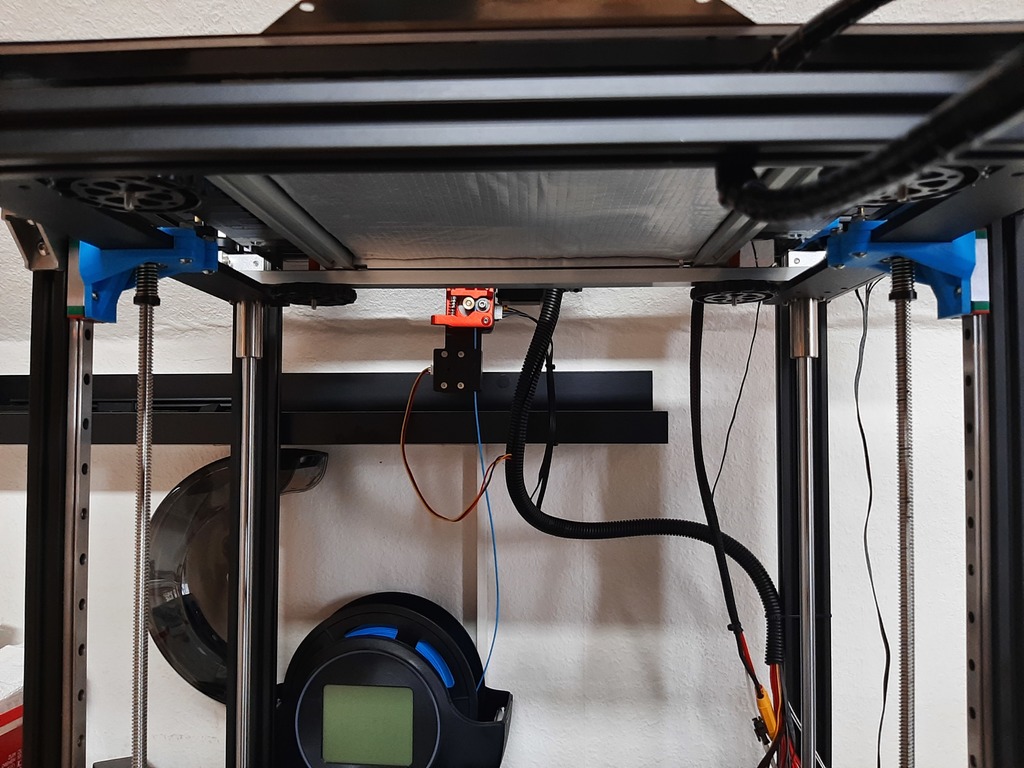
Hi, i made this Linear Rail Bracket, to get a bit rid of the Z wobble on the Ender 5 Plus This mod doesent change the Print height in any way ! I have 0 improvements on my prints to be honest with you. Maybe with further mods it will make the prints better. The bed is more stiff and theres is way less wobble, but runs up and down smooth. Im just gonna be honest with you in saying i got 0 improvements. But i like to share my creation. PLEASE COMMENT IF IT DOESENT FIT OR YOU HAVE PROBLEMS !!! What you need: 2x Z Lead Screw Mount Bracket or 2x Z Lead Screw Mount Bracket with side mounts 2x Z Lead Screw Mount 2x2020 Aluminum frame length: 49 - 48.5mm (depends on your printer, please measure first!!!) you need to measure the inside of the top rail to the bottom of the rail. (See Picture 1) 8x Right angle bracket (90degree) for M5 or M4 Screws 16x M5 or M4 T Nuts (Depends if you choose M5 or M4 angle brackets) 16x M5X8mm or M4x8mm Screws (Depends if you choose M5 or M4 angle brackets) 8x M3x8Allen Screws (Can be normal ones or flat head) 8x M3x8mm (flat allenscrews!!) 8x M3 T nus for the 2020 Frame 4x M4x20 Allen Screws 4x M4x20 Nuts 8x M3x20 Allen Screws (or other M3x20 flat head screw, but it has to be flat!) 2x MGN12H Liar Rail 480mm (you can also use 500 and cut it or 470mm) Instead of using allen screws, you can also choose other screws but i cant gurantee you that you will reach all of them and that they fit. Most importantly choose 8x M3x8mm screws with a flat head so you can mount them in the printed bracket ! How to assemble: 1. Printed Parts: 1.1 Print the Z Lead Screw Bracket with Side Mounts 2 times or without the side mounts 1.2 If you print the Bracket with the Side Mounts, i removed 0.2 Millimeters to account for the supports. The 0.2 Milimeters have been removed on the side where you screw it onto the MGN12H Linear Rail Block. So when you use supports you dont have to do alot of filing to make it fit. 1.3 Print the Z Lead Screw Mount 2 times. 1.4 Remove your supports, and lay your printed parts aside from now 2. Dissassembling 2.1 Unscrew the Nut that holds your Z lead screw in place in the stepper motor, on both sides. 2.2 Unscrew the 4x M3 Allen Screws that hold The Brass Nut, on both sides. 2.3 Hold your Bed with one hand, and use your other hand, to unscrew the lead screw. you have to screw upwards, after doing that, you can slip the lead screw out down below. Watch out for the other side your bed may fall, hold it in place !!!!! 2.4 Remove your Z axis stepper motos on both sides, 2.5 Remove the plate that holds the stepper motor. 2.6 Remove about 4-3 mm of the end plate so you can slip in your 2020x49-48.5mm frame in place. (See picture 2) 2.7.1 (No angle grinder ? well maybe there is a shorter plate on thingiverse that you can print or do you want me to make one ? ->comment down below.<-) 2.8 Reassemble your stepper motors with the plate, onto your 3d printer 2.9 Take your Lead screw nut and make sure it fits into the Z Lead Screw Mount Bracket or Z Lead Screw Mount Bracket with side mounts, that you printed, without problems. 3. Attaching Linear Rail and 2020 Frame together 3.1 Cut your 2020 to the right since so they go in and out smooth. (For me it was 48.4mm) (See Picture 1) 3.2 See if they fit in place and are in a right angle and not crooked !!! 3.3 Take your 8x M3x8Allen Screws (Can be normal ones or flat head) and your 8x M3 T nuts, as well as your linear rails. 3.3.1 (If you choose a 500mm linear rail, cut it to size so its flush on both sides) 3.4 Take your linear rail, with your block and choose 4 holes on one rail and evenly spread out 4x M3 Screws. do it on frames for each side. 3.5 Attach 4 T nuts on the rail on the backside 3.6 Slide in your linear rail on your 2020 frame. 3.7 Attach your linear rails, so that the rail is flush with your 2020 on one side, and make sure its exactly in the middle of the rail and not crooked ! (If you choose a 500mm linear rail, cut it to size so its flush on both sides) 4. Assembling the Linear Rail and Frame onto your printer 4.1 Take your MGN12H Block and slide it gently onto your linear rail if its not already on. 4.2 Attach your 2x Z Lead Screw Mount Bracket or 2x Z Lead Screw Mount Bracket with side mounts, using the 8x M3x8mm Flat allens screws. 4.3 Slide in your 2020x frame with the linear rail facing your printer bed on both sides.(If your linear rail is only flush on one side, make sure the flush side is upwards near the XY axis) Make sure that you also slide in the Z lead screw braket on your print bed, so the holes line up with the existing ones, used to hold the Lead Nut in place 5. 90 Degree Brackets 5.1 Take your 8x M5X8mm or 8xM4x8mm Screws (Depends if you choose M5 or M4 angle brackets) and 8x M3x8Allen Screws (Can be normal ones or flat head) 5.2 Take 4x 90 degree brackets, and Slide in 2 screws per bracket. Slightly screw in the T nut. Do this for all 4 5.3 slide in two brackets on both sides of the 2020 frame that has your linear rail attached. (See Picture 3) 5.4 Tighten 1 screw on each bracket, so it holds onto the frame of your linear rails. 6. Attaching your Z Lead Nut and Screw (no anti backlash. Anti backlash screw tutorial one below) 6.1 Slide your bed up and down and make sure it slides easy without any problems. 6.2. Take your Lead screw and screw on the Lead screw nut. Do this for both Lead Screws. 6.3. Lift your bed and slide in your lead screw from the bottom. Do this for both sides. 6.4 Reattach the lead Screw in your Z Stepper Motor, and tighten the Screw that holds the Lead Screw in place. 6.5. Take your 8x M3x20 Allen Screws, the 8x M3 Nuts that you removed and also the Spring washer that was on the M3 screws, holding the Lead Screw nut in Place. 6.6 Slide in the M3x20 Screws trough the bracket with the Spring washer, and tighten it (I recommend using angled pliers) 6. Attaching your Z Lead Nut and Screw (Anti backlash) 6.1 Slide your bed up and down and make sure it slides easy without any problems. 6.2 Take your 8x M3x20 Allen Screws, the 8x M3 Nuts that you removed and also the Spring washer that was on the M3 screws, holding the Lead Screw nut in Place. 6.3 Slide in the M3x20 Screws without the spring washer, trough your anti backlash screw, so the thread is facing away from the anti backlash screw. 6.4 Take your spring and the counter part from your anti backlash screw and reassemble it onto you Z lead screw. The Spring should holt the flat allen head screws in place 6.5. Lift your bed and slide in your lead screw from the bottom. Do this for both sides. 6.6 Reattach the lead Screw in your Z Stepper Motor, and tighten the Screw that holds the Lead Screw in place. 6.7 Take your spring washer and your 8x M3 nuts and tighten it. (I recommend using angled pliers) 7. Tightening the frames 7.1 Run your Heatbed down so its in the middle of the 3d printer (i measured around 20mm from top to bottom from the MGN12Hblock) 7.2 Make sure that the 2020 frame is not crooked. (I recommend taking measurements top and bottom so they are equal. 7.3 Tighten the 8 screws that are still lose on the 90 degree brackets 7.4 Roll your bed up and down. It should go up and down really smooth. 7.4 Roll your bed up and down. It should go up and down really smooth. 7.5 Take your 3d Printed Mount bracket and slide it in on each side. 7.6 Take your 4x M4x20mm screws and 4x M4 nuts and slide them trough the mount from the bottom. 7.7 Tighten the screws. 8. Testing 8.1 Move your bed slowly up and down, keeping one hand on the off switch if something goes wrong turn it off and check if anything is crooked. 8.2 If it goes up and down smootly and you are satisfied, attach the remaining 4 90 degree brackets onto your frame. 8.3 After attaching the brackets do one last test Finished ! do a XYZ Test print or a vase wobble test print
With this file you will be able to print Ender 5 Plus Z Lead Screw Linear Rail with your 3D printer. Click on the button and save the file on your computer to work, edit or customize your design. You can also find more 3D designs for printers on Ender 5 Plus Z Lead Screw Linear Rail.