Ender 5 plus Z screw sync indicator/ cover
thingiverse
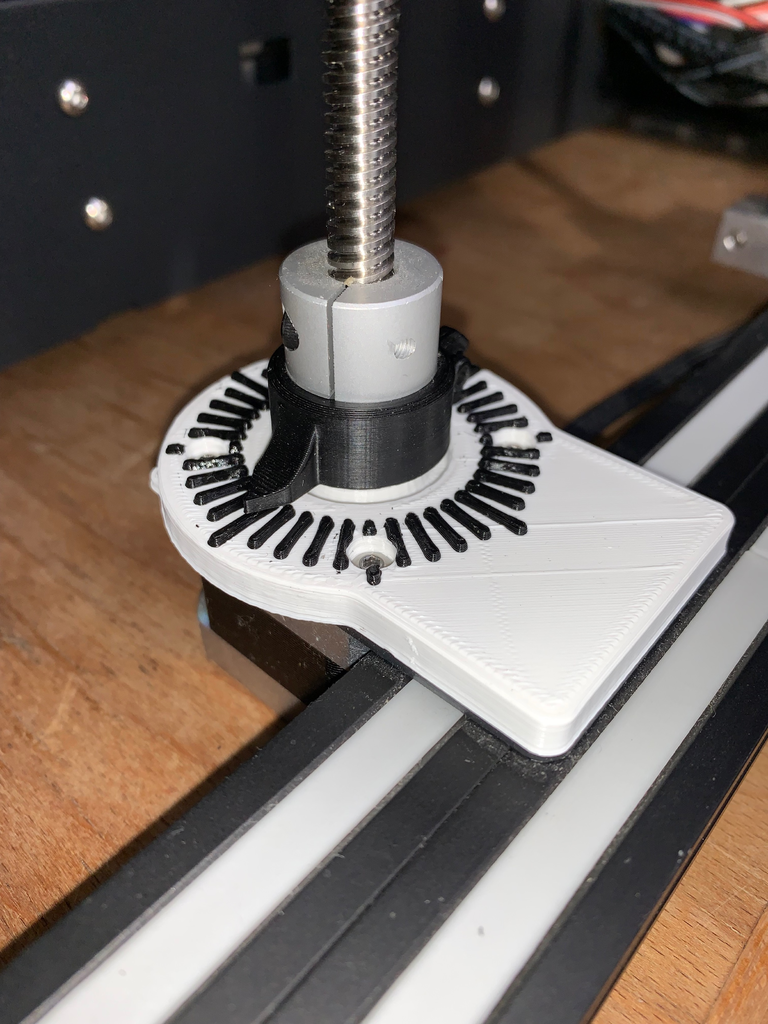
Z-srew indicator and (dust/ bolt)cover for indicating the angle of the z-srews to see if they are in sync. I came on the idea from JonathanA66 (https://www.thingiverse.com/jonathana66/designs) He made a z-screw indicator for indicating the the z-screw by printing his thing (https://www.thingiverse.com/thing:4460521). I was impressed of how good this works and how much problems this indicator solves. But i was still twisting about the design and the way it got dusty on de bearing of the z-stepper, so i designed a remix with a full rotationonal indicator and also functional as dust/ bolt cover for a cleaner look. Due to the Ender 5 Plus having independent Z screws, it is quite easy for them to get out of sync. Just removing a part can cause the bed to fall, possibly getting out of sync. If you are like me and don't run auto bed level every print this leads to crashes. These indicators will give you a quick visual indication of whether they are still synced or not. After install, you can easily sync them up before powering on the printer. Included 1 file. The base as a single (print it twice). Print in High Quality for the best result with the lines. The pointer that fits on the coupler can be find on "https://www.thingiverse.com/thing:4460521" and should have enough walls to make the band solid. Requires 2x [M3 x 10mm] minimum length bolts. I did not find it necessary to tap the holes in the pointer first, but I would recomend run the bolt through the hole before installing so it is pre tapped. To install 1. Unscrew the 4 z-stepper bolts 2. Untighten the bottom bolt of the z-coppler. 3. Turn de z-crew manually by hand so that it moves up. 4. Place the cover/indicator plate over the z-stepper schaft and on the alumiumplate 5. Screw the 4-stepper bolts trough the cover/indicator plate and through the alumiumplate in the z-stepermotor and tighten the screws. 6. Turn the z-scew all the way down on the z-stepper shaft (you want the z-screw all the way down so if you feel resistance make one/two extra turn(s) just to be sure that it is all the way down). 7. Do steps 1 to 6 for he other side. 8. Turn on the printer and autohome. 9. measure the length from the top of the x-gantry (aluminum profile where the extruder is mounted on) to the plate were the z-screw is mounted(black plate where the z-screw is holding the bed) on both sides and make sure they are the same. If not turn one or both of the z-screw so that the distances on both sides is the same (i took 95.0 mm and meaures it with a calliper). 10. Autohome the printer. 11. Screw the pointers (https://www.thingiverse.com/thing:4460521) with the [m3x 10mm] bolt on the z-copplers and point then both in the same angle (I prefered them both towards me so 6 o'clock as in the picture). 12. Measure again the hight of the x-gantry to the black plate and look if both sides are the same, to see if they are still alinged. 13. Now both z-screws are aligned at the same hight. You can level the bed as normal (i prefer with a paper). and you are done! Now if one of the screws is sagging or is not at the same angle you just: 1. autohome you printer. 2. turn the screws at the same angle (match each other). 3. autohome again. 4. and your done! The bed is at the same angle/level as you leveled it! The pointers should always match each other from now on after a home until you do another manual level then you may have to adjust the pointers. If you have problems aligning your bed, I recomend watching this youtube video: https://www.youtube.com/watch?v=kdQ_0IvolnE Each tick on the base is 9 degrees, which should be 0.1mm of Z travel. So one full rotation is 40 stripes and stand for 4mm
With this file you will be able to print Ender 5 plus Z screw sync indicator/ cover with your 3D printer. Click on the button and save the file on your computer to work, edit or customize your design. You can also find more 3D designs for printers on Ender 5 plus Z screw sync indicator/ cover.