Ender 5 upgrade - Hidden cables - Cable chain
thingiverse
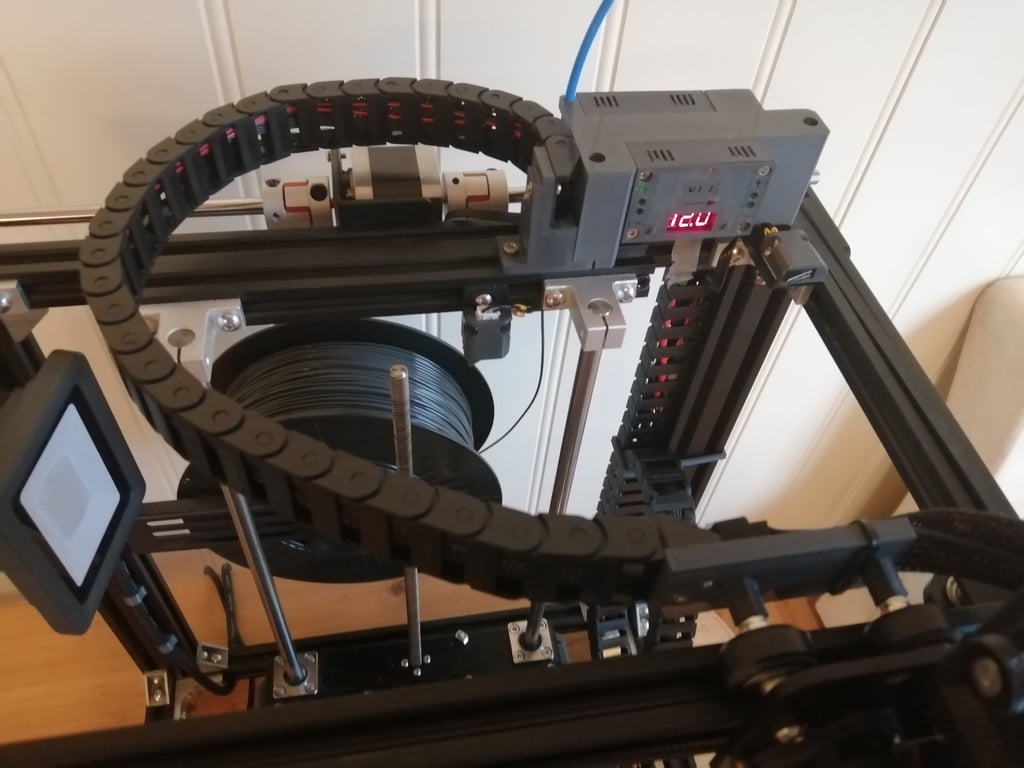
<H2><strong>Ender 5 upgrade</strong> - Hide cables - Cable chain management system.</H2> For cables to: Heat bed, stepper motors (Y,Z,E), hotend, bed thermistor, hotend thermistor, hotend fans, endstops (Y,Z). <strong>Bed Cable Chain:</strong> Electronics Box -> Heated Bed. <strong>Vertical Cable Chain:</strong> Electronics Box -> Top right corner of Ender 5 3D Printer. <strong>Horizontal Cable Chain:</strong> Top right corner -> Hotend plate. <strong>Wiring Connectors Box:</strong> Top right corner of Ender 5 3D (between Vertical & Horizontal Cable Chain). <h3><strong>Update: 20.01.2020 - Cable Chains Parts Location</strong></h3> <h4>Part 1 - Ender 5 - Bed Cable Chain and Vertical Cable Chain Brackets Location</h4> <img src="https://cdn.thingiverse.com/assets/1c/bd/7a/ba/02/featured_preview_Ender_5_Cable_Chain_Brackets_Location_part_1.png" alt="Ender 5 - Bed Cable Chain and Vertical Cable Chain Location" title="Ender 5 - Bed Cable Chain and Vertical Cable Chain Brackets Location" /><i>Ender 5 - Bed Cable Chain and Vertical Cable Chain Brackets Location</i> <strong>STL's you can see above:</strong> 1x ender5_cable_chain_bottom_bracket_v1.stl 1x ender5_cable_chain_bed_bracket_v1.stl 1x ender5_cable_chain_top_bracket_v1.stl 2x ender5_cable_chain_clip_v1_print_x2.stl <h4>Part 2 - Ender 5 - Horizontal Cable Chain Brackets Location</h4> <img src="https://cdn.thingiverse.com/assets/e7/4a/13/15/75/featured_preview_Ender_5_Cable_Chain_Brackets_Location_part_2.png" alt="Ender 5 - Horizontal Cable Chain Brackets Location" title="Ender 5 - Horizontal Cable Chain Brackets Location" /><i>Ender 5 - Horizontal Cable Chain Brackets Location</i> <strong>STL's you can see above:</strong> 1x ender5_cable_chain_hotend_bracket_back_v1.stl 1x ender5_cable_chain_hotend_bracket_front_v1.stl 1x ender5_cable_chain_hotend_bracket_2x_nut_M5xM4_l10mm_v1.stl 1x ender5_cable_chain_hotend_bracket_support_clip_v1.stl <h4>Part 3 - Ender 5 - Wiring Connectors Box Location</h4> <img src="https://cdn.thingiverse.com/assets/e8/0c/da/82/34/featured_preview_Ender_5_Cable_Chain_wiring_connectors_box_with_lid_Location_part_3.png" alt="Wiring Connectors Box with lid - Version 01" title="Wiring Connectors Box with lid - Version 01" /><i>Ender 5 - Wiring Connectors Box with lid - Version 01</i> <strong>STL's you can see above:</strong> 1x ender5_cable_chain_wiring_connectors_box_case_V01.stl 1x ender5_cable_chain_wiring_connectors_box_lid_V01 <img src="https://cdn.thingiverse.com/assets/9f/ef/4f/e5/10/featured_preview_Ender_5_Cable_Chain_wiring_connectors_box_case_V02_Location_part_3.png" alt="Wiring Connectors Box - Version 02" title="Wiring Connectors Box - Version 02" /><i>Ender 5 - Wiring Connectors Box - Version 02</i> <strong>STL's you can see above:</strong> 1x ender5_cable_chain_wiring_connectors_box_case_V02.stl <h3><strong>Update: 28.02.2020 - Wiring Connectors Box (more photos) </strong></h3> <strong>There are two shapes available to print:</strong> <h4>Wiring Connectors Box with lid - Version 01</h4> Files to print: 1x ender5_cable_chain_wiring_connectors_box_case_V01.stl 1x ender5_cable_chain_wiring_connectors_box_lid_V01 In addition, I used: 2x <a href="http://s.click.aliexpress.com/e/2xJEdu2G">M4x8mm</a> + <a href="http://s.click.aliexpress.com/e/dVQNF8EG">T-nut</a> (for fixed wiring connectors box case to the 2020 aluminium extrusion). 2x <a href="http://s.click.aliexpress.com/e/2xJEdu2G">M3xmin.6mm + nut</a> (to attach the lid). 1x 8 Pins Spring Wire Connector Terminal. I have cut 8 of them from this <a href="http://s.click.aliexpress.com/e/oPFrUMKM">12pins</a> wire terminal strip. Connect wiring: Fan1 +&-, Fan2 +&-, Hotend Thermistor +&-, Hot-end Heater +&-. If any of the wires are too short, You can extend it in this place. <img src="https://cdn.thingiverse.com/assets/ea/f0/35/c9/12/large_display_IMG_20200113_234953.jpg" alt="Ender 5 - Wiring Connectors Box with lid - Version 01" title="Wiring Connectors Box with lid - Version 01 - See: Top Right Corner" /><i>Wiring Connectors Box with lid - Version 01 - (Top Right Corner).</i> <img src="https://cdn.thingiverse.com/assets/35/c9/43/e6/83/featured_preview_IMG_20200113_183107.jpg" alt="Ender 5 - Wiring Connectors Box with lid - Version 01" title="Wiring Connectors Box with lid - Version 01" /><i>Wiring Connectors Box with lid - Version 01</i> <h4>Wiring Connectors Box - Version 02</h4> <img src="https://cdn.thingiverse.com/assets/1f/f5/a3/8b/35/featured_preview_IMG_20200120_153336.jpg" alt="Ender 5 - Wiring Connectors Box - Version 02" title="Ender 5 - Wiring Connectors Box - Version 02 - See: Top Right Corner" /><i>Ender 5 - Wiring Connectors Box - Version 02 with two LM2596 Led Voltmeter Step Down Module (Top Right Corner).</i> File to print: 1x ender5_cable_chain_wiring_connectors_box_case_V02.stl Optionally when you have silent 12VDC fan powered by LM2596 LED Voltmeter DC-DC Step-Down Module you can print case for it. This thing you can find here: https://www.thingiverse.com/thing:4056842 or there https://www.thingiverse.com/thing:4087634. ender5_cable_chain_wiring_connectors_box_case_V02.stl has been designed to fully support two of that modules. Bolts: <p> 2x <a href="http://s.click.aliexpress.com/e/_sMgaSj">M4x20mm</a>+<a href="http://s.click.aliexpress.com/e/dVQNF8EG">T-nut </p> <img src="https://cdn.thingiverse.com/assets/bf/70/b4/60/50/featured_preview_IMG_20200227_230048.jpg" alt="Wiring Connectors Box - Version 02 with two LM2596 Led Voltmeter Step Down Module - Inside View" title="Wiring Connectors Box - Version 02 with two LM2596 Led Voltmeter Step Down Module - Inside View" /> <img src="https://cdn.thingiverse.com/assets/52/cb/10/0b/f5/featured_preview_IMG_20200227_224254.jpg" alt="Wiring Connectors Box - Version 02 with two LM2596 Led Voltmeter Step Down Module - Inside View" title="Wiring Connectors Box - Version 02 with two LM2596 Led Voltmeter Step Down Module" /><i>Wiring Connectors Box - Version 02 with two LM2596 Led Voltmeter Step Down Module - Inside View</i> More assembly photos of wiring connectors box - Version 02 with two LM2596 Led Voltmeter Step Down Module: https://www.thingiverse.com/download:7735980 <h3><strong>Update: 11.12.2019 - Horizontal cable chain going to hotend.</strong></h3> As you can see I have higher plate for direct drive. The parts will be fit to the stock Ender 5 plate too. <img src="https://cdn.thingiverse.com/assets/b2/d0/75/59/6a/featured_preview_IMG_20191211_011551.jpg" alt="Ender 5 Hotend horizontal cable chain" title="Ender 5 Hotend horizontal cable chain " /> <h4>Ender 5 - Horizontal cable chain - Files to print (brackets):</h4> 1x ender5_cable_chain_hotend_bracket_back_v1.stl 1x ender5_cable_chain_hotend_bracket_front_v1.stl 1x ender5_cable_chain_hotend_bracket_2x_nut_M5xM4_l10mm_v1.stl 1x ender5_cable_chain_hotend_bracket_support_clip_v1.stl <img src="https://cdn.thingiverse.com/assets/25/c6/e3/c4/39/tiny_preview_ender5_cable_chain_hotend_bracket_back_v1.stl" width="100" alt="ender5_cable_chain_hotend_bracket_back" title="ender5_cable_chain_hotend_bracket_back" /> <img src="https://cdn.thingiverse.com/assets/bd/74/e4/91/ce/tiny_preview_ender5_cable_chain_hotend_bracket_front_v1.stl" width="100" alt="ender5_cable_chain_hotend_bracket_front" title="ender5_cable_chain_hotend_bracket_front" /> <img src="https://cdn.thingiverse.com/assets/5e/a8/fa/c4/2e/tiny_preview_ender5_cable_chain_hotend_bracket_2x_nut_M5xM4_l10mm_v1.stl" width="100" alt="cable_chain_hotend_bracket_2x_nut_M5xM4_l10mm" title="cable_chain_hotend_bracket_2x_nut_M5xM4_l10mm" /> <img src="https://cdn.thingiverse.com/assets/11/31/73/8d/ae/tiny_preview_ender5_cable_chain_hotend_bracket_support_clip_v1.stl" width="100" alt="ender5_cable_chain_hotend_bracket_support_clip" title="ender5_cable_chain_hotend_bracket_support_clip" /> <h4>Ender 5 - Horizontal cable chain - Additional you need:</h4> 1x exactly this one: <a href="http://s.click.aliexpress.com/e/El3iYhKs"> cable chain 20x10x1m</a>. Use <strong>31 chain links (~47.5cm)</strong> and two end connectors from it. 2x <a href="http://s.click.aliexpress.com/e/2xJEdu2G">M4x8mm</a> + <a href="http://s.click.aliexpress.com/e/dVQNF8EG">T-nut</a>. 2x <a href="http://s.click.aliexpress.com/e/2xJEdu2G">M4x8mm</a>. 2x <a href="http://s.click.aliexpress.com/e/2xJEdu2G">M3xmin.6mm + nut</a>. 2x <a href="http://s.click.aliexpress.com/e/2xJEdu2G">M3xmin.10mm + nut</a>. <h3><strong>10.11.2019 Ender 5 Upgrade - Bed Cable Chain and Vertical Cable Chain</strong></h3> <H4> 1. I have designed and printed all below parts: </H4> 1x ender5_cable_chain_bottom_bracket_v1.stl 1x ender5_cable_chain_bed_bracket_v1.stl 1x ender5_cable_chain_top_bracket_v1.stl 2x ender5_cable_chain_clip_v1_print_x2.stl Print with bed support only, STL dimensions in mm, PLA, infill:~40-100%. All of STL files are in correct printing orientation. ender5_cable_chain_clip.stl: print 2x. <img src="https://cdn.thingiverse.com/assets/f6/c7/91/8f/18/tiny_preview_ender5_cable_chain_top_bracket_v1.stl" width="100" alt="ender 5 cable chain top bracket" title="ender 5 cable chain top bracket" /> <img src="https://cdn.thingiverse.com/assets/41/15/fd/8e/2c/tiny_preview_ender5_cable_chain_bottom_bracket_v1.stl" width="100" alt="ender 5 cable chain bottom" title="ender 5 cable chain bottom bracket" /> <img src="https://cdn.thingiverse.com/assets/ca/bb/6f/5e/a3/tiny_preview_ender5_cable_chain_bed_bracket_v1.stl" width="100" alt="ender 5 cable chain bed bracket" title="ender 5 cable chain bed" /> <img src="https://cdn.thingiverse.com/assets/8e/aa/00/9a/c6/tiny_preview_ender5_cable_chain_clip_v1_print_x2.stl" width="100" alt="ender 5 cable chain clip" title="ender 5 cable chain clip" /> -Estimated print time: ~2.5h -Estimated amount of filament: ~30g (100% infill, support bed only). <H4> 2. I have ordered two 20x10mm 1m chains: </H4> 2x <a target="_blank" href="http://s.click.aliexpress.com/e/El3iYhKs"> Cable chain 20x10, 1m</a>. <img src="https://ae01.alicdn.com/kf/HTB1iNRYQNTpK1RjSZR0q6zEwXXaV.jpg" width="100" alt="ender 5 cable chain" /> <strong>Bed Cable Chain:</strong> 38 cable chain links.(~58cm). <strong>Vertical Cable Chain:</strong> 35 cable chain links (~53.5cm). <H4> 3. And have used two screws only: </H4> 1x <a href="http://s.click.aliexpress.com/e/2xJEdu2G">M4xmin.10mm</a> + <a href="http://s.click.aliexpress.com/e/dVQNF8EG">T-nut</a> (see: cable_chain_bed_v1.stl) 1x <a href="http://s.click.aliexpress.com/e/2xJEdu2G">M4x8mm</a> + <a href="http://s.click.aliexpress.com/e/dVQNF8EG">T-nut</a> (see: cable_chain_top_v1.stl) <H4> 4. Now my Ender 5 cable management system looks like on the photo. </H4> <img src="https://cdn.thingiverse.com/assets/35/84/ee/06/99/featured_preview_IMG_20191110_184630.jpg" alt="ender 5 cable management system" title="ender 5 cable management system" />
With this file you will be able to print Ender 5 upgrade - Hidden cables - Cable chain with your 3D printer. Click on the button and save the file on your computer to work, edit or customize your design. You can also find more 3D designs for printers on Ender 5 upgrade - Hidden cables - Cable chain .