Ender 6 Enclosure Top
thingiverse
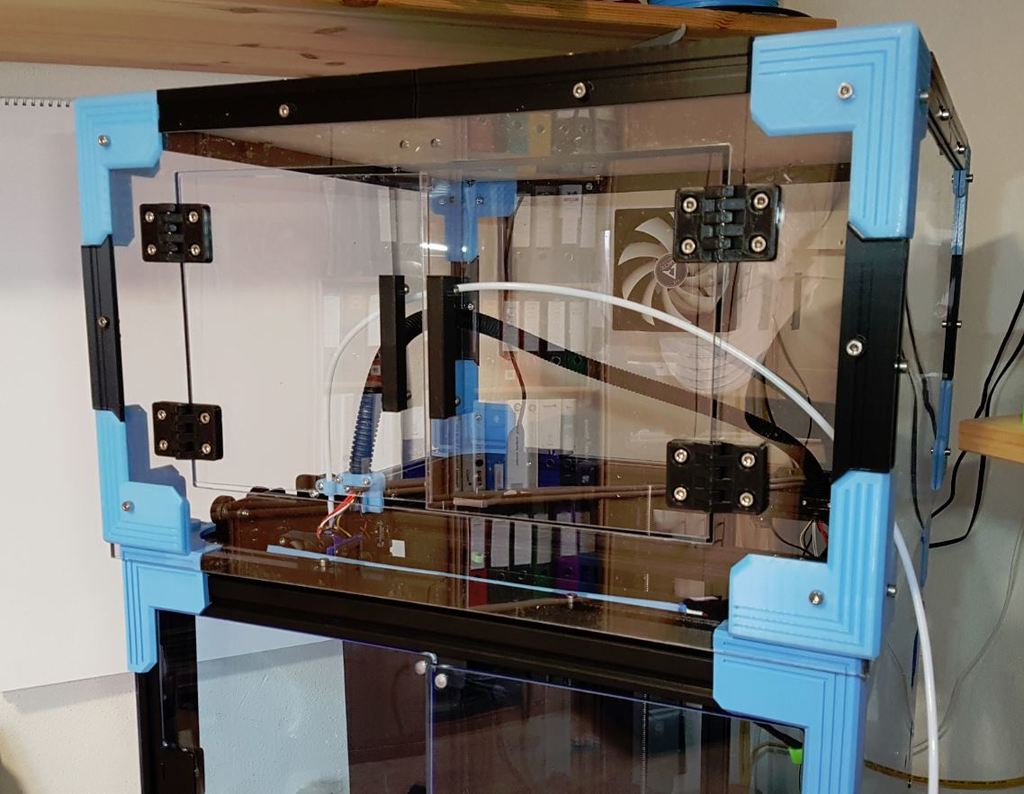
21.05. Dichtprofil für Tür, im Vasenmodus gedruckt. Door sealing profile, printed in vase mode. 28.03. Halter für Thermometer hinzugefügt. Es fehlen noch seitliche untere Dichtleisten und in Vasenmodus gedruckte Dichtprofile für die Türen. Aber der Ender 6 kann ja immer noch keinen Vasenmodus... Thermometer holder added. Lateral lower sealing strips and sealing profiles printed in vase mode for the doors are still missing. But the Ender 6 still can't do a vase mode ... ______________________________________________________________________ Danke an Steve32060 für die Ender 6 Ecke. Diese Ecken sind die Grundlage für die Gehäusehaube. Es sind noch nicht alle Teile fertig. In die Frontscheibe kommt eine Tür, in die Heckscheibe kommt ein 120 mm Ablüfter mit Drehzahlsteller. Es werden Polycarbonatscheiben mit 3 mm Dicke verwendet. Die senkrechten Scheiben stehen unten 10 mm über. Wenn man die Profile mit anderer Länge benötigt, kann man die Länge geringfügig skalieren. Die oberen Ecken und Profile werden außen montiert. Die unteren Ecken und die senkrechten Profile werden innen montiert. Die beiden Leisten werden vorne auf das Alu-Profil geschraubt. Die beiden Führungen werden hinten auf das Alu-Profil geschraubt. Thanks to Steve32060 for the Ender 6 corner. These corners are the basis for the housing cover. Not all parts are finished yet. There is a door in the front window and a 120 mm exhaust fan with speed controller in the rear window. Polycarbonate panes with a thickness of 3 mm are used. The vertical panes protrude 10 mm at the bottom. If you need the profiles with a different length, you can scale the length slightly. The upper corners and profiles are mounted on the outside. The lower corners and the vertical profiles are installed on the inside. The two strips are screwed onto the aluminum profile at the front. The two guides are screwed onto the aluminum profile at the back. Es wird benötigt: It is required: 4x Ender6Ecke1 4x Ender6Ecke2 1x FuehrungHL 1x FuehrungHR 2x LeisteV 2x ProfilSenk1 2x ProfilSenk2 4x ProfilSeitl 4x ProfilVH Version 2 Die unteren Ecken V2 und die senkrechten Profile V2 werden aussen montiert. Der Fuss V2 wird unten innen montiert. The lower corners V2 and the vertical profiles V2 are mounted on the outside. The foot V2 is mounted inside below. 2x Ender6Ecke1 2x Ender6Ecke2 1x FuehrungHL 1x FuehrungHR 2x LeisteV 4x ProfilSeitl 4x ProfilVH 2x Ender6Ecke1UV2 2x Ender6Ecke2UV2 4x FussV2 2x ProfilSenk1V2 2x ProfilSenk2V2 Version 3 Senkrechte Profile V3 statt senkrechte Profile V2 Vertical profiles V3 instead of vertical profiles V2 2x ProfilSenkV3 Version 4 Statt der Profile den Winkel verwenden Use the angle instead of the profiles 8x WinkelV4 1x Deckscheibe 509x496 mm oder 515x502 mm ich verwende eine 6 mm Sperrholzplatte 509x496 mm, oben schwarz unten weiß 2x Front und Heckscheibe 502x300 mm 2x Seitenscheibe 509x300 mm Schrauben M 4x10 und M 4x16, Muttern, Unterlegscheiben, Hammermutter in M 4 1x cover plate 509x496 mm or 515x502 mm I use a 6 mm plywood plate 509x496 mm, black above, white below 2x front and rear window 502x300 mm 2x side window 509x300 mm Bolts M4x10 and M 4x16, nuts, washers, hammer nuts in M 4 Türgriff / Doorhandle Ender 6 door handle https://www.thingiverse.com/thing:4768759 Türscharnier / Door Hinge Hinge Remix M4 DIN 912 https://www.thingiverse.com/thing:4775688
With this file you will be able to print Ender 6 Enclosure Top with your 3D printer. Click on the button and save the file on your computer to work, edit or customize your design. You can also find more 3D designs for printers on Ender 6 Enclosure Top .