Ender 6 Z Axis Linear Rail Brackets
thingiverse
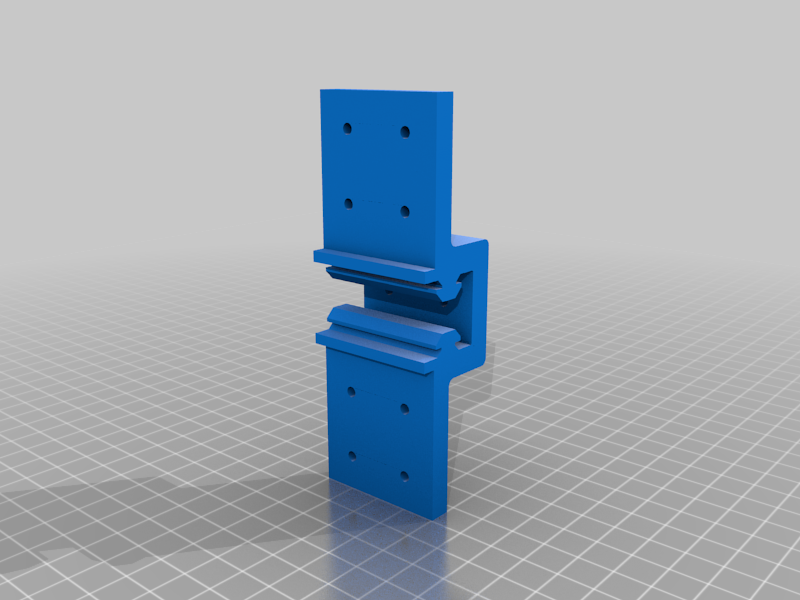
This is 100% my own design, from scratch, created using my Ender 6 printers and my personal design tools. (Preface due to jelly fellow getting my last submission of this file removed with slander). On to the good stuff! I am a proponent of getting the most performance out of any given printer platform. I have converted nearly all of my printers from their OEM plastic wheel system to more durable and accurate linear rails. I did not find a solution for the Ender 6 Z axis so I went with the most robust and easily usable solution I could engineer. Excluding printing time, this modification should take approximately 1 hour. The Ender 6 has quite a bit of performance left to unlock when you upgrade the motion system. I also highly recommend using Klipper with input shaping tuned properly to maximize results overall on this printer. Parts required: 2X 450mm MGN12 Dual Carriage Linear Rails note: Clean and lube appropriately before installation to ensure a long life 16X M3x12mm SHCS (Socket Head Cap Screws + Washers) 4X M3x14mm SHCS (Socket Head Cap Screws + Washers) 8X M3x18mm SHCS (Socket Head Cap Screws) 12X M3 T-NUTS Printing: This is a fairly easy print, run at a speed your printer can faithfully produce accurate dimensions. Print at 100 percent infill, no supports are needed. I printed mine in Taulman 910 Nylon, solely because this printer will have a heated enclosure and I felt PLA might be inadequate at 60C+ ambient temperatures for this role. For non actively heated enclosures PLA/ABS/PETG will work great. Post Processing: We are working with a very tight tolerance in the 2020 extrusion, the bracket v slots are being used to ensure the accuracy of positioning of the 2 bed extrusions we attach to the linear rails. That said any amount of elephant foot (bulging where the print touches the print bed) will need to be filed or clipped off with your tool of choice. If you do not do so, you will not be able to slide the brackets completely over the 2020 extrusion. I have found sharp flush cutters work very well for this purpose. Assembly: You will want to print two 20x40 MGN12 Linear Rail alignment jigs to facilitate accurate installation of the linear rails. Unplug your printer and remove the rear panel. While the parts above are printing you can begin by lowering the print bed manually so that it can be supported by a spare filament spool as you remove both left and right Z axis wheel assemblies. We are working with a very close tolerance on either side, which will become more evident when you install the linear rails. Note: BE SURE you have one carriage above and one carriage below the build platform 2020 extrusion when you install your rails, or you will be doing it a 2nd time. Tip: I unscrewed one of the bed platform bolts to allow enough wiggle room to get the 2nd linear rail installed, then put said bolt back in after the rail was secured. Both linear rails are installed using 4 m3 fasteners and 4 m3 t-nuts each. Next you will place the printed linear rail adapters over the 2020 extrusion and slide them back into place over the carriages. You may now install the 16 m3 fasteners (with washers) into the carriage blocks. Then you can slide the t-nuts in behind the z axis brackets and insert the longer m3 fasteners (wish washers). Leave them loose until you have adjusted the position of each 2020 extrusion to be even and clear of the back panel, then you may snug them up. Tip: You can leave the 2020 plastic caps off and push the extrusion far enough to allow a solid flat panel to be attached to the back of the Ender 6, making it all the more easily properly enclosed. Enjoy!
With this file you will be able to print Ender 6 Z Axis Linear Rail Brackets with your 3D printer. Click on the button and save the file on your computer to work, edit or customize your design. You can also find more 3D designs for printers on Ender 6 Z Axis Linear Rail Brackets.