Ender Extender Dual Y Axis Linear Bed - BLV Blend
thingiverse
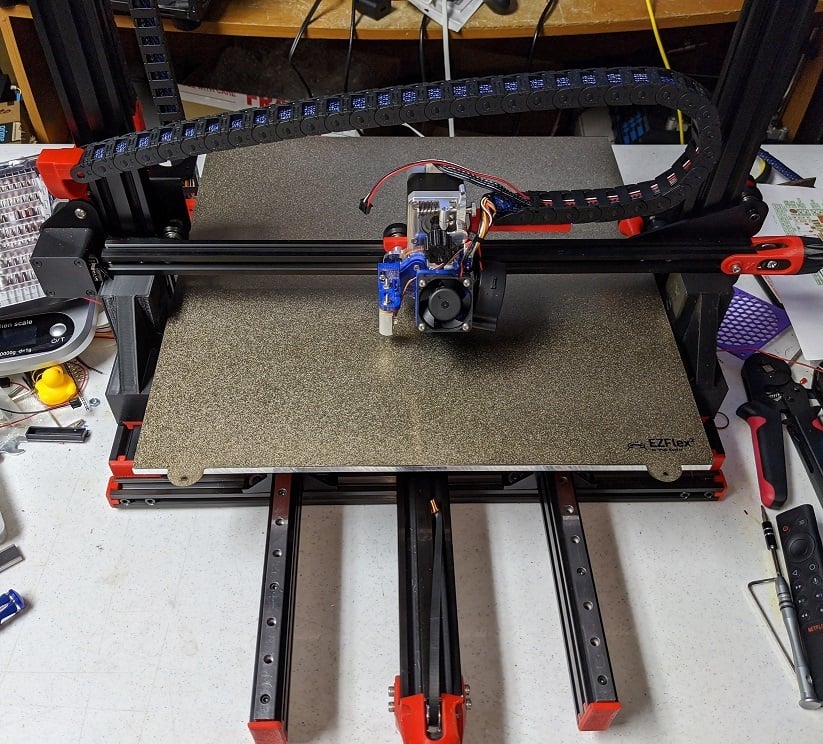
This is a replacement bed carriage for an Ender 3 Pro that's had the Ender Extender 400 & 400XL kits installed. This adds 2 linear rails on either side, which helps with stability, and gets rid of those troublesome wheels the original bed uses. It's based on the great BLV setup and uses the belt mounts from his kit (I'd suggest using his whole aluminum setup, and go with linear rails on the X and Z as well). I designed the plate to use 2 rail carriages on the left side-rail, and a single rail carriage on the right side-rail, but in retrospect, I could have just as easily left it with 4 carriage mounts, 2 on either side, as the adjustment of the rail alignment may have actually been a bit easier with it set up that way. I had the plate cut by SendCutSend.com, using the DXF file included in this thing, and everything turned out perfectly, with everything lining up just right. I chose to have it cut from .125" 6061 Aluminum, and it's holding up a near-9 pound print bed without any issues at all. The setup I have requires 2 additional 600mm 2040 v-slot rails which are mounted to either side of the existing 4040 rail on the ender Pro (I believe it should also work with the non-Pro as well, but use 2 600mm 2020 rails instead, and smaller corner gussets). I used 2 600mm MGN12 linear rails, with a total of 3 MGN12H carriages (don't get the MGN12C's, they won't work with this mount). I attached the extrusions with 20x40 corner gussets designed for use with 2020 v-slot rails and t-nuts, although once you have the location for the rails you could always drill the existing 2020 that comes with the Ender Extender kit. So far the gussets are working as intended, with one on the front outside of each rail, and one on the back inside of each. I had to file down the slot tabs on one side that attaches to the 2040 rail side, but you can leave them on the side that attaches to the bottom 2020 rail. It approximately aligns front to back with the existing 4040 rail on my Ender Pro setup. Due to where the rail mounts are placed on the left side, you'll either have to use very small leveling nuts on that side, or do what I did, and use solid bed mounts, with nylock nuts holding the bed down, and use a ABL sensor like a BLTouch or EZAbl. I use solid mounts on all my printers, and a mix of BLTouch probes, and EZABL Pro sensors for the ABL. I used the BLV endstop mount, mounted to the outside of the right rail so that the carriage on that side triggers it. The plate is also designed to allow for a larger Y-axis stepper motor (I'm using a 4248, which barely clears, larger steppers will also work, but you may need to sand the bottom side of the mount just a touch for clearance). I initially used printed versions of the BLV kit's belt mounts for the bed plate, and the endstop bracket (STL's included in this pack). They worked fine in testing, but I ended up ordering the full aluminum parts kit, as I'm going to use linear rails on the Z. I may also do the X if I decide to change out the Micro Swiss direct drive setup I have on the printer now. (The black carriage pictured above was a printed version I used for mockup until the cut aluminum plate came in). <b>600mm 2040 Extrusion for Ender 3 Pro(I used Zyltech for the extrusions, as they had them in stock, with quick delivery):</b> http://www.zyltech.com/zyltech-2040-v-groove-extrusion-black-pre-cut-lengths-300mm-2000mm/ <b>600mm 2020 Extrusion for Ender 3</b> http://www.zyltech.com/zyltech-black-2020-v-groove-extrusion-pre-cut-lengths-300mm-2000mm/ <b>600mm Linear Rails w/MGN12H carriage:</b> https://www.amazon.com/gp/product/B082DGCVWN/ref=ppx_yo_dt_b_asin_title_o03_s00?ie=UTF8&psc=1 <b>2020 Gussets for extrusions for Ender 3 Pro:</b> https://www.amazon.com/gp/product/B07PBJG87F/ref=ppx_yo_dt_b_asin_title_o09_s00?ie=UTF8&psc=1 <b>2020 Gussets for extrusions for Ender 3:</b> https://www.amazon.com/dp/B07GGLYX9V/ref=sr_1_2?dchild=1&keywords=2020+corner+gusset&qid=1596172966&s=hi&sr=1-2 <b>Amazon Link for BLV kit (if you want it quick):</b> https://www.amazon.com/gp/product/B08931162P/ref=ppx_yo_dt_b_asin_title_o07_s00?ie=UTF8&psc=1 <b>Aliexpress Link for the BLV Kit (if you want to save and don't mind the shipping wait):</b> https://www.aliexpress.com/item/4000433938880.html?spm=a2g0o.productlist.0.0.269f4c13pPyFAK&algo_pvid=c80a0124-3ee6-47ae-8ae6-750fe6c7798a&algo_expid=c80a0124-3ee6-47ae-8ae6-750fe6c7798a-0&btsid=0ab6f82415961710900427252e34ed&ws_ab_test=searchweb0_0,searchweb201602_,searchweb201603_ <b>Y-Axis stepper I'm using (4248):</b> https://www.amazon.com/gp/product/B01L3VARKC/ref=ppx_yo_dt_b_search_asin_title?ie=UTF8&psc=1
With this file you will be able to print Ender Extender Dual Y Axis Linear Bed - BLV Blend with your 3D printer. Click on the button and save the file on your computer to work, edit or customize your design. You can also find more 3D designs for printers on Ender Extender Dual Y Axis Linear Bed - BLV Blend.