Ender5Plus Corexy Conversion Enclosure Lid
thingiverse
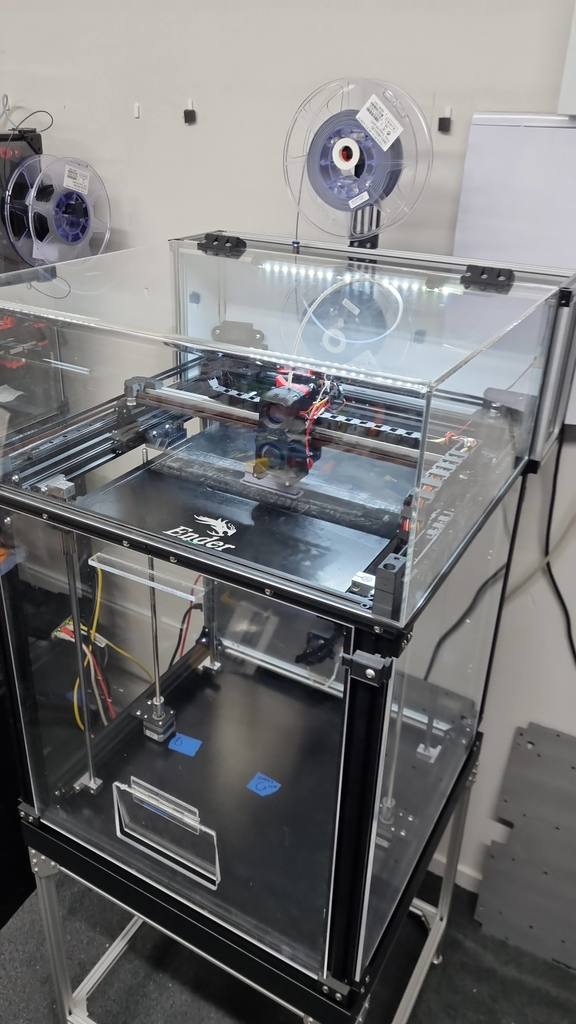
UPDATE 07/01/2022 Refer to the Electronix Case for acrylic panels, associated mounts and BOM. https://www.thingiverse.com/thing:5110697 --- UPDATE 07/01/2022 The small printable panels to fit each end of the rear frame replace the acrylic. I found that it's better to have them on each side. The fans can be controled by the control board with a enclosure thermister (if you have enough outlets/pins on the control board). --- UPDATE 17/12/2021 Passive chamber temps just from the heated bed were climbing over 45°C so I have added a printable extractor panel to mount a 6010 fan and carbon filter. Fan requires 4x M4 BHCS and 4x M4 nuts. This can be mounted on either side of the lid frame replacing the small acrylic panel. Fan wire and 2pin jst plug has been accommodated for to keep wiring tidy. Find a local supplier of aquatic carbon filters and cut to suit holder. Holds 20mm thick filters. Please also note this lid enclosure is intended to fit my corexy conversion only, however you can modify it to suit your requirements. --- UPDATE 07/12/2021 Nolonger a work in progress. All parts uploaded are mounted on my machine and are working as intended. I recommend measuring your machine to confirn all dimensions before printing the large parts ...just in case. I will not be held responsible if the parts dont fit your printers frame. Please also note this lid enclosure is intended to fit my corexy conversion only. --- UPDATE 29/11/2021 Added another couple of pictures of the Lid enclosure. --- UPDATE 23/11/2021 Most STL files have been uploaded with acrylic plans. For the side panels to enclose the frame you are best to do a measure and create your own plan for each panel. When ordering the 2020 extrusions make sure you can tap the centre hole with an M5 tap. Do not make it M6... the box corner connectors do not work with M6 SHFHs. More to come soon. --- UPDATE 22/11/2021 I will do BOM for those interested with acrylic lid plans and all parts to be printed It will take me about a month, so please be patient. If you're interested start by ordering or have on hand at least 50 each of these... M5x10mm BHCS, M5x14mm BHSC, M5x20mm BHSC, Min 2/M5x45mm SHCS with 2/ M5 Nylok nuts for hinges, M5 Spring T Nuts and M5 hammer T nuts. I will confirm the numbers but this should be in you horde anyway. I used "Raven SE10 Multi-Purpose Sponge Seal 9 x 3mm x 5m EPDM Rubber Black 5955" to seal the lid when closed. This is local to me so you will need to find something similar like this... https://www.aliexpress.com/item/4000003462527.html?spm=a2g0o.productlist.0.0.144b6888dQIVJk&algo_pvid=55740c05-f2c9-4f12-bbf4-53ba85e170cb&algo_exp_id=55740c05-f2c9-4f12-bbf4-53ba85e170cb-16&pdp_ext_f=%7B%22sku_id%22%3A%2210000000004074977%22%7D You'll need to find a local acrylic supplier that can prepare/bend/glue acrylic panels unless you are confident to do this work. I'll upload stl files in a day or so. --- UPDATE 13/11/2021 Black acrylic panels for the box have ordered and they should be here next week. I have designed and printed the LED mount and have a very simple idea to mount a Wyze Cam using it's stock magnet and steel washer up up inside the box out of the way. --- Ender5Plus Corexy Conversion Enclosure Lid and Enclosure Panels Design Requirements No.1 keep as compact as possible. No.2 design to be used with my corexy conversion system. When I decided to convert my Ender5Plus to a corexy printer and then move the Ender5plus's electronics to the rear of the machine, I always had in my mind to add an enclosure lid. I have been using my printer with an enclosure lid for some time now with panels mounted to the exterior of the frame but I am having to upgrade things because of the current printers conversions. They original hinge point of the lid swung back having to make sure the printer was about 200mm off the wall at the rear which was on oversight to be honest and I never really liked it. With this new design the hinge point is now at the top and is confined to be within the depth of the enclosure box when opened and the printer now can be pushed hard against the wall. There is a printed shelf edge that is fixed to the frame perimeter for the lid to seat on when closed and I have made allowance for optional 3mm foam tape to surround the lid for a better sealed environment when printing. The front cross member extrusion remains in place. I have designed this to work with my ender5plus corexy conversion that has all the steppers fitted within the stock dimensions. This will definitely not work with steppers hanging off the rear and inverted (IMO a clumsy non-compact design). All stl's and acylic panel plans will be uploaded once I have put it all together to confirm the design is working as designed. At this point I'm not sure about a BOM but if there's enough interest I'll see what I can do.
With this file you will be able to print Ender5Plus Corexy Conversion Enclosure Lid with your 3D printer. Click on the button and save the file on your computer to work, edit or customize your design. You can also find more 3D designs for printers on Ender5Plus Corexy Conversion Enclosure Lid.