ENDLESS customizable, interchangeable shelf
prusaprinters
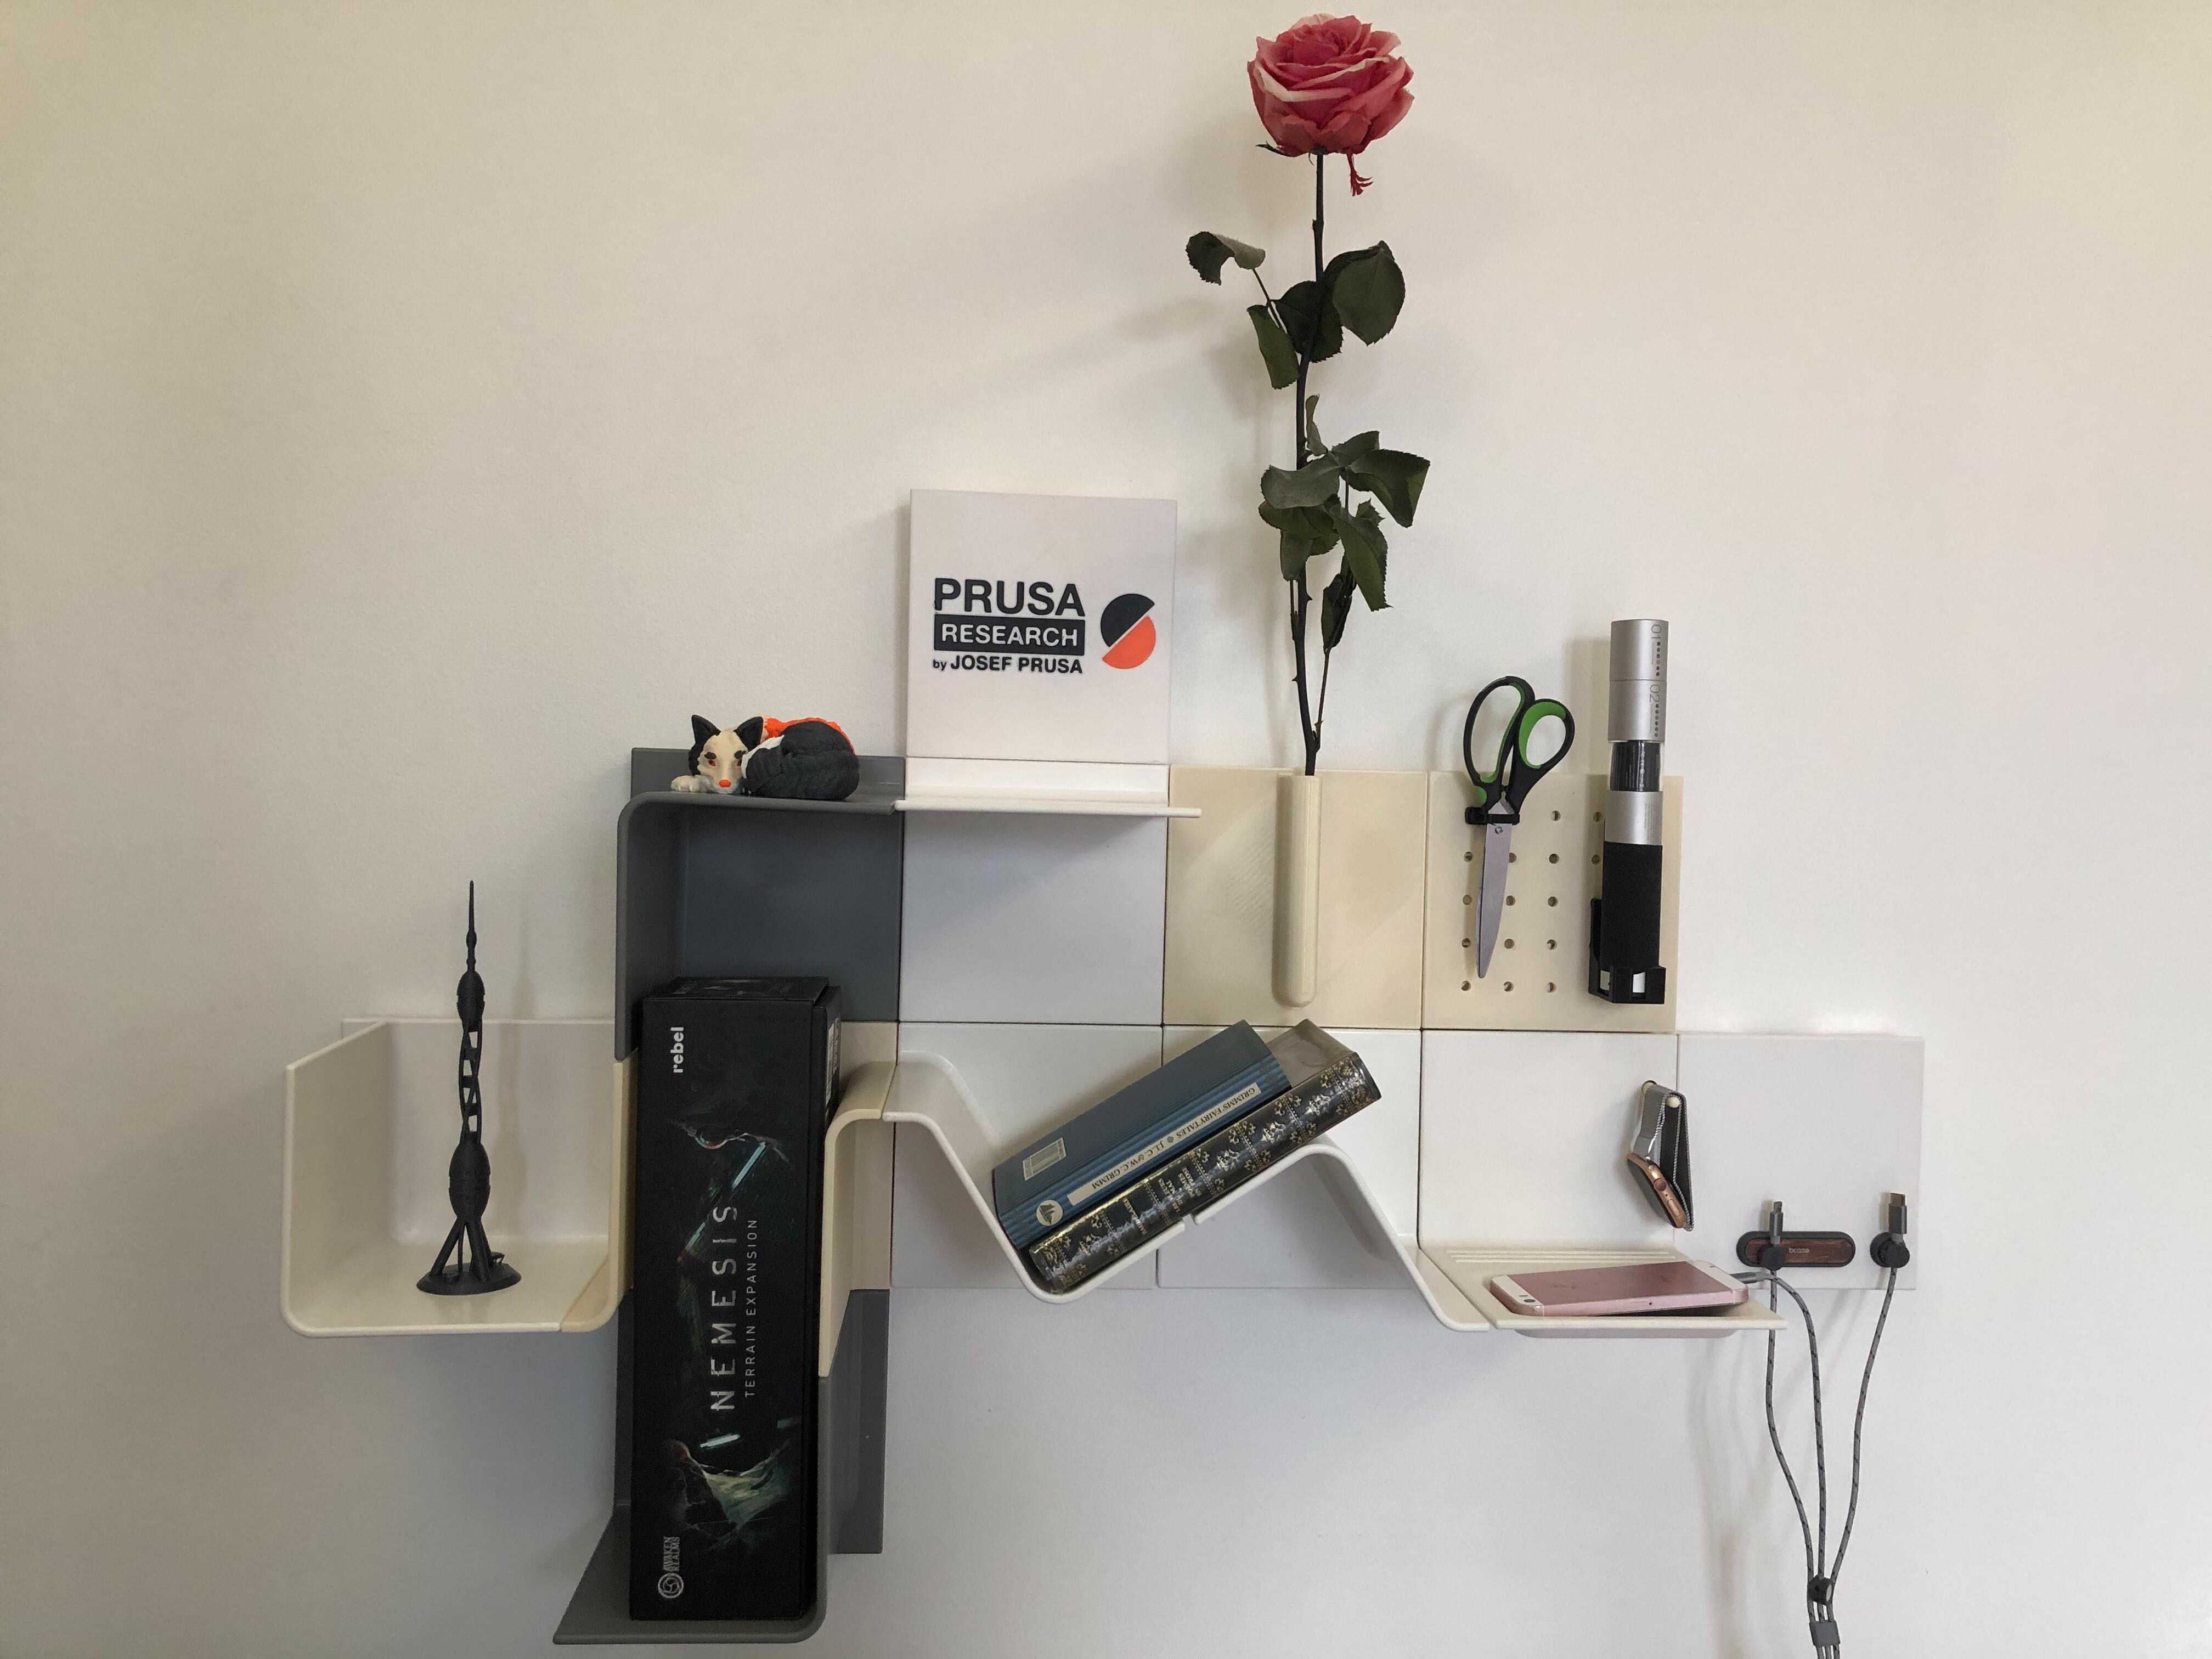
<p>This is a fully customizable modular cube that is wall mounted, you can print any number of module and interconnect each other to create anything you want.</p><p>With it's many differents modules you can change plates to suit your needs, from book shelves to figurines display the possibilities are <strong>ENDLESS</strong>.</p><p>For better looking, i recommend Ironing/Sanding/Smoothing every plate.</p><p>Even if modules are designed to be sturdy and resistant, i recommend to not exceed 5 kg per module.</p><p><strong>ENDLESS</strong> is composed of 3 parts and an optional 4th part :</p><ul><li>The main module that is the basic cube that is screw to the wall</li><li>The connector that connects modules to each other</li><li>The Plate which is the visible part which can be used as shelves or cosmetic display.</li><li>The Finisher is the last and optionnal part, it is purely cosmetic it's to fill the "hole" from sides of the composition to improve the look from sides.</li></ul><p>Even though the main module is screw to the wall, the plate can be interchange as much as you want whenever you want.</p><p><strong>Please leave a like and comment an idea of shape you would like to see as a plate and i will try my best to design your idea !</strong></p><h3><strong>NEWEST ADDITION :</strong></h3><figure class="image image_resized" style="width:50%;"><img src="https://media.prusaprinters.org/media/prints/54214/rich_content/41e12565-bd8c-4b1f-98b8-d50d7a1977a4/image_2021-08-27_111537.png#%7B%22uuid%22%3A%22c4b45634-733d-44f3-8ecd-7334995e20a5%22%2C%22w%22%3A1272%2C%22h%22%3A1095%7D"></figure><h3><strong>UPDATE :</strong></h3><pre><code class="language-plaintext">27/08/2021 ; Adding Single c plate mini and Single l plate mini thanks to suggestion in comments :) 28/01/2021 : Adding a new special Prusa plate to show your love for prusa ! (Beware you need the upgrade MMU2S to print this plate) 29/01/2021 : I identify a very small defect in the design of the connector that prevent it to smoothly connect with modules, if you already download the file, please redownload the connector. 29/01/2021 : Adding the new advanced plate, the flower plate to show your love for the love of your life (valentine is coming !) 30/01/2021 : I just realized that i upload wrong files for the plates, all basic plates were early prototypes with wrong scales, wrong shapes and without tweaks that made it easier to print. For those of you who already download the files and print those plates i'm deeply sorry, please re-download the basic plates files for a better experience For those who may ask what's changing from early prototypes is basically better alignement between plates, more overhangs so that print needs less to no supports and rounder shape over the edges for a better look. 31/01/2021: Introducing 2 basic Plates with 2 variation, those are the Double C Plate and Double L Plate, those plates aren't really stand alone, they exist to connect visually plate with each other especialy L Plates. 01/02/2021: Introducing a fourth part to the three part ENDLESS, it's the finisher, it's totally optionnal but the finisher will improve the look of ENDLESS when you look from sides. Also i updated the connector to add small design improvement. 01/02/2021: Can a modular shelf be even more modular ? Of course it can ! Introducing the advanced plate the Pegboard Plate, both in Metric and Inch. 02/02/2021 : You return home and and just want to empty your pockets so you can sleep ? Well say no more, with the advanced plate Handy Cuby, this allow you with his recessed form to empty you pocket and even hang your watch. 09/02/2021 : Quick update with the addition of 3mf file for the prusa mini for the connector. 21/02/2021 : Last day Prusa Contest update with 3 new Basic Plates Z Plate Wall Plate Slide Plate i also rearranged files in folders and the tutorial thanks to new prusa printer feature. 20/03/2021 : In order to celebrate the organization contest 1st price i propose today three new advanced plate for gamers, i upload so many basic plates but very few advanced plates and since i'm a gamer myself i today propose Game Rack Plates ! With three flavors : Switch, PS4 and Xbox One. I'm sorry for PS5 and Xbox Series X users i don't have those consoles so i can't measure box lenght but i you want to measure it and send me the details i can try to adjust and make two new game rack for newer consoles.</code></pre><h3><strong>HOW TO INSTALL :</strong></h3><ol><li>Print as much as main module as you want</li><li>Print as many connector as needed to connect cube to each other (for 3 cube you need 2 connector)</li><li>Print the desired Plates for each of your printed modules.</li><li>[Important] Remove the 4 thin layer on the connector this thin layer exist in order to avoid supports in this zone.</li></ol><figure class="image image-style-align-center image_resized" style="width:50%;"><img src="https://media.prusaprinters.org/media/prints/54214/rich_content/8271c1f3-115a-49fe-8149-98f964788834/break-point.jpg#%7B%22uuid%22%3A%2204e14025-4c83-471c-9142-bdf8e32c58a2%22%2C%22w%22%3A1341%2C%22h%22%3A1120%7D"></figure><ul><li>5. Connect each modules with the connectors to form the shape you want, to know if a module is connected you push the connector until you hear a "click" sound you can push a little on the two side bar like on the photo for an easier fit. (it is also that way that you can unconnect modules)</li></ul><figure class="image image_resized" style="width:50%;"><img src="https://media.prusaprinters.org/media/prints/54214/rich_content/9722790b-4722-4700-9fe2-706339378a63/img_0958.jpg#%7B%22uuid%22%3A%229e2c9dbc-d9d3-41c0-9ddb-c796a1420c08%22%2C%22w%22%3A3024%2C%22h%22%3A3024%7D"></figure><ul><li>6. Screw the modules to the wall (you don't need to screw each modules, you can for exemple screw the left and right modules in a composition of 3 modules in lign.) nb : you can refer to the image to know where is the location of the screw.</li></ul><figure class="image image_resized" style="width:50%;"><img src="https://media.prusaprinters.org/media/prints/54214/rich_content/847e2faa-83d4-43ca-ab00-a4eceed77d30/img_0955.jpg#%7B%22uuid%22%3A%22b7643ba6-1ad7-4a56-822c-dce7f3631d1a%22%2C%22w%22%3A3024%2C%22h%22%3A4032%7D"></figure><ul><li>7. Take a plate and slide onto the modules, repeat until each modules is cover by a plate.</li></ul><figure class="image image_resized" style="width:50%;"><img src="https://media.prusaprinters.org/media/prints/54214/rich_content/edf70600-627a-453b-a670-11abd7b75a1b/img_0954.jpg#%7B%22uuid%22%3A%2285bde502-834b-4229-b051-353d6d571870%22%2C%22w%22%3A3024%2C%22h%22%3A4032%7D"></figure><ul><li>8. Enjoy and reposition plates whenever you want, you can even move the main module and remove connector by pressing with your finger to unsnap two modules (Refer to step 5 to unconnect modules)</li></ul><h5>Optionnal Step : </h5><figure class="image image-style-align-left"><img src="https://media.prusaprinters.org/media/prints/54214/rich_content/183f16d0-69d8-4dd7-8a3a-3c3db1165580/image-dios-2.jpg#%7B%22uuid%22%3A%22f74e77fa-5a87-48f1-a166-19e98834a815%22%2C%22w%22%3A130%2C%22h%22%3A130%7D"></figure><p> </p><p>You can print and add finisher on the edge of each module which isn't connected to another module in order to have a smooth view from the sides</p><p> </p><p> </p><h4><strong>Basic Plates :</strong></h4><ul><li>Cover Plate : This is the most basic plate, it's mostly cosmetic, or you can glue anything you want.</li><li>I Plate : This is a most common plate that you can use as a shelf or figurine display.</li><li>L Plate : Also a common plate that can be used to form a shape or to prevent something from falling on side</li><li>V Plate* : This plate is most usefull when you want to store a book, perfect for using it as a bedside shelf for your phone or book. Also this shape is very special because you can use two V Plate and invert one to create a sort of "wave" that visually connect two I plate that is place up and down.</li><li>Double C Plate* : This isn't a stand alone plate, this mean this plate is useless on it's own, this plate just allow to complete a curve on the up and down side.</li><li>Double L Plate* : Same as C Plate, this plate isn't really beautiful on it's own, however when combine with other L Plate, you can achieve beautiful results, but the double L plate can be use as a stand alone because of the two plane shape that allow to place things on it as if there was two mini shelf.</li><li>Slide Plate* : It is a straigh line to connect an up and down I or L Plates, it is useless when used alone and is mostly esthetic</li><li>Wall Plate* : This is a kind of alternative to the L Plate which create a sort of wall but instead of breaking the line it continue to connect the upper part with the down part like the Slide Plate.</li><li>Z Plate* : Also called the anti slide, it is more usefull than the slide plate, because it can be use on it's own, also i think it beautifully connect up and down part.</li><li>Single C Plate mini : This plate derivated from the Double C plate, there is only one side that display a “C” shape.</li><li>Single L Plate mini : This plate derivated from the Double L plate, there is only one side that display a “L” shape.</li></ul><p> * The asterisk means that the plate is also available in invert position.</p><h4><strong>Advanced Plates :</strong></h4><ul><li>Game Rack Plates : There is 3 variation of the plates, for Switch, Xbox one and PS4 Games, The logo is embossed for each plates, so you can use layer color change to make it more beautiful.</li><li>Handy Cuby : This plate is a "Vide-poche", it allow you to empty your pocket with it's curved storage space, also this plate is in two part, the second small pin that you can insert on the plate will allow you to hang your watch.</li><li>Pegboard Plate : The Pegboard plate contain 5x5 peg hole standardize in Metric or in Inch, you can use your already existing pegboard compatible tool to hang your beautiful caliper.<br>Cherry on the cake, the plate is one of the easieast to print because you can print it flat on the pegboard side.</li><li>Flower Plate : This plate is meant to hold one or a small composition of flower, however i can't garantee that the print will be waterproof, if you want it to be waterproof you can try to apply some epoxy.</li><li>QI iPhone Plate : This plate is meant to be used with an iphone as a bedside shelf, the round hole is for the QI charger, the QI charger used is the standard IKEA QI charger.<br>The plate is inclined so you can see your phone while it's charging on landscape and portrait mode.</li></ul><p><a href="https://www.ikea.com/fr/fr/p/nordmaerke-chargeur-sans-fil-blanc-liege-80472114/">IKEA Charger example</a></p><ul><li>QI Flat iPhone + Apple Watch Plate : This plate is designed as a bedside shelf, the round hole is for the QI charger (see above for the QI charger brand) and the hanging band is for the Apple watch that use the original magnetic charger of the apple watch.</li></ul><p><strong>Special Plates :</strong></p><ul><li>Prusa Plate : This is an alternative cover of the basic Cover Plate, with the Logo of prusa research for showing your love for Prusa !<br>Be careful this 3mf is only compatible with the upgrade MMU2S for the prusa MK3S because of the multi material 3d printing.</li></ul><p>Thank you for reading.</p><h3>Print instructions</h3><p>The Main module and basic plates can be printed without supports</p><p>The plates theorically don't need supports for the center part, there will be a long bridging and it will be ugly (see photo of the bellow of the plate) but it doesn't affect the functionnality of the plate and will connect to the module as expected. At least the most important part is the visible part. Also I strongly recommend to use a brim so that 8 circles connectors won’t fall during printing.</p><p>The connector need at least 4 small support, please take the 3mf file of the connector, the supports are already pre-charged.</p><p>All Advanced Plates needs supports</p><p>I strongly recommend to print 0.15 or lower layer height for the connector and main module</p><p>Prusa Plate MMU2S Color used :</p><ul><li>Prusament PETG Signal White</li><li>Prusament PETG Orange</li><li>Prusament PETG Jet Black</li></ul>
With this file you will be able to print ENDLESS customizable, interchangeable shelf with your 3D printer. Click on the button and save the file on your computer to work, edit or customize your design. You can also find more 3D designs for printers on ENDLESS customizable, interchangeable shelf.