Erecting Flap Clock
prusaprinters
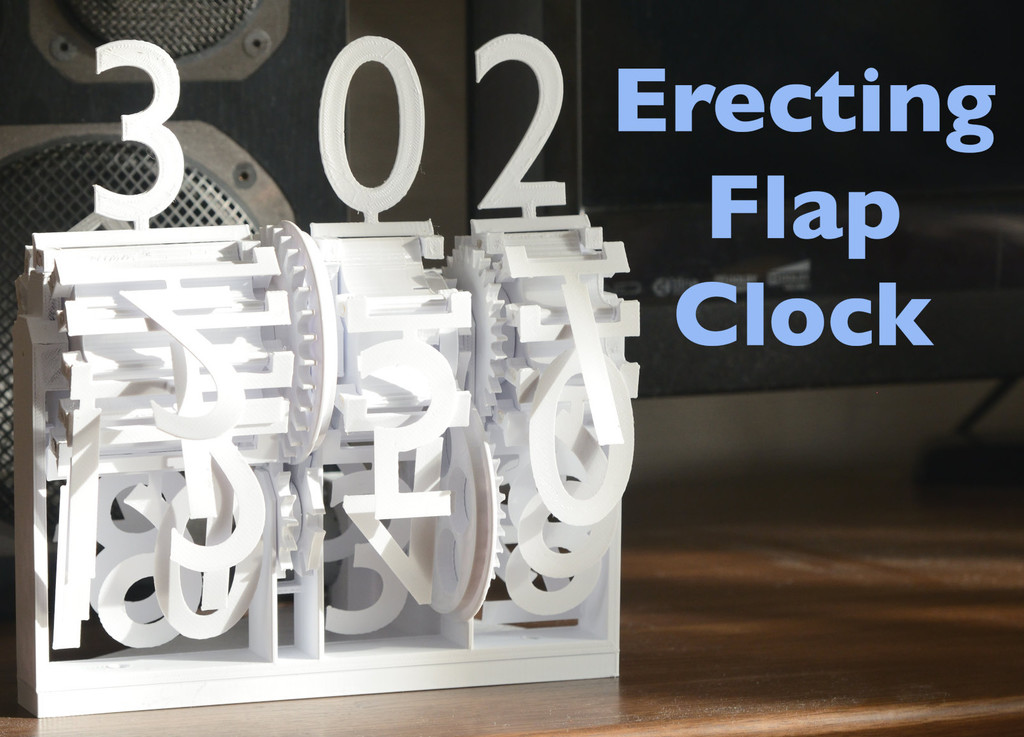
<h3>Similar to split flap clocks but each flap is single sided and erects at the top of the clock.</h3><p>Download all files from the following link, <a href="https://www.thingiverse.com/thing:5140134/zip">https://www.thingiverse.com/thing:5140134/zip</a></p><p>Note : this clock is relatively difficult to make.</p><p>This clock can be printed out with common 3D printers (largest part size is within 20cm x 20cm). Dimension (without flaps) : H151mm x W195mm x D157mm</p><p>Operation (time adjustment)</p><ul><li>Wheels of hour and tens of minute can be advanced manually.</li><li>By pressing reset button of Arduino, the clock advances 1 minute instantly.</li><li>To adjust the fine position of the 1st digit of minute, reset the Arduino while the motor is working.</li></ul><figure class="media"><oembed url="https://youtu.be/CxS2LTh9U1w"></oembed></figure><h3>How to make</h3><p>You need</p><p>Parts:</p><ul><li>28BYJ-48 geared stepper motor and ULN2003N motor driver board (usually comes with the motor)</li><li>Arduino nano (or the other micro computer you like)</li><li>Steel wire (radius = 1.5mm or around. I use 1.6mm stainless wire)</li><li>Some tapping screws (around 2mm x 8mm)</li><li>Glue, lubricant (silicone oil), solder, electronic wire</li></ul><p>Tool:</p><ul><li>Soldering iron for assembling circuitry and welding plastic parts</li><li>PC for programming Arduino</li><li>Drill bit, radius = 2mm</li><li>Sharp knife and/or file for deburring</li></ul><p>Assembly manual is supplied as PDF file.</p><ul><li>All parts can be printed out without support.</li><li>Some parts consist of multiple shells (closed polyhedrons). Cura slicer handles such data properly, but the other may not. In this case, please use online STL fix service.</li><li>Circuitry is same to Hollow Clock 2, <a href="https://www.thingiverse.com/thing:4761858">https://www.thingiverse.com/thing:4761858</a></li></ul><p>so I omit the description on it. It uses Arduino nano and 28BYJ-48 geared stepper motor.</p><p>Circuits can be enclosed in the case at <a href="https://www.thingiverse.com/thing:5145523">https://www.thingiverse.com/thing:5145523</a></p><p>Q&A</p><p>Q1. Why "1" of tens of minute (10min.stl) are not centered?</p><p>A1. To reduce the width of hour rotor, leftmost "1" of "10", "11" and "12" are shifted right. When the current time is "12:12", it is better to shift the "1" of tens of minute to show same appearance for hour=12 and minute=12. If you do not like it, you can use "1.stl" for tens of minute.</p><p>Q2. Naming rules of flaps</p><p>A2. STLs with "h" letter in file names are for hours. "0", "2", "3", "4" and "5" are shared to 1st and 2nd digits of minutes. "1" is different, because of the reason written in A1.</p><p>Q3. Can I use 3D printer filament for the main axis?</p><p>A3. It is recommended to use steel wire (shaft) for the main axis. It would be difficult to pass through the curled filament to the long sequential holes.</p><p>Q4. The gears are very loose.</p><p>A4. Generally consumer 3D printer has less precision. If we use serious design of gears such as involute, it tends to be stuck. Therefore I use thin and loose gears.</p><p>Q5. It is difficult to adjust phases to make all flaps erecting at a same time.</p><p>A5. It is the most difficult and troublesome part of assembly of this clock. My design offers to adjust (tune) fine phase of each rotor. Hours rotor can be adjusted by the position alternatives of small gear (gear-3 and geneva-4). Hub-6.stl of has many holes to insert the ratchet-spring part to adjust the phase. Please enjoy it.</p><p>Q6. It is difficult to set rotors (hubs) after attaching flaps</p><p>A6. The design assumes the flexibility of main frame. Carefully bend the frame to widen the room to insert the hubs.</p><p>Q7. Posture of printing</p><p>A7. Place all parts flat plane facing down. Main frame (frame.stl) can be lay down as the back side is at the bottom. No supports are needed for all parts.</p><h3>Trouble shooting</h3><p>Actually, jam of 0 and 1 is difficult to solve. In this case, please use "anti-jam-flap.zip" which includes left shifted 1 to avoid this case.</p><h3>Design highlights</h3><p>Category: Gadgets</p>
With this file you will be able to print Erecting Flap Clock with your 3D printer. Click on the button and save the file on your computer to work, edit or customize your design. You can also find more 3D designs for printers on Erecting Flap Clock.