Espresso Tamper
thingiverse
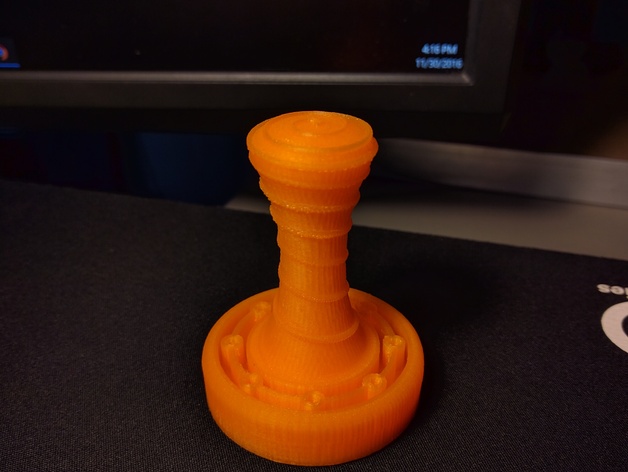
I needed a tamper for the espresso machine I acquired last year, and since I just got a 3D printer (the Maker Select from Monoprice) I decided to make my own! This is made to fit a 2" basket (where the espresso goes) and I made it slightly undersized just in case it printed larger than designed. I think the diameter is probably around 1.98". Print Settings Printer: Monoprice Maker Select Rafts: Yes Supports: Doesn't Matter Resolution: Normal Infill: 40% Notes: I let Cura add a default skirt, but I think a raft would have made it easier to remove. I also had to shave off some excess material around the edge, so a raft would almost certainly leave the bottom with a nicer finish. I actually added text to the bottom ("Dont Tamper" hehe) but I forgot that the depth had to be a multiple of the layer thickness, so it doesn't show up. Let me know if you'd like me to update the file and re-upload since I know everyone doesn't have access to Solidworks. Perks of being an engineering student! Note from the close-up of the helix that it's a bit dribbly, and that's after I cleaned it up a bit. I don't know for sure how to make that come out more nicely, but I imagine a lower print speed would help. I just extruded a circle along a variable-pitch/diameter helix I fudged around the surface of the part, so I know having less of the circle protrude from the surface would decrease the overhang but creating the helix and fitting it to the surface with points with pitches/diameters that looked nice was tricky. Not too shabby for my first try, though, I think. Note that I also made the wall thickness three times my print resolution, so 1.2 mm. That's up from the normal two times resolution at 0.8 mm. How I Designed This I started with the diameter of the espresso basket, slightly undersized to make the tamping base. After extruding that half an inch or so, I drew an axis perpendicular to the base and drew a spline curve from the top to the edge of a circle on the base. I played with the points on the curve until I liked the shape, then revolved it around the central axis. I then made a helical curve in a 3D sketch and swept a circular profile along it. The helix took the most time by far, and for the record it made it easier to dimension the points on the spline curve and make note of their locations relative to the top of the base, then input those dimension into the spreadsheet for the variable pitch/diameter curve, and then play around with them and interpolate new points in between, especially where the profile curves sharply.
With this file you will be able to print Espresso Tamper with your 3D printer. Click on the button and save the file on your computer to work, edit or customize your design. You can also find more 3D designs for printers on Espresso Tamper.