ew version at the suggestion of Thread Compass inspired by Boris Vallejo
prusaprinters
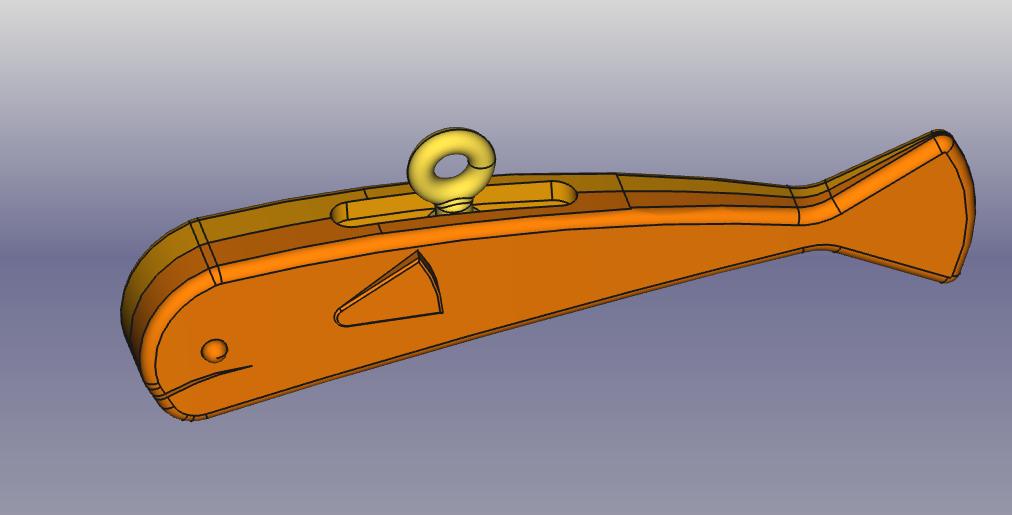
<p>Neu geändert auf Anregung Faden-Kompass inspiriert durch Boris Vallejo</p><p>Auf einem Bild von Boris Vallejo (1983) sieht man eine neben einem Pegasus ähnlichem Esel<i> (mit Flügeln)</i> kniende Frau, die so vermute ich so einen am Faden befestigten <i>“Eisenstein”</i> Kompass benutzt.</p><p>Gesehen hier:</p><p><a href="https://cp12.nevsepic.com.ua/62/1353959762-0440780-www.nevsepic.com.ua.jpg">https://cp12.nevsepic.com.ua/62/1353959762-0440780-www.nevsepic.com.ua.jpg</a></p><p>Diese Geänderte Version ist jetzt 2 teilig zum kleben, mit 1,9mm löchern die für 1,75mm Filament Stifte sind damit sich die Hälften beim Fügen/Kleben nicht verschieben.</p><p>Die Öse ist jetzt verschiebbar um den Schwerpunkt einzustellen.</p><p>Nicht vergessen die Öse beim Füge-Vorgang mit einzusetzen UND darauf achten das diese nicht mit Klebstoff benetzt wird.</p><p>Zur Vervollständigung benötigt man einen Neodym-Magneten Durchmesser 6mm und 3mm hoch.</p><p>Dieser wird in die unten liegende Öffnung eingesetzt.</p><p>Wenn man danach einen dünnen Faden <i>(am besten möglichst dünnes Nähgarn)</i> ca. 30cm lang an der Öse befestigt sollte der Kompass je nach Einsetz-Richtung des Magneten mit dem Kopf nach Norden b.z.w. Süden aus pendeln und somit die Richtung weisen.</p><p>Bei nicht-Gebrauch kann man das Teil als Kettenanhänger benutzen.</p><p>Viel Spaß :-)</p><p>----------------------------------------------------------------------------------------</p><p>Google translates:</p><p>Re-modified at the suggestion of Thread Compass inspired by Boris Vallejo</p><p>In a picture by Boris Vallejo (1983) a woman is shown kneeling next to a Pegasus-like donkey (with wings) who I suspect is using an 'ironstone' compass attached to a thread.</p><p>Seen here:</p><p>https://cp12.nevsepic.com.ua/62/1353959762-<br>0440780-www.nevsepic.com.ua.jpg</p><p>This modified version is now 2 parts for gluing, with 1.9mm holes for 1.75mm filament pins so that the halves do not move when joining/gluing.</p><p>The eyelet can now be moved to adjust the center of gravity.</p><p>Don't forget the eyelet when joining<br>Use the process AND make sure that it is not wetted with adhesive.</p><p>To complete you need a neodymium magnet diameter 6mm and 3mm high.</p><p>This is inserted into the opening below.</p><p>If you then take a thin thread (preferably thin sewing thread) approx.<br>30cm long attached to the eyelet, the compass should point north or north depending on the direction in which the magnet is inserted. Commuting from the south and thus pointing the way.</p><p>When not in use, you can use the part as a pendant.</p><p>Have fun :-)</p>
With this file you will be able to print ew version at the suggestion of Thread Compass inspired by Boris Vallejo with your 3D printer. Click on the button and save the file on your computer to work, edit or customize your design. You can also find more 3D designs for printers on ew version at the suggestion of Thread Compass inspired by Boris Vallejo.