EX-MAX Arcade Fight Stick
thingiverse
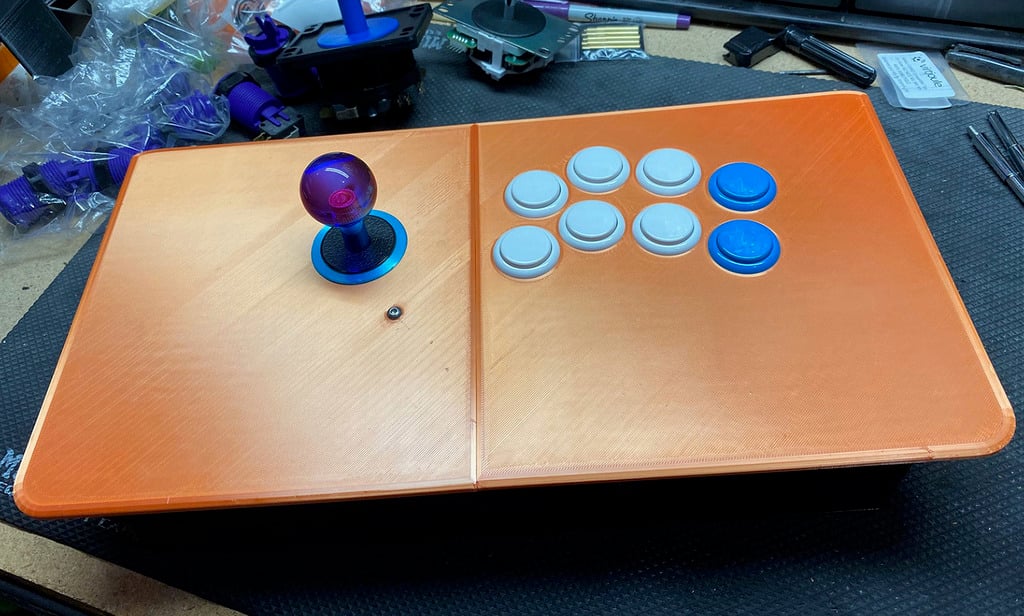
<body> <h1><strong>EX-MAX Arcade Fight Stick</strong></h1> <p>Here it is, the 8 button fully printable (almost) full sized arcade/fight stick case platform. Based on the same design as the EX6 just expanded with some design upgrades that I'v added after printing a few of these. Assembled top panel size of 16" Wide x 8.5" High, gives a full sized arcade feel with maximum space for your hands. The modular design of this stick allows you to choose & print a variety of top panel options so you try different button layouts and various sticks as well. Top panels for both Japanese & Korean sticks and multiple 8 button layouts are included, with more to come. Button layouts will fit any 30mm button of your choice, Sanwa, Seimitsu, Crown, etc. The bottom pieces come with various button hole layouts for start, select, home, turbo, L3, R3, TP and a mounting hole on the rear for a Neutrik NAUSB-W A/B USB Feed-Through adapter. Also included are joystick spacers so you can set the stick to your desired height. PCB mounts for Brooks ZeroPi, Xbox, Retro & UFB control boards plus a new pcb mounting for the Wireless Fighting Board that holds the battery pack for a clean install and a mount for the wireless antenna.</p> <p>Original Remixed from the Full Size Arcade Stick by jasondemeter (<a href="https://www.thingiverse.com/thing:3514821">thing:3514821</a>). </p> <p><strong>Hardware Need:</strong></p> <p>12 - M4x12 Screws (For Case)</p> <p>2 - M4x16 or M4x20 Screws (For Joystick Mounting) Size depends on spacer used.</p> <p>16 - M4 Nuts</p> <p>8- M3x12 Screws (For Neutrik USB [2] + PCB Mount [4]) or 4 M3x16 if using the Wireless PCB (12mm will still work its just a little tighter)</p> <p>8– M3 Nuts</p> <p>Neutrik NAUSB-W A/B USB Feed-Through</p> <p>Non-Slip Surface Grip Pads - for bottom of case. ( I used these off Amazon - <a href="https://www.amazon.com/gp/product/B000SL0KJC/ref=ppx_yo_dt_b_asin_title_o01_s00?ie=UTF8&psc=1" target="new">SoftTouch Self-Stick Non-Slip Surface Grip Pads</a>)</p> <h2>Top Panel Options:<BR> </h2> <p><strong>Top Left EX-MAX Japanese.stl</strong> – 40mmx85mm mount holes will fit Sanwa & Seimitsu sticks or any others that use the same mounting<BR> </p> <p><strong>Top Left EX-MAX Korean.stl</strong> – 50mmx73mm mount holes with full collar hole (35mm)<BR> </p> <p><strong>Top Right EX-MAX Vewlix.stl</strong> – Vewlix layout based on the dimensions from <a href="http://www.slagcoin.com/joystick/layout.html" target="new">slagcoin.com</a><BR> <p><strong>Top Right EX-MAX SegaP1.stl</strong> – Sega P1 style layout based on the dimensions from <a href="http://www.slagcoin.com/joystick/layout.html" target="new">slagcoin.com</a></p> <p><strong>Top Right EX-MAX SegaP2.stl</strong> – Sega P2 style layout based on the dimensions from <a href="http://www.slagcoin.com/joystick/layout.html" target="new">slagcoin.com</a></p> <h2><strong>Instructions</strong>:</h2> <h3><strong>You will need print:</strong></h3> <p>1 Top Right Panel</p> <p>1 Top Left Panel</p> <p>1 Bottom Right</p> <p>1 Bottom Left</p> <p>Joystick Spacer</p> <p>PCB Mount (Optional) </p> <h3><strong>Printing Tips:</strong></h3> <p>You will need atleast a 230x230 build plate. Ender 3 users will need to use the Ender3 Pro profile in Cura.</p> <p>If you are using bed clips BE CAREFULL watch your spacing.</p> <p>Turn off Build Plate Adhesion NO SKIRT otherwise the parts will appear to be to large to print on the Ender 3</p> <p>The bottom <span jsslot=""><span data-dobid="hdw">piece</span></span>s are a tight fit, you most likey will need to adjust the <strong>Horizontal Expansion</strong> setting in the slicer to get them to fit together. I'm printing them at -.15mm, but depending on your printers calibration this number will be different.</p> <p>Bottom <span jsslot=""><span data-dobid="hdw">piece</span></span>s can be printed with out support depending on how well your printer handles overhangs (larger holes may have a slight droop). Tops need no support. </p> <p>Tops should be set flat on the build plate and <strong>dropped</strong> -0.5mm into the build plate to remove the overhang on the bottom couple layers.</p> <p>The PCB mounts need supports (from build plate only), the holes are undersized so the screws can just screw in and hold.</p> <p>The joystick spacers can be resized on the z axis in your slicer so you can make them any height you want. Iv found 3mm to be perfect for Sanwa JLFs and the 5mm to be good for the Korean sticks. Seimitsu sticks can vary in shaft length so you may need some testing to see what you like. I don't use any spacers with the LS-40 or LS32 due to the shorter shaft height.</p> <h3><strong>Assembly:</strong></h3> <p>Snap the bottom <span jsslot=""><span data-dobid="hdw">piece</span></span> together and get them to fit as flat as possible to each other. Since the fit is tight sometimes a few whacks with a rubber mallet is need to get them level to each other. (Dont get crazy with it) Screw the two sides together (M4 x 12) through the mounts at the top centers of the bottom pieces. The bottom pieces should be glued together for maximum stability after being screwed together. Running some medium or thin CA glue over the seam has worked well for me (do it from the inside of the case to keep the bottom looking good)</p> <p>Glue the nuts into the top panels with some CA glue. The nuts will pop into the holes on the top panels but are not tight enough on their own. Be sure that the nuts are sitting flat in the holes so you don't get any mis threading when screwing the bolts in. Don't get any CA in the treads, just a drop of thin CA on the edge of the nuts will be fine. If you find the screws hard to screw in don't force it, instead drill out the holes of the bottom piece slightly to give the screws a little wiggle room. </p> <p>The Tops are now screwed together via one bolt on each side of the center supports to add extra strenth and to assure that the tops have a smooth surface to one another. I recommend doing this on a flat surface; countertop works great, before installing any buttons or joystick.</p> <p>My reccomendation for wiring when using a Brook board is to use the 20-Pin connector but cut the Start / Select / Home bundle off of the wiring harness and wire these buttons to the screw terminals. This will allow the top panel to be simply removed by disconnecing the 20-pin cable, while leaving the Start / Select / Home buttons connected to the pcb. </p> <p>10 M4 x 12 screws will secure the tops in place (Screws have been added to the sides for added stablity)<BR> </p> <p>If you are using a joystick spacer the best way to install it is to screw the mounting screws to the top panel, then add the spacer, then screw the joystick on with 2 more nuts. The holes in the spacers are sized to fit over the nuts. This makes installing the joystick easier and lets you do it with just a wrench, the first set of nuts will hold the bolts in place and keep them from spinning when you are installing the joystick. </p> <p>If using the PCB Mount use 4 – M3 x 12 screws. Screw them into the bottom of the PCB Mount, add the board and then use M3 nuts to secure it. The boards only needs 3 screws, the one by the USB plug is almost impossible to get on so just leave it off. In the files there is the Brooks PCB Nut Tool.stl which is a small wrench for the M3 nuts to make screwing them on much easier.</p> <p>If using the Brook Wireless board the screw installation is the same as the normal pcb mount but use M3x16 screws instead (12mm will still work its just a tighter fit for the nuts). Place the PS3 battery into the space on the mount with the wires coming out of the side. Then add the "Top" piece to keep the battery from moving around. Lastly add the PCB and screw it down</p> <p>The PCB Mount holes are undersized so the screws can just screw in to the mount itself, the nuts are only needed to hold the board in place. You can mount it to the case with strong double sided tape, I used servo tape.<BR> </p> <p>The last 2 M3x12 screws can be used for the Neutrik NAUSB-W A/B USB Feed-Through if it didn't come with any.</p> <p>If you want to trick out your Neutrik USB Feed-Through here are some links to the <a href="https://www.thingiverse.com/thing:3894623">Grommet Boot</a> and the <a href="https://www.thingiverse.com/thing:2993190">Center Insert</a></p> </body>
With this file you will be able to print EX-MAX Arcade Fight Stick with your 3D printer. Click on the button and save the file on your computer to work, edit or customize your design. You can also find more 3D designs for printers on EX-MAX Arcade Fight Stick.