Experimental Prusa X-carriage with auto tightening belt
thingiverse
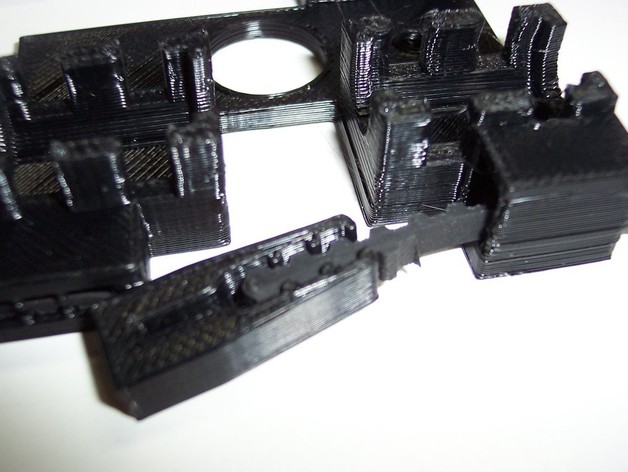
I take my extruder on and off my Prusa to change out the hot ends often. I love Greg’s X carriage, but I find it takes some fiddling to retighten the belts. After seeing this, neat thing http://www.thingiverse.com/thing:16730 I wanted to try to build that concept into the X carriage, and while I was at it, try to reduce the hardware parts count. I tried to utilize the concept of a Drop Clamp which self tightens as strain is put on the wire. My thing is fixed on one side of the x carriage, and the other side uses the self tightening idea. As an afterthought I added one screw, and bolt hole (M4 or 6-32) to use if required to add a bit more tension if your belt still has some slop. The LM8UU bearing holder was copied from this thing, and then modified to suit my needs.http://www.thingiverse.com/thing:15219 This was more an experiment to try the idea, as opposed to a finished product. I wanted to share with the community in the hopes that maybe it might inspire someone to build on the concept and reduce the hardware count. Instructions Print. I used 25% infill and 3 shells at 0.5mm There should be a single strand raft that was printed in between the teeth of one jaw. Remove with a knife, or pliers, or some other tool. Clean up as per your usual routine with sandpaper, knife, emery board file. Bend one side of the timing belt smooth side in thus exposing the teeth. Insert the bent belt into the jaws fixed to the x carriage Feed the other end of the belt through the box on the carriage and bend the belt again, smooth side in. Insert the bent belt into floating jaw In theory you should stretch the belt “too tight†to clamp and set, and then when you insert the floating jaw into the box, it should settle at just the right tension. IF this system works, then you could have a belt holding system that does not use any metal hardware, and remove 4 M3 nuts, bolts and washer from the BOM. Reality and my 3D CAD’s are 2 vastly different things, so I quickly added the one screw/bolt tensioning system. If you so desire, add a M4, or 6-32 nut/bolt into the Jaw box holder, and tension the jaw with the screw. I have included the Google Sketch up file for others to modify and play with.
With this file you will be able to print Experimental Prusa X-carriage with auto tightening belt with your 3D printer. Click on the button and save the file on your computer to work, edit or customize your design. You can also find more 3D designs for printers on Experimental Prusa X-carriage with auto tightening belt.