exposure frame for pcb 60mmx100mm
thingiverse
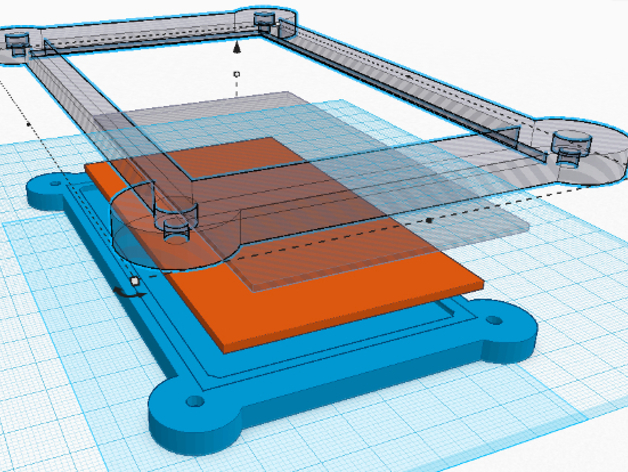
Update: followed by modular box system:http://www.thingiverse.com/thing:506288 my latest creation- an exposure frame for pcb 60x100mm It will give you a techno looking robust picture frame as well. The latest and the greatest thing in a series of frames I designed the last days. I'v started with these things: modded the thing:498613 made http://www.thingiverse.com/thing:501257 made http://www.thingiverse.com/thing:502919 made http://www.thingiverse.com/thing:501886 The bottom part holds one pcb 60x100x1.75mm and a sheet of transparent paper or acrylic film with the layout you have printed out. The top part holds a thin glass plate. The design allows for easy milling the parts from 8-10mm thick metal sheet or hard plastics blocks. The files: newest fixed and streamlined top part: http://www.thingiverse.com/thing:505896 new bottom part with cave where springily soft material goes in bottom part (pcb-holder) top part (glas-holder) Sketch drawn with very tight tolerances. It was a long way from modding other poeples stuff to this stage: design your own thing and make some progress one step after the other. Learn from failure, improve functionality, design, finish. Go through the iterations. Eventually make the final design. Head over to the next thing. Create, make, share things. I'm so excited. huh! Instructions Sketches are drawn with very tight tolerances. Update: the top parts window has an offset of 1mm, this will be fixed soon :DONE Things you should know: glass : 65mm x 110mm x 2mm (more thickness is ok, only limited by the screws length) glass for top frame version2: 66mm x 105mm x 2mm pcb: 60 x 100 mm your sketch: 65 x 110mm Don't exxeed these sizes. . Print first, measure the real dimension twice, cut once. Be accurat with the pcb and the sheet as much as possible. However have the glass cut to size smaler by 0.2mm should be ok. . I have printed using PLA (orange from Kiboplast, I recommend this heartly , very good stuff) The bag holding the pcb is in average 60.02mm wide. The calculated size is 60.0mm. I'm very pleased with this result. To compensate plastics shrinking (ABS) add some percentages in your slicer programm settings in (2-5 percent as usual). Attention please: look at the things size not the feed amount! if any increase the x-y-axis dimensions only . How to use this thing: Look at the vey first picture in the galery, please! Better look at my video on Youtube : assembling the frame http://shortlinks.de/5iam If it won't work got to Youtube, find user "Maki Box" , select video"pcb exposer frame" . put your things together in this order: into the bottom frame -the soft matte (?) or slice of a sponge -the pcb clad -the fotofilm . put the glas into the top frame . This may be the tricky part. You have find out how to assemble the pieces together without falling off. Take some adhesive? Fasten the glas temporarily with the top frame using some drops of superfast glue (cyanacrylat based). . like with a usual box with lid , the topframe goes onto the bottomframe fasten the screws and do the exposure screw the parts together with screws 3mm. The poor imperial things user will have to do some math;-). . But I can help you out: 3mm equals 0.012 inch. . If you have trouble aligning or stacking the things together: print your pcb pattern with index marker and circles on a sheet / flim sized the same or bigger than the frames dimension cut out or stamp out small holes 3mm wide centered with the passmarks use the screwholes for alignment hole (centre) distances: 70mm x 115mm . If there is some interist I could make some modifications: a top part without sunken holes (more rigid) bottom part without the badge for the pattern sheet / -foil. -wider bottom part with slide-in rails for easy insert of your pcb- pattern you have sealed in selfmade bags , I'm not sure about this- it may bow the film's edge areas when pushed by the glass plate toward the pcb . Let me know.
With this file you will be able to print exposure frame for pcb 60mmx100mm with your 3D printer. Click on the button and save the file on your computer to work, edit or customize your design. You can also find more 3D designs for printers on exposure frame for pcb 60mmx100mm.