ExpressLRS 2.4Ghz Press Fit Design
thingiverse
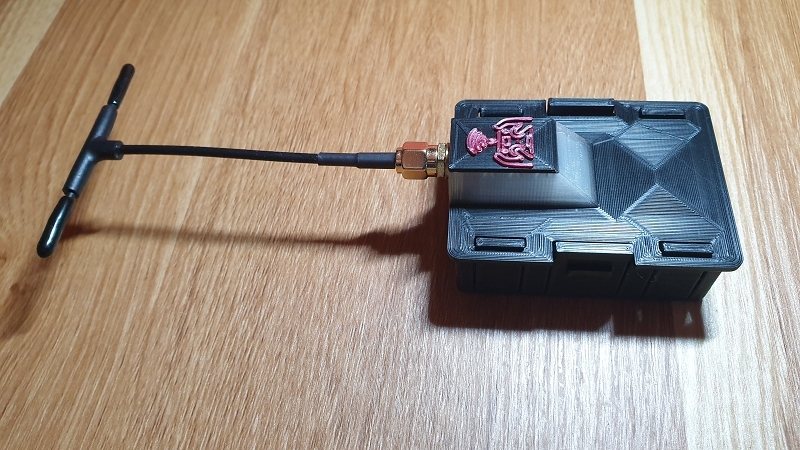
I originally downloaded a version of this case from Thangs "JR Module Bay ExpressLRS HM - 900MHz No Screws No Supports" and decided to make a 2.4ghz version for the Happy Model sold on AliExpress. If you're interested in the 900Mhz version head on over to https://thangs.com/Solidware/JR-Module-Bay-ExpressLRS-HM--900MHz-No-Screws-No-Supports-16442 I liked the idea of a screw-free version so with about 10 or so prototypes I've come up with this design. I feel after looking at others around on Thingy and Thangs I felt they weren't really what I was looking for so I wanted it to be as simple as possible. It may not be for everyone but I was encouraged just recently to upload my version so here it is. Enjoy. This was all achieved using PLA, yes it would be better in other materials but I designed it around the strength of PLA, and as a test, I've opened this up using the clips around 20 or so times and it still hasn't broken on me. Printing: No special settings, but here are mine listed below using Cura and a Creality CR-10S Pro. Layer Height - 0.15 Wall Thickness - 1.2mm Wall Line Count - 3 Horizontal Expansion - 0.0 mm Initial Layer Horizontal Expansion - (-0.25) "Elephants Foot" Top/Bottom Thickness - 0.8mm Top Layers - 6 Bottom Layers - 6 Top\Bottom Pattern - Zig Zag (for the Box) - Concentric (for the Lid) Bottom Pattern Initial Layer - Zig Zag (for the Box) - Concentric (for the Lid) InFill Density - 100% (for the Box) - 20% (for the Lid) InFill Pattern - Grid Printing Temperature - 210 degrees celsius Build Plate Temperature - 60 degrees celsius Print Speed - 50 mm/s Enabled Retraction - True Retraction Speed - 45 mm/s Combing Mode - All Z Hop When Retracted - True Enable Print Cooling - True Fan Speed - 100% Also just note for the Lid, you will need to use support set at: Support Structure - Normal Support Placement - Touching Buildplate Support Overhang Angle - 79 Degrees Support Pattern - Zig Zag Support Density - 20% Support Infill Layer Thickness - 0.15 Instructions: Once printed it you simply snap the board in the four clips that hold on the lid and also creates enough pressure to also hold in the board and given we have layer lines in the print, it also contributes to holding the board in place. The only modification to the board and the case is where the 4 posts highlighted in green in the picture that snaps into the board. You will simply need to use a small bladed knife to bevel the edges on the bottom side of the PCB board where the posts meet up with the board and the posts themselves to help give them a chance to snap in place a bit better. But really give them a good scraping because if it doesn't fit it's a pain to get out and you could snap the clips in doing so. Highlighted in red you may notice I've also chopped off a bit of the plastic of the connector, you can ignore this as it was part of my prototyping process in coming up with a clip system.
With this file you will be able to print ExpressLRS 2.4Ghz Press Fit Design with your 3D printer. Click on the button and save the file on your computer to work, edit or customize your design. You can also find more 3D designs for printers on ExpressLRS 2.4Ghz Press Fit Design.