Eyeball Bowler
thingiverse
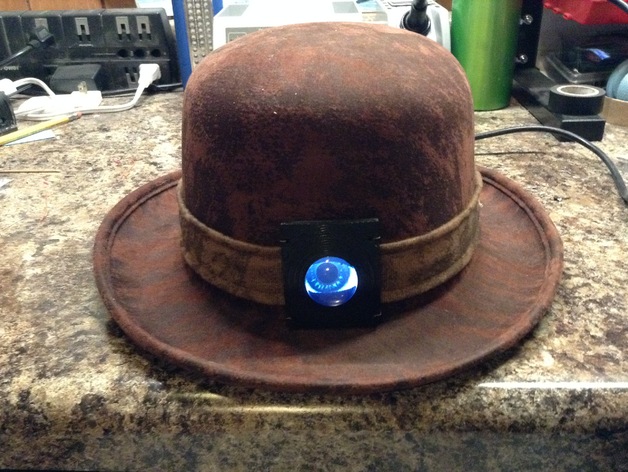
Adafruit 1.44" TFT LCD Display cover and lens holder for Eyeball Bowler Tutorial found here: https://learn.adafruit.com/animated-electronic-eyes-using-teensy-3-1/bowler-hat My video can be found here: https://www.youtube.com/watch?v=CsEU-dP8dx8 I used a Teensey 3.2, an Adafruit 1.44" Color TFT LCD Display and other components listed in the tutorial. I found 1" circle lens in the jewelry section at the hobby shop. They are a little smaller, and not half round like in the tutorial, but I think it looks good. I didn't cut a hole in the band, and I didn't hide the components behind the band. This cover holds the TFT display and lens so they both mount on top of the hat band. I put a slit in the hat under the cover and behind the hat band. The ribbon cable is passed through the slot. The Teensy, and battery are velcroed to the inside top of the hat. There is plenty of room inside. Print Settings Rafts: No Supports: No Resolution: .2 mm Infill: 20% Notes: This is printed flat side down with no supports (backside down). I designed in two thin solid layers so the printer can bridge the gaps without supports. You will need to cut out this layer under the center lens hole, and drill the layer inside the four mounting holes. This method uses less material than supports and is easier to remove. I have included the 123D file so it can be modified to fit your components. Post-Printing As noted above, the thin layer in the lens hole needs to be cut out and removed. The four mounting holes have a thin block and will need to be drilled out.
With this file you will be able to print Eyeball Bowler with your 3D printer. Click on the button and save the file on your computer to work, edit or customize your design. You can also find more 3D designs for printers on Eyeball Bowler.