EZ Print Christmas Tree
thingiverse
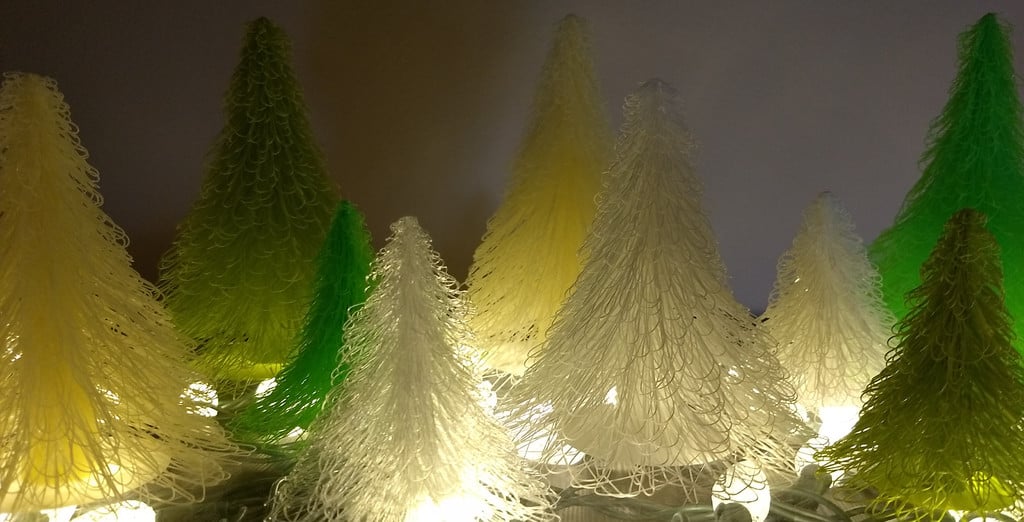
UPDATE! It seems that many users are not familiar with using multiple processes in their slicer. So, I have uploaded an EXAMPLE Simplify3d factory file and settings files for the 2 parts that need to be printed together, but as separate processes. The profiles are Simplify3d's default Ender 3 profiles with the simple modifications required to the print the trees as already described in the directions below. I have been hesitant to include these because there are more settings specific to your printer/filament that you'll need to modify than there are necessary to printing the trees. So PLEASE be aware that these are not magic files that will allow you to print these trees properly according to your unique setup. Use them only as a reference if you're unfamiliar with how to tune slicer settings. As far as the troubles people have had with other slicers, such as Cura, unfortunately I can't help you there, since I use Simplify3d. I have, however, included the .gcode file for the 160mm tree as a reference for those not using Simplify3d. ************************************************* READ DIRECTIONS BEFORE PRINTING! ************************************************* EZ Print Christmas Trees are easy and fun to print if you follow these simple guidelines. They utilize the "droop loop" method to create the branches, and have been hand crafted to ensure a lush tree that won't leave you frustrated with failed attempts. 3 tree sizes are available: 80mm, 120mm, and 160mm. A single tree consists of 2 models that get printed together: the Main part (branches) and an Inner part (cone) that acts as the center support. You need to print the Main and Inner parts as separate processes, since they require different print settings. GENERAL SETTINGS ================= 0.4mm Layer Width 0.3mm Layer Height The above layer dimensions are important! The branches were made to those exact sizes and rely on them to slice properly and adhere to the inner cone. As such, I do not recommend scaling the models. ***You may need to enable "single wall extrusions" in your slicer for the branches to print. 60mm Print Speed with Speed Overrides Enabled, i.e. Simplify3d's default is "adjust speed for layers below 15/sec and speed reductions down to 20%". I can't say that the trees won't print with other speed settings, but I've had success with all tree sizes with these same settings. No bottom or top layers needed for either Main or Inner part. Recommend 32, 48, and 64 line brims respectively for each sized tree. These are necessary to ensure the hollow, thin-walled cone of the tree stays adhered to the bed. It also makes a nice base for the tree if you don't remove it. However, the tree will easily still stand should you choose to remove the brim. Main Part (Branches) ======== NO RETRACTION! This is necessary to ensure the branches adhere to the Main part's center cone and so that the "droop loop" method functions. NO PART COOLING! The "droop loop" method will not work if you cool the filament. You want the filament to lay down naturally on top of the previous layer. *** The exception to this is that you can turn on part cooling while it's printing the base where no branches are attached. Turn the part cooling off on the layer before the first branches are printed. While not absolutely necessary, I do recommend doing this. ONE WALL While the center cone that the branches connect to is solid and would allow you to print multiple walls and infill, only print ONE WALL and NO INFILL. The cone is solid because the slicer interprets the movements differently than when it's a hollow model, so unfortunately I can't provide an easier model that would only allow one wall to be printed. Inner Part (Cone) ======== The inner cone helps stabilize the tree while printing, since the outer main part should not be printed with part cooling and retraction. It also provides some integrity to the final product. Print this as you normally would, i.e. part cooling and retraction turned on. The inner cone can be printed with as many walls and infill as you'd like, but I recommend printing 2 walls and no infill. NOTES ====== I've successfully printed all 3 tree sizes with 5 different brands of PLA. I'm not sure how non-part-cooled filaments will print. Though I'm confident they'd still print, as is the point of the Inner part. The shape of the tree will vary depending on the filament used and how hot you print. Generally I recommend you print on the hotter end that your printer/filament can successfully do. If you're unsure print one of my Fast Informative Temperature Towers first https://www.thingiverse.com/thing:3127899 As you can see in the sample pictures they all turned out with their own uniqueness: some fluffy, some natural, and some slender like a "Whoville tree", so be sure to experiment!
With this file you will be able to print EZ Print Christmas Tree with your 3D printer. Click on the button and save the file on your computer to work, edit or customize your design. You can also find more 3D designs for printers on EZ Print Christmas Tree.