EZStruder Mount for BI V2.5
thingiverse
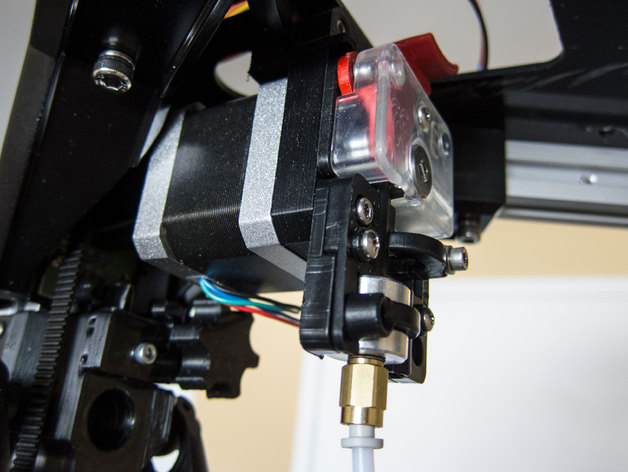
A simple mount (or bracket) to install the EZStruder on the Boots Industries BI V2.5. You can also install an optional fan shroud if your stepper get hot. The new extruder cold end remain at the same location as the original. Instructions BOM (for 1 EZStruder and fan) 5 x M3x20mm socket screw 1 x M3x30mm socket screw (use 3 flat washer or cut the screw) 5 x M3x16mm socket screw (or 15mm or even 20mm) 4 x M3 nut 1 x 40mm 12V fan PRINTING Print in ABS (motor gets hot), 0.2mm layer height or more, 20% infill or more. There is 2 version for the mount, one with ears to attach a fan shroud. There is also 2 version of the fan shroud, one is specifically designed for use with my belt conversion: http://www.thingiverse.com/thing:607516 ASSEMBLING Remove the clear plastic cover from the main body. Attach the EZStruder and the groove mount to the stepper motor with new cap screws (or other screw that fit). Use 2 M3x20 for the drive base plate, and 1 M3x20mm + 1 M3x30mm for groove mount. When the EZStruder and the groove mount are properly seated, you can proceed to insert the drive gear. It should go almost flush to the end shaft, only 0.5mm lower. You can easily check the alignment of the gear looking trought the entry side. Don't forget to reinstall the clear plastic cover. Insert the Nyloc nuts into the nut holder, clip it to the bracket and use 2 x M3x20 socket screw to fasten the mount at the original location. Attach the fan and its shroud with the remaining socket screws and nuts. WIRING You need to feed the 12V fan some way. The simplest way for me was to use the same wiring as the BI V2.5 Pico conversion, introducing a new Y cable at the top. You can also use one of the spare cable (gray/black or gray/white) on tower 3 to bring 12V at the top from the RUMBA board (EXP3 pin 1&3). FIRMWARE UPDATE Since the new motor gear is now located on the other side of the filament, you need to reverse the direction of the motor for the proper operation of the extruder. First extruder is EXT0 or E0, second EXT1, etc. Repetier firmware (from BI):Configuration.h #define EXT0_INVERSE 1 Repetier firmware (latest version):Configuration.h #define EXT0_INVERSE true Marlin firmware:Configuration.h #define INVERT_E0_DIR true CALIBRATION Recalibrate the extruder steps/mm, theorical value is 92.6 (16 microsteps ), 185.2 (32 microsteps - BI V2.5). Use these as a starting point. The formula is: NEMA 17 (16 microsteps) : 200 x 16 = 3200 steps / (11mm gear diameter x Pi) = 92,599 steps/mm NEMA 17 (32 microsteps) : 200 x 32 = 6400 steps / (11mm gear diameter x Pi) = 185.198 steps/mm I'm using 186. Repetier firmware:Configuration.h #define EXT0_STEPS_PER_MM 186 Marlin firmware:Configuration.h #define DEFAULT_AXIS_STEPS_PER_UNIT {72.9, 72.9, 72.9, 186} Enjoy your new EZStruder!
With this file you will be able to print EZStruder Mount for BI V2.5 with your 3D printer. Click on the button and save the file on your computer to work, edit or customize your design. You can also find more 3D designs for printers on EZStruder Mount for BI V2.5.