F117 Nighthawk
thingiverse
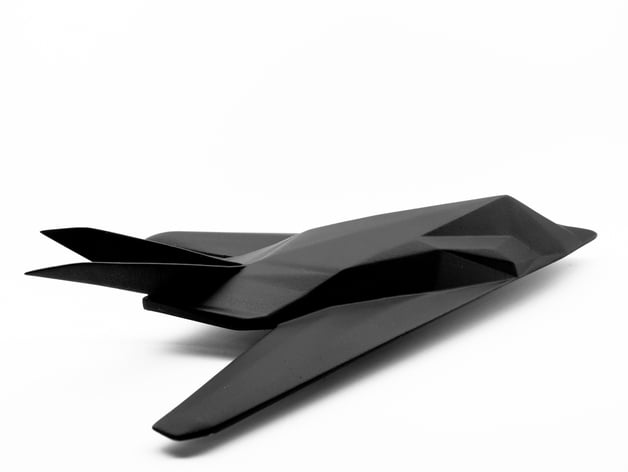
https://en.wikipedia.org/wiki/Lockheed_F-117_Nighthawk (Read if you care) I have always had an affinity for aircraft. Coming from a line of United States Air Force pilots it may very well be a predisposition. I decided to start modeling a specific family of USAF aircraft, the Skunkworks brainchildren. This class of aircraft defined our forward momentum and powerful poise during all of modern history's air warfare. Not only did this division fly faster, longer, more powerfully, and more stealthy than any other across on the planet. They implemented some of the most ground breaking technologies of the past 80 years of flight. A fringe society to say the least but I envy the strategy. To push development at a rapid pace; groups must accept risk for the rewards, push boundaries, iterate, and adapt. Their designs are inspiring and feats of engineering. To gain a small new perspective on such objects drives personal development evermore. I hope everyone enjoys these models I will release them as I complete each one. Print Settings Printer: Prusa i3 mk2 Rafts: No Supports: No Resolution: User discretion below .25mm Infill: 15-30%Rectilinear (Depending upon scale) Notes: 1.75mm PLA/ 5mm Brim for one layer/ 50c Bed/ 212c Extruder 1st layer - 210c remaining layers/ No Fan Room 73F 10-20% RH Post-Printing Merge Two Halves and prep surface Begin by using a flat mini file on all overhanging extruded material Slightly over file brim edge to allow proper alignment. Merge two halves with (5min) 2 part epoxy. The 5 mins is the setting time, it should give you enough time to mend the pieces as close to perfect as the base layers will allow. This is only dependent on how well your print adhered to your print bed. After drying time on epoxy (30min) clean seam out and fill in seam with epoxy on the end of a toothpick wait ~3;30-4 mins and wipe excess off with a lint free towel being careful not to drag the towel parallel to the seam ; only perpendicular to the seam. Wet or dry sand entire body with 320 grit sandpaper following planar surfaces. Do not sand edges or else the hard lines that are specific to this aircraft will dull and not disperse light around surface accurately. From here it is user discretion. As one model of a fleet of low-poly Skunkworks craft that I am building I am applying a matte final coat to the models in the major color specific to the original. In this case; the final product will be matte Black. 1st Round of Primer 1st Round of Wet Sanding and Glazing Putty Wet Sanded the Putty down 2nd Primer Coat and Wet Sanded after Putty 3rd Primer Coat Wet Coat of Primer I will do one more top coat for good measure, but I will call this complete as far as this post is concerned. How I Designed This tOP vIEW oF tHE dESIGN tABLE tOP vIEW oF tHE dESIGN tABLE iN aN eDGE vIEW fRONT vIEW oF tHE dESIGN tABLE fRONT vIEW oF tHE dESIGN tABLE iN aN eDGE vIEW sIDE vIEW oF tHE dESIGN tABLE sIDE vIEW oF tHE dESIGN tABLE iN aN eDGE vIEW Reference Images Galor Lots of reference goes a long way. Models or toys always offer some form of insight into the actual shape of such an object. Sheer concentration and determination eventually gets you to where you want to be with a shape.
With this file you will be able to print F117 Nighthawk with your 3D printer. Click on the button and save the file on your computer to work, edit or customize your design. You can also find more 3D designs for printers on F117 Nighthawk.