Fanatec CSL Pedal Kit (w/load cell) Brake & Accelerator Mods
thingiverse
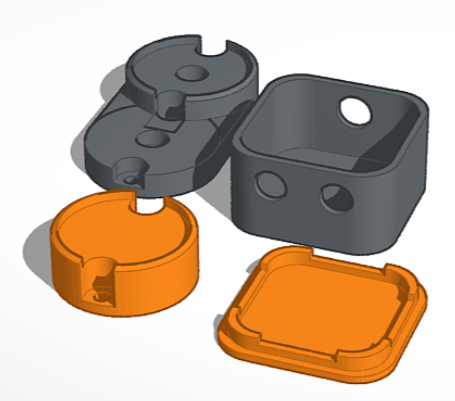
<b>Fanatec CSL Pedal Kit (w/load cell) Brake & Accelerator Mods </b> Hi everybody! This is my second project shared to Thingiverse. Feedback is welcome - I hope this comes in handy for someone who was looking for what I was. This design was inspired by a Sim Racing Corner video I watched a couple of weeks ago: https://www.youtube.com/watch?v=ANdLjTH-e8k I loved the idea of what Jeremy had accomplished, and decided I would attempt to walk where he had crawled. Functionally this is identical but I designed this with aesthetics and simplicity in mind. I wanted everything to be easily and properly installed, but easy to remove with no marks or damage to the pedal if and when required. <b>Brake Pedal Spring:</b> 1x Compression Spring - 20x10x25mm BLUE https://www.aliexpress.com/item/4000277618107.html I also ordered the red & yellow ones - I found the red one too stiff. I THOUGHT the yellow one was perfect but found it way too soft after a couple of uses, so tried the blue one and it's been perfect for me for a couple of weeks now. No special mods here - remove 2 of the elastomers & 1 of the spacers, fit the spring, then have 3 goes at getting it back in without it all going everywhere :) <b>Bass Shakers:</b> 2x 50mm 4ohm 25W Shakers BLACK https://www.aliexpress.com/item/1005003924678285.html The wire on these spacers wasn't very good, so I removed it and soldered some thicker gauge speaker wire on - there was just enough room that it doesn't affect the speaker movement in any way. Much stronger than the original wire. <b>Shaker Spacers:</b> The spacer was designed to be removable and to use the original screws. The mini variant included only has 2 holes, and can be used in the top most position. Both spacers are narrow enough to be used in either the load cell OR the standard CSL pedal as they differ in width ever so slightly. I ended up using 2 of the full-size ones so there was room to screw in the clip that holes the split conduit. In the photos I am using holes 2 & 4 for the pedal height. <b>Banana Box:</b> Mocked up a quick banana box to contain 2x banana sockets. I used these sockets: https://www.amazon.com.au/gp/product/B07D52R7TL/ To be honest they are fairly poor quality and in hindsight I should have used better quality ones. May replace them but they work fine. I ran the speaker wire from the shaker to the banana box through 10mm split tube. The banana sockets are 9mm holes, the split tube hole is 10mm. The tube is held in with a cable tie. The tube sits neatly behind the bar for the accelerator pedal, and out of the way from the load cell parts. There is next to no actual movement of the tube or wire during use so it should be very durable. The banana boxes are held in by a command strip cut in half - this makes it easy to get out of the way when you adjust the large mounting bolt underneath, then just clicks back into place. Doesn't move so doesn't need anything more than that. The lid will click into place fairly easily and doesn't move. <b>Other Notes:</b> I printed these on a Super Racer @ 100% infill, 100m/s 210/60deg. I wanted them solid to transfer as much of the vibration as possible through to the pedal. Probably doesn't need to be that solid but they still took less than 1 hour for the large spacer. I used Tinkercad for all of this - I am just starting to learn with Onshape thanks to TeachingTech's new series but Tinkercad is still a lot quicker for me with these simple shape kind of designs. I am looking forward to being able to create more detailed models :)
With this file you will be able to print Fanatec CSL Pedal Kit (w/load cell) Brake & Accelerator Mods with your 3D printer. Click on the button and save the file on your computer to work, edit or customize your design. You can also find more 3D designs for printers on Fanatec CSL Pedal Kit (w/load cell) Brake & Accelerator Mods.