Fastest RC Car on Thingiverse
thingiverse
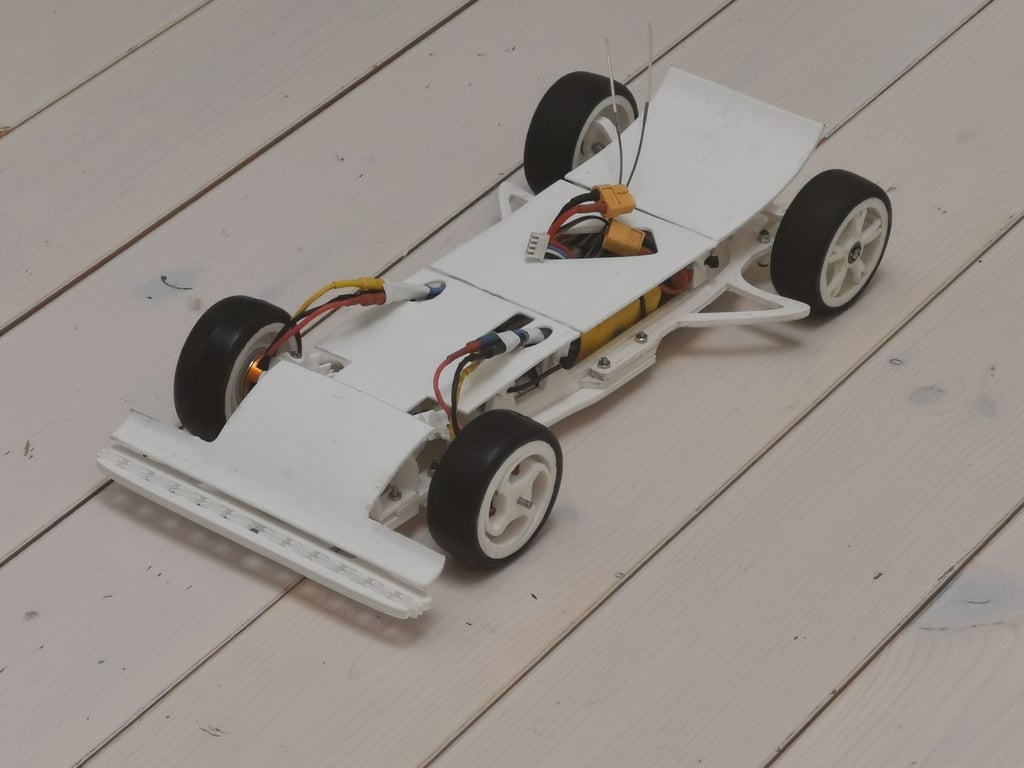
<h1>Pretty soldering!</h1> I would highly recommend you buy [This Kit](https://www.banggood.com/custlink/mvvKYP1OQD). I use it every time I solder and also in this project. **If you are interested in purchasing a fully assembled piece of this model it is possible to deliver it to you. To contact me, navigate to my Thingiverse page by pressing the icon (O.M.) and clicking "message me". You can also leave a comment. ** <hr></hr> ### Don't believe the title?### Build one of these and race it against the car you think is the fastest. You might be surprised at what this car can do. I once exploded a wheel by giving it too much throttle on a high-speed run. I built this car during summer and it was great fun. Designed to be easy and cheap to build with a total price of around *40-50 dollars*. With a low-cost remote control probably 30 dollars more. All the mechanical parts (suspension, steering, drivetrain, and brakes) are finished but the car body is a work in progress. There is, however, a spoiler and wing you can mount temporarily. Furthermore, it has a customizable grid in the bottom of the center chassis where you can use zip ties to mount anything that fits. I mounted a speedometer on the front as you can see in the pictures. **Short description of characteristics** The car is fun to drive; more fun than the store-bought RC cars I have driven. The reason is that only the length of the road and your courage limits your speed, not the motors :) Handling is great at low speeds and the tires grip very well. At higher speed the car tends to behave like an arrow and stabilize itself (due to design geometry) which increases confidence. Moving on, the suspension of the model car is very stiff so it is not suitable for off-road usage. To keep the car affordable I designed a 3D printed friction based dampening system instead of using oil dampening. All in all, the car works fine on asphalt and you can even do some off-roading if you drive slowly. You should really avoid jumping though. The car is designed like a sports car, not a rally car. It has high performance on flat tarmac but not so much on bumpy surfaces like grass or gravel. If you want me to design oil dampening you could leave a comment and I will do it if I have time. The same goes for designing a car body. **Acceleration** The max power is around 300 Watts (100-150) and weight is around 600 grams. This makes the power to weight in bhp/kg around 0.6, comparable to a *Bugatti Veyron*. It is fairly fast for an RC car. Also, it is very high geared with makes it good for high speed instead of torque. **Speed** The highest recorded speed is around *40 mph (60 kph)* but I was limited by line of sight. If you install FPV you could probably go much faster. The motors can theoretically take the car up to *180 kph (110mph)*, but air/wheel resistance would probably make for a practical max speed of around *62mph (100kph)*. **Handling** The handling is very good and also customizable. Since the two motors are fixed individually to the front wheels, this enables for a very interesting feature. That is *torque vectoring*. By giving more power to the outside wheel in a turn, it can increase the turning force giving you more steering response! Also if you want less steering response and reduce oversteer you can give more power to the inside wheel. All of these settings are easy to do if you have a programmable RC remote. I used a programmable RC plane controller for mine and used the function "program mix" to adjust the amount and direction of torque vectoring. I also tried replacing the rear wheels with a skid to make a sled-like drift car (I have a video if you want). **Breaking** The motors act like brakes too and are mounted in the front wheels. Braking hard makes the car stabilize like an arrow, which is useful when racing or slowing down from high speed. <br></br> <h1>Required Parts</h1> Parts and Materials * Motors (2 of them): https://www.banggood.com/custlink/DKvvNCVIsy * ESC (2 of them): https://www.banggood.com/custlink/mG3mQCP8sv * Power Distribution Board: https://www.banggood.com/custlink/GDDYEnQFnv * Power cable: https://www.banggood.com/custlink/v3vYEbbVkE * Servo Splitter (to power both motors with one servo port): https://www.banggood.com/custlink/DvmdYsnR3P * Steering Servo: https://www.banggood.com/custlink/GD3GNpVS2j * Battery: https://www.banggood.com/custlink/3GDKArPIsp * Battery connector: https://www.banggood.com/custlink/mK3dYQNtbw * Battery strap: https://www.banggood.com/custlink/D3vDNJtinO * Low voltage alarm: https://www.banggood.com/custlink/KKDmnctib4 * M3 botls: https://www.banggood.com/custlink/mvvKnJFSeL * M3 Self-lock nuts: https://www.banggood.com/custlink/DKKGnJt867 * Ball bearings: http://rover.ebay.com/rover/1/711-53200-19255-0/1?ff3=4&pub=5575518411&toolid=10001&campid=5338561590&customid=&mpre=https%3A%2F%2Fwww.ebay.com%2Fitm%2F10pcs-626ZZ-608ZZ-623ZZ-625ZZ-Deep-Groove-Flanged-Ball-Bearing-For-3D-Printer%2F143015560559%3FssPageName%3DSTRK%253AMEBIDX%253AIT%26_trksid%3Dp2057872.m2749.l2649 * Wheels (slicks): http://rover.ebay.com/rover/1/711-53200-19255-0/1?ff3=4&pub=5575518411&toolid=10001&campid=5338561590&customid=&mpre=https%3A%2F%2Fwww.ebay.com%2Fitm%2F4-x-RC-Y-Type-Wheel-Rim-Smooth-Rubber-Tires-for-1-10-On-Road-Car-Black%2F253489079078%3FssPageName%3DSTRK%253AMEBIDX%253AIT%26_trksid%3Dp2057872.m2749.l2649 * RC Car Transmitter and compatible receiver (for instance this pair): https://www.banggood.com/custlink/KGGEyQNRrT * Basic tools like soldering iron, wire cutter and wire stripper/knife for exposing the copper on the wire. Also, some screwdrivers and pliers for the nuts and bolts are required. <br> <h1>Assembly</h1> **Assembly Video**: https://www.youtube.com/watch?v=SiD28fYTkQY Steps: 1. Assemble all the plastic parts using the assembly video (or photos above) BUT DO NOT ATTACH THE AERO PARTS/BODY PANELS YET. 2. Place the receiver as shown in the images above (top right corner of center chassi) 3. Connect the steering servo to aileron/steering on the receiver 4. Connect the servo splitter to channel 2 (throttle channel) of the receiver. Then insert the ESC servo cables at the other end of the servo splitter. 5. Solder both ESC power cables to the power board, then solder power cables from the power board to the battery connector 6. Solder each ESC to a motor (connectors are optional) 7. Turn on the vehicle and remote controller and test that everything works. The steering servo should turn in the "right" direction and both motors should rotate forward. If one motor is rotating backwards, desolder two esc wires and ressolder them at switched places. 8. Calibrate ESC:s, without the wheels on, only motors. Do this by turning the remote on with full throttle, then turn the car on. You should hear a couple of beeping sounds after around 5 seconds. Decrease throttle to zero, the lowest throttle, and wait for the beeps once again. The motors are now synced and ready to be used. 7. Attach the remaining electronics inside the center chassi (for example the ESC and battery) 8. Fasten the front spoiler using bolts and the rest of the body panels using zip ties (or string/ nuts and bolts) 9. The model vehicle should be ready to drive! Youtube 2: https://www.youtube.com/watch?v=6innwn9AbG8
With this file you will be able to print Fastest RC Car on Thingiverse with your 3D printer. Click on the button and save the file on your computer to work, edit or customize your design. You can also find more 3D designs for printers on Fastest RC Car on Thingiverse.