FDM printed SLA-Printer by TOS
thingiverse
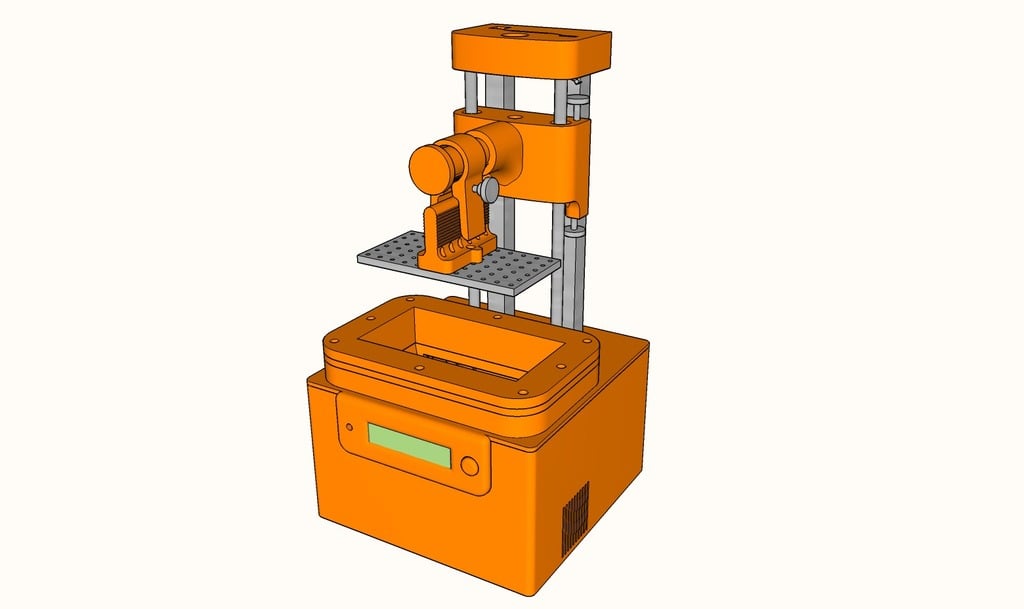
Update 27.05.2018 Uploaded some video to YouTube with installation instructions for NanoDLP https://youtu.be/vNF5q_EgofE Update 25.05.2018 Unfortunately detected a design flaw in the nanoDLP-Shield v 2.0 just now. This prevents an connected stop key from working. If you use the shield with a model B design (Nextion UI) this will not affect you. However, I updated the gerber files to v 2.1 to fix the issue. You can find the updated gerber file in the file section of this thing. An graphic that describes the issue and the fix was added to the galery. https://cdn.thingiverse.com/renders/e1/80/9d/2e/6d/2c8fb8921ea3c9bb4391917d14888a1e_preview_featured.JPG Also added a PDF-file that contains the paper templates for the reflector mirror to the files section. Update 04.05.2018 Uploaded some video to YouTube with build instructions for the UV-reflector https://youtu.be/w0hcv9C8mI8 Update 02.05.2018 Uploaded some video to YouTube with a guideline about preparing the hdmi display to get used for an SLA-Printer. The video covers the following topics: - type of display and components used - interconnection of components and display to raspberry pi - initial test of display - removal of backlight - application of protective glass - recovering/cleanup of adhesive layer of protective glass https://youtu.be/zdHR6w-UEnI Update 28.04.2018 uploaded some build instructions for the UV-LED-Box. You can find them at... https://youtu.be/Y7dDw7RyXCs Update 26.04.2018 Slightly modified the nanoDLP-schield, so that screw terminals can be used for 12 v input and 12 v UV-LED. Also created a video that shows how to solder the nanoDLP shield: https://youtu.be/Muqkb-LbFVw Update 09.04.2018 Nextion is next! ;-) The Nextion UI for nanoDLP is based upon Julien Delnatte (aka Tibus) "TouchScreen-For-NanoDLP" (credit where credit's due!) https://github.com/Tibus/TouchScreen-For-NanoDLP/blob/master/README.md I added the follwing functions on top of his work: - show TCP/IP on home screen - show QR-Code of TCP/IP for comfortable smartphone access - added Shutdown button - added Reboot button - added Function to add Plates - added Function to delete Plates - replaced text buttons with graphical icons https://youtu.be/yKJH2sTfvlE Update 05.04.2018 (2): Started working on an 'model B' which is basically the same, but replaces the frontpanel with 3.2 inch Nextion display. For this the core- and hull parts must be replaced with - tosla_32_nxt32core.stl - tosla_32_nxt32hull.stl Update 05.04.2018: Big thanks to my friend Mats Zander, who was so kind to create Gerber-files for the nanoDLP-shield. The ZIP-file is now available on the Thing-Files-Section of the thing. This allows to order a professional manufactured PCB by any online provider. Of course you still need to solder the components to it, but the task becomes much easier! BTW: we added one more connector to support Nextion displays! Update 12.03.2018: Uploaded some video on YouTube to explain the nanodlp shield schematic: https://youtu.be/Wb5JIAkboEg Update 19.02.2018: While testing, it turned out that I underestimated the criticality of a good VAT design. While I liked the simplicity of the predecessing VAT design a lot, it turned out that it just wasn't able to maintain the tension of the foil over a longer period. Today I uploaded a enhanced VAT design, consisting of 3 seperate 3D printed parts. Build instructions for the new VAT can be found on YouTube: https://youtu.be/L0omLMDEv60 Update 03.02.2018: Uploaded some build instructions for the printer body and z-axis to YouTube... https://youtu.be/DbIEzbua1AI Update 01.02.2018: Uploaded "tosla_31_uvdifusor.stl". Must be printed in transparent material and need to be installed inside the uv-reflector. Update 29.01.2018: First successful test today. Here is some video footage: https://youtu.be/10tiZy_Tpp8 Update 26.01.2018: - updated zslider to "tosla_31_zslider.stl" (only "cosmetics" and less material, no functional change; older version can still be used) Update 20.01.2018: this is a major update that reflects first test results and fixes a lot of issues: - changed build plate to aluminium with hole-pattern to reduce suction effect, therefore 3D-printed part consists only of the handle, aluminium plate must be cutted, drilled separately. - shortened z-gantry to reduce leverage effect of forces to the z-axis. - moved z-stepper motor and smooth rods closer to vat, so z-gantry can be more shortened (see above) - used space that become availble by moving z-stepper motor to the front to add two additional aluminium bars (15x15 mm) to the back of the printer. This will add a lot of stability to the z-axis. - redesigned the VAT completely as it turned out that it was way to over-engineered in the first place - re-positioned z-endstops to fit in available spaces after re-positioning all the other stuff ...therefore the following 3D-printed parts have been updated to reflect all those changes: - updated the vat base to "tosla_28_vat.stl" (less parts/material, better assambly of foil) - updated the build plate to "tosla_29_zplate.stl" - updated the z-slider to "tosla_29_zslider.stl" - updated the z-top to "tosla_29_ztop.stl" - updated the z-shaft to "tosla_29_zshaft.stl" - updated the body-core to "tosla_29_bodycore.stl" Update 14.01.2018: - updated the vat base to "tosla_26_vatbase.stl" to fix a minor issue. - updated the vat basin to "tosla_26_vatbasin.stl" to fix a minor issue. Update 09.01.2018: - added missing uv-reflector-frame "tosla_25_uvreflector.stl" - updated the vat base to "tosla_25_vatbase.stl" to fix a minor issue. - updated the vat basin to "tosla_25_vatbasin.stl" to fix a minor issue. Just a pre-release of the STL's for my FDM-printed SLA printer. It's still work in progress, therefore no final/complete BOM and/or instructions for the moment. There is a first video on YouTube that explains the z-gantry design: https://youtu.be/xuOsPoC8g8Q BOM (work in progress): - Raspberry Pi Modell 3 - 5.5 inch lcd display 2560x1440, - HDMI-MIPI driver pcb compatible with 5.5 inch display - glass protector for 5.5 inch dispaly - DC converter 9a 4-40 V to 1,2-34 V, adjustable constant current (65x48x24mm) - FEP film (150 x 200 mm, 0.025 mm thick) - 2x microswitch 3pin NO/NC/C, 1a 125 VAC (12,8x5.8x10mm) - 12v 5a external power supply (barrel connector 2.1 ID, 5.5 OD) - Nema 17 stepper motor - flat HDMI cable with 90 degree type A connector 200 mm flat ribbon cable UV-Light box: - 4x 10 watt power UV-LED, 405nm wavelength - 130 x 56 x 20 mm aluminium heatsink - 40 x 40 x 10 mm 12v fan - thermal adhesive tape (as used for heatsink assamblies) Model A only (1602 display): - 1602 Serial LCD module with I2C interface - 5mm LED - tactile switch 6x6x4,3, 4pin - hole matrix board 20 x 34 mm, double sided, 2.54 mm pitch/ 0.1 inch pitch Model B only (Nextion display): - 3.2 inch enhanced Nextion display nanoDlp-shield: - voltage regulator pcb MP1584EN - DRV8825 stepper driver (or pin compatible) - mosfet IRFZ44N - some resistores (1x 100 Ohm, 4x 10k, 1x 100k) - capacitor 50v 100µF - some pinhead connectors (1x 2x20 female, 4x 1x2 female, 2x 1x8 female, 3x 1x4 male, 2x 1x3 male, 4x 1x2 male) - 2x screw terminal (2pins, 5.08mm pitch) - nanodlp PCB (Gerber-files, see file-sections) - circular power switch, 19mm diameter, 250 VDC 6 Ampere - female barrel power connector (2.1 ID, 5.5 OD) - a bunch of m3 10mm screws - 2x LM8LUU linear bearings - 2x aluminium pipes 8mm OD x 350mm - 2x aluminium bars 15x15mm x 350mm - 1x leadscrew 8mm x 300mm - 1x leadscrew nut 8mm (...to be continued) There will be some update with more details later. Regards, TOS
With this file you will be able to print FDM printed SLA-Printer by TOS with your 3D printer. Click on the button and save the file on your computer to work, edit or customize your design. You can also find more 3D designs for printers on FDM printed SLA-Printer by TOS.