Feet Prints
thingiverse
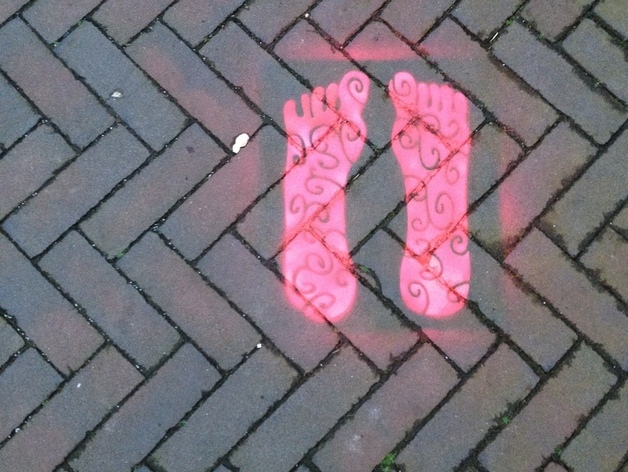
These feet are stencils that you can re-size and add your own designs, so that when you're out and about you can spray paint the ground you've walked. Mark your footsteps. Instructions The initial inspiration came from sushi with laser cut designs that I saw on the unlimited design contest site. http://unlimiteddesigncontest.org/en/product/kimono-sushi Because sushi are so small it gave me the idea to create a stencil that could be small and portable. How did I create them? I will explain it to you so you can make your own and create your mark on all the places you've traveled near and far. The creation of the feet happens in illustrator. I used the pencil tool but if you prefer the pen that works just as well. These are best because you are drawing organic shapes. I literally held my feet in front of my computer and sketched them out on Illustrator. You can either do that or use the ones I've made and adjust them as you see fit. The swirly designs were done using the eraser tool, I put them in after drawing the feet. I found it to be the best for additional designs because it makes a thick enough line to be visible when you spray paint your stencil. Several important things to make sure you do in Illustrator before using the laser cutter are the following: -You must have a border around the feet or else your stencil will be awkward and large. -You have to make sure you have at least an inch between the border and your image or else you will have sloppy border lines painted on the ground. -You are drawing an image based on the negative space, so make sure you're lines are outlining the image you want. -The feet must be a single continuous line. If you put images inside the foot you have to attach the separate lines. Otherwise you'll just have a cut out of the design and it won't appear on your stencil. -Save it as an SVG file. -Lastly, if the laser cutter you're using is a smaller one make sure to rotate your image 90 degrees or else it will be too large and will not cut it. And that's just plain frustrating. Laser cutting! There are many possibilities for what materials to use. The best ones I've found are: Plywood. Plywood is super strong, but it's not as portable. You can't bend it and it could snap in half because you have to use thin plywood for the laser cutter to be able to cut through it. It is heavy enough that you don't have to hold it when spray painting, which is a plus. Cardboard. It's light and is portable as well. Though with too much folding or bending it could tear and it's not waterproof. Cardboard is best for tests instead of the final stencil. It too is heavy enough to stay put when spray painting. Laser cutting! The settings on the laser cutter were: Cardboard: Set the laser strength at 50 and speed at 70. Plywood: Set the strength to the max of 100 and speed at 55. Make sure that you have the laser in focus or your stencil will not be accurate. Hit OK and let the laser work its magic! Now you have a lovely pair of feet to mark your travels with! Spray painting. Spray paint can be bought in hardware stores and comes in a wide range of colours. When you spray paint the feet hold the can 6 to 12 inches from your stencil. The closer you hold the can the stronger the paint which also means a higher chance of the paint running or going over the lines and ruining the image. Please note: Spray painting in public spaces is illegal in most countries so do it at night and be as conspicuous as possible. If that means dressing as a ninja, I highly encourage it. GOOD LUCK!
With this file you will be able to print Feet Prints with your 3D printer. Click on the button and save the file on your computer to work, edit or customize your design. You can also find more 3D designs for printers on Feet Prints.