Feiyu 3Axis Gimbal to Steady-cam Conversion Parts
thingiverse
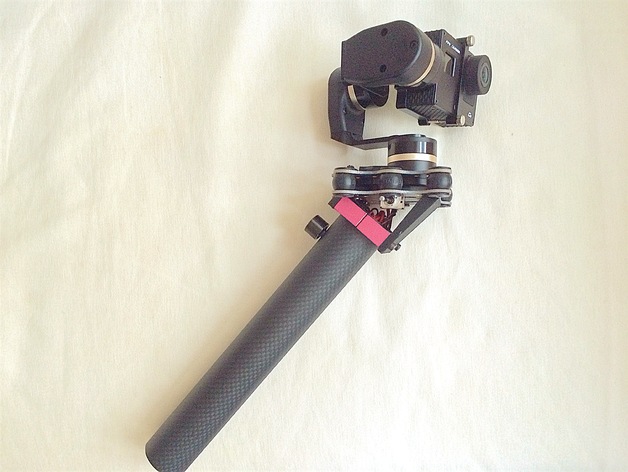
**New!! Added a cap to cover the hole at the bottom of the handle (carbon tube). Now you can leave the lipo's balance-tab/charge connector sticking out at the bottom of the handle. The cap has ample room for it. No more tucking in and pulling out the charge connector every time you need to re-charge the lipo. **Previous I created the brackets for mounting the Feiyu3-axis gimbal plate to the CNC aluminium boom clamps. For the steady-cam conversion, you will need these other parts (watch tutorial at http://www.youtube.com/watch?v=KIhuCa3YDBY) Mini 3-axis Feiyu Gimbal for aircraft 30mm Outer-Diameter Carbon Tube (hobbyking) 10mm-thick Aluminium boom clamps for 30mm tube (hobbyking) 2-way flip switch for RC transmitter (hobbyking) Simple Servo Tester (ebay) Simple 5v BEC/ voltage regulator (hobbyking) 2000mah Turnigy NanoTech "AirSoft" Series 2-cell Lipo battery (hobbyking) Instructions To achieve the correct angle of elevation for the gopro camera on this DIY handheld gimbal, the required shape of each bracket is hand-drawn on paper with a thickness of 3.5mm in mind so that the printed brackets would not flex. The drawing is converted to a 2D shape in Photoshop and then extruded to become an STL. There are no holes in these brackets as the placing of the holes would depend on the type of cnc boom clamps you use.
With this file you will be able to print Feiyu 3Axis Gimbal to Steady-cam Conversion Parts with your 3D printer. Click on the button and save the file on your computer to work, edit or customize your design. You can also find more 3D designs for printers on Feiyu 3Axis Gimbal to Steady-cam Conversion Parts.