Felder Crosscut Fence Zero Clearance Insert
thingiverse
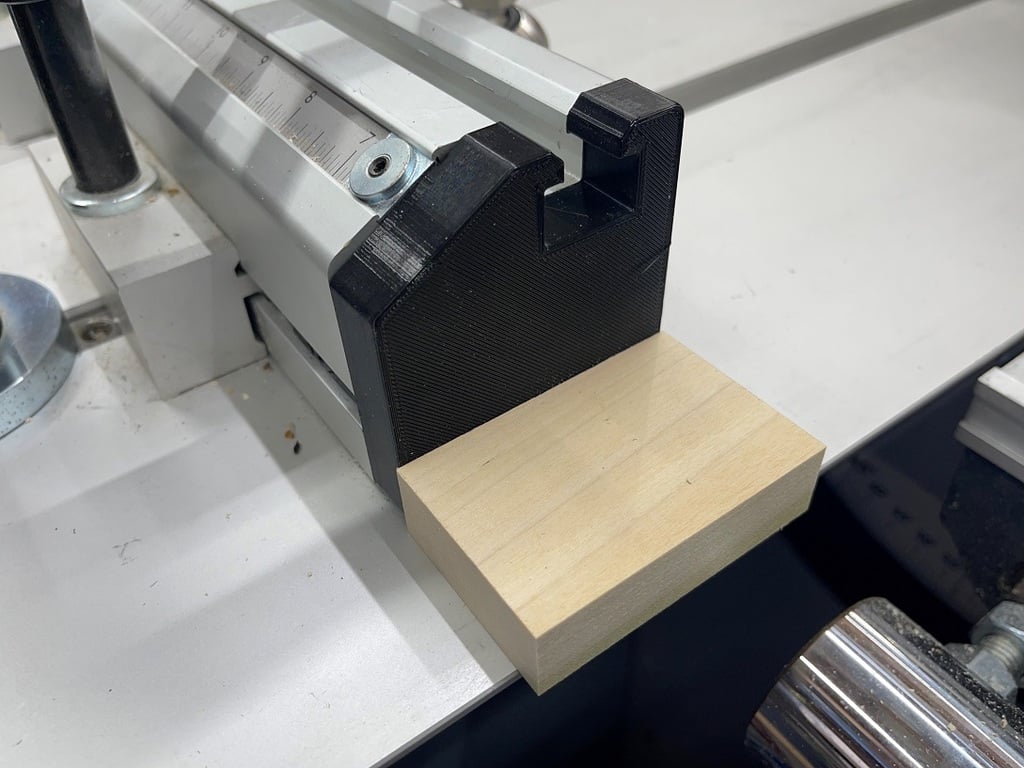
This is a zero-clearance for your Felder cross-cut fence. It will fit any Felder equipment which has the same fence extrusion as the K700 series. That includes the combo machines. Felder sells something called a "splitter tongue" for their Format4 series. But that piece of machined LVL costs a whopping $267. On my K700P, I have the fence extrusion installed at the near-end of the table like a traditional cross-cut fence. This will also work if you install it on the far end, as long as the extrusion is in the same orientation as mine. Anyone printing this should know their way around the workshop, so I'll keep the instructions brief and focus on printing and assembly specifics. # You will need * Printed Fence cap * Printed left and right t-nuts * Two short M5 screws with low-profile heads. I used nylon ones so I could cut them to length and also so they wouldn't mar the aluminum * Two low-profile M5 nuts. Mine are 3mm thick, not the usual 4-5mm. If you get nylon ones, you can file them to the appropriate thickness for your fence. * Optional, the printed drill guide * A piece of 3/4" or 19mm wood to use as the zero clearance insert * Thick super glue or a small amount of epoxy * Sander or hand plane to trim # Printing Instructions: Note that both STLs are likely flipped 180 degrees from what you need. Sorry about that. * Print the t-nuts flat for the maximum strength. Make sure the hex hole is on the build plate side. Use supports in that hole, and be sure to clean them out thoroughly. Print these at 100% infill so they are completely solid, These parts really do need to be strong. * Print the face plate. This should also be printed flat-side down so the reference surface is as flat as possible. No supports needed. However, you'll want the top and bottom layers and the sides here to be strong. For my PETG, I used 6 bottom layers and 4 top plus min 3 on the sides. The rest of the fill is up to you, but I used 25%. This part will take a bit of abuse with test fits and with block replacements, so you want to let it live as long as possible * Optionally print the drill guide. This is a tool to help you drill holes in the wood in the correct spots # Assembly instructions Before gluing anything, fit the nuts and screws in the t-nuts and try them in the fence. You'll almost certainly need to do some work here to make sure they can lock in the fence, but fit easily when installing the cap. Again, if you use nylon screws and nuts, a file can make quick work of it all. If you find the nuts aren't fitting correctly, make sure you have *completely* cleaned out the infill. Even a little infill can mess up the tight clearances here. Note that the t-nuts are designed to fit specific slots. The lower slide of the slot has an internal chamfer, and the t-slot nut has a matching lower chamfer. I know I could have made this more obvious by keying them or something. Maybe in the next rev. Next, test the fit of the cap piece without the t-nuts. It should be a very snug fit. Have a scraper or other thin metal or plastic tool handy to help you remove the cap from the end. I found that gently prying from the top while using a dowel to gently push out from the t-slots will get it removed. This is also why you want to make this piece have strong walls and top/bottom. Once you are happy with the t-slot and cap fit, remove them and slot them into the cap piece with some super glue or epoxy, or whatever works best with the material you've printed. Double check to ensure these are installed perpendicular to the cap so they'll fit when dry/cured. Let that all cure/dry as appropriate. # Wood block install instructions Using the drill guide, or by manual measurement, and a drill size appropriate for your screws drill the three holes in a piece of wood that is as long as the fence insert is wide. I recommend drilling into the side grain and having the end grain face the blade. Ensure the screws aren't long enough to touch the blade! > The drill guide is designed to fit against the critical surfaces of the wood: the front facing the blade and the bottom against the table. However, depending upon how calibrated your printer is, it may not be 100% accurate. Once you've drilled a test piece, you can shim with tape if necessary. In my case, it's off by a hair (as you can likely see in the pics) so I will need to shim inside the guide for more accurate drilling. Intent here is to ensure that the wood is in line with the fence and isn't pushing the work piece away from the fence, and also isn't so far back that its usefulness as a zero-clearance insert is negated. When you screw the wood on to the cap, it can help if you put both on the same flat surface and then hold them in place while you screw it in. It doesn't matter how far back the wood protrudes, but it does matter that it's in line with the front, and square. Once you've drilled into the wood and installed as per the pics, you can then install the entire piece into the fence and tighten down the screws. If you end up moving this piece for any reason, you will want to cut a new wood block. If the wood protrudes beyond the fence at all, you can plane or sand it back, or just shim the drill guide and cut another. Video of trimming the insert here https://youtu.be/PyE-3wVCeFI # In use In use, this will help prevent tearout on workpieces. It will also make it much easier for you to position workpieces a specific distance from the blade, without using fence stops. This is helpful when you're working off of a pencil mark on the piece, for example.
With this file you will be able to print Felder Crosscut Fence Zero Clearance Insert with your 3D printer. Click on the button and save the file on your computer to work, edit or customize your design. You can also find more 3D designs for printers on Felder Crosscut Fence Zero Clearance Insert.