Felix 3.x Proximity sensor mount (Dual Extruder Only)
thingiverse
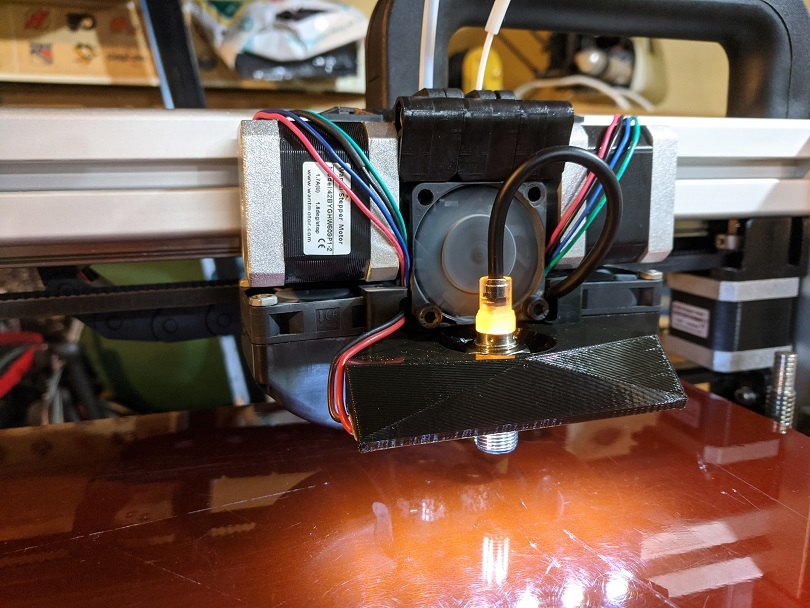
<h2>If you like what you see here, consider leaving a tip.<br></h2> <h2>*** READ EVERYTHING HERE BEFORE UPGRADING YOUR PRINTER ***</h2> This is a bracket to mount the official Felix Printers proximity sensor to your Felix 3 series printer (<b>Dual Extruder Only</b>). If you own a felix 3 series printer and want auto bed leveling but don't want to to pay for the full Tec 4 upgrade kit and don't want to go down the 3 series firmware editing rabbit hole, all you need to do is buy the proximity sensor and the Tec 4 display module, and flash the Tec 4 firmware. If you're just looking to add an LED light to you're Felix 3 series print head, <a href="https://www.thingiverse.com/thing:2702862">check this out</a>. Parts: <ul> <li><a href="https://shop.felixprinters.com/tec4-proximity-omron-sensor">Felix Tec Series Proximity Sensor</a> (Omron E2B-M12KSO4-WP-C2 2M)</li> <li><a href="https://shop.felixprinters.com/felix-tec-4-lcd-control-panel">Felix Tec 4 LCD Control Panel</a></li> </ul> Downloads: <ul> <li><a href="https://www.felixprinters.com/downloads/?dir=2.%20Tec%20and%203%20Series/5.%20FELIX%20Tec%204/5.%20Firmware">Tec 4 Firmware</a> - Download the firmware, the "How To - Upload Firmware.pdf" file, and the "Read Me - Firmware Notes.pdf" file. Read everything before trying to upload the new firmware.</li> <li><a href="https://www.felixprinters.com/downloads/?dir=2.%20Tec%20and%203%20Series/5.%20FELIX%20Tec%204/1.%20Manuals">Upgrade Guide</a> - Download and completely read the "Upgrade Guide - FELIX 3 to Tec 4.pdf" file</li> <li><a href="https://www.felixprinters.com/downloads/?dir=2.%20Tec%20and%203%20Series/5.%20FELIX%20Tec%204/1.%20Manuals">Tec 4 User Manual</a></li> </ul> <b>I can't stress enough</b> how important it is to read everthing here, in the upgrade guide, the firmware notes and Firmware upload how-to before making any changes to your printer, but I'll try to cover the important bits here: -There are two printable bracket files included in the downloads on this page. One is a mount for the proximity sensor. The other includes a place to insert a section of 12 mm wide LED strip to add a light to your print head. -The new firmware sets the printer's baud rate to 115200, so you'll need to make sure your control software matches. -Select the correct firmware to upload based on which extruder drive wheels you have. See the firmware notes for details. -The proximity sensor replaces the Z axis optical end stop and is wired to the same location on your printer's control board. Note that the proximity sensor requires 12V, but some older Felix control boards only supply 5V to the Z axis sensor. In that case, you'll need to wire the positive lead of the sensor (yellow wire) to the 12V power rail. See the upgrade guide for more details. -The printable bracket is attached by removing the front fan shroud bolts closest to the extruders, inserting the bracket ligning up the bolt holes in the bracket with the bolt holes in the fan shrouds, and reinserting the bolts . -With the printer nozzles just touching the build plate, the proximity sensor should be mounted with a 1 to 2 mm gap between the build plate and the sensor's tip. If you've already upgraded your printer to the new style print bed with the leveling adjusters above the build plate, follow the upgrade guide instructions for setting the proximity sensor gap as the sensor will need to clear those adjusters.
With this file you will be able to print Felix 3.x Proximity sensor mount (Dual Extruder Only) with your 3D printer. Click on the button and save the file on your computer to work, edit or customize your design. You can also find more 3D designs for printers on Felix 3.x Proximity sensor mount (Dual Extruder Only).