Fertilizer dispenser v2
thingiverse
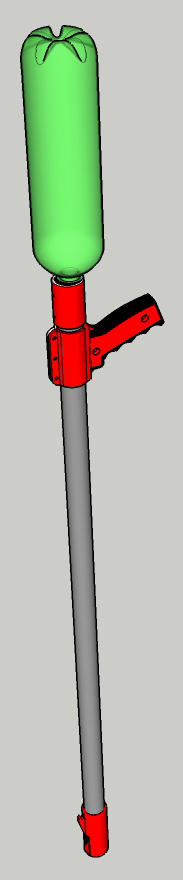
Simple fertilizer dispenser. Beside printed parts, you'll need 1 x wood screw, 2 x M5 screws, 5 x M3 screws, M3 and M5 nuts, a 32 mm diameter PVC pipe and a rubber band. Put the plug in the tube. Place the slider on the PVC pipe and push it all the way in. Mark the places for drilling/cutting pipe. Remove the plug and slider. Cut / drill the PVC pipe on the marked places. Push the plug into the tube, place the slider on the tube. Secure the plug with a wood screw. wrap the rubber band in place at the plug and attach the other end of the rubber band to the slider. Place the bottle holder on the other end of the pipe. Drill holes through the provided places. Fasten the holder with 2 M3 screws. Attach the handle to the appropriate height. The fertilizer dispenser is ready for use. After assembling the device, fill the bottle with fertilizer and screw it into place. Fertilizer dosing is performed by the length of pressure of the slider on the application site.
With this file you will be able to print Fertilizer dispenser v2 with your 3D printer. Click on the button and save the file on your computer to work, edit or customize your design. You can also find more 3D designs for printers on Fertilizer dispenser v2.