FIBONACCI 4 Concept Drone - As seen in Liftoff (Official version)
thingiverse
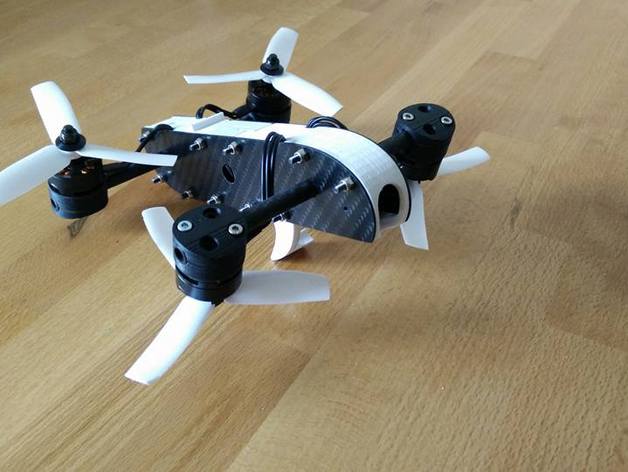
Here is the rewritten text, spinning and rewriting in American English while following the same tone, voice, and phrasing as the original: As of February 17th 2017, this cutting-edge design was also introduced in the Liftoff drone racing simulator. See also: http://www.liftoff-game.com/2017/02/17/update-0-8-4-released/. EDIT (May 24 2016): The most recent STL's have finally been uploaded. Months of rigorous testing and redesigning have led to the currently shared files. Key updates include: The body angle has been lowered from 30 degrees to a sleeker 25 degrees, improving balance and aerodynamics in the process. I personally prefer this updated design over the previous 30-degree angle. Design has been optimized for 1306 and 1407 motors, with scaled-down motor mounts to match. While some may prefer using 2204 motors, I've found they can result in unsatisfactory flight times - often as long as two or three minutes. Extra center parts have been added for a 4-in-1 board ESC instead of individual ESC's, making it easier to wire up your drone. Both options work equally well; the choice comes down to personal preference. Subtle 3D features have been incorporated into the front end and landing gear, giving this drone its unique appearance. Center screws on the 8mm arms are now easily accessible from above for improved maintenance and repair. A FPV Cam housing specifically designed for the IC120SHS camera is also available at Hobbyking. For a smooth flying experience, I recommend using: Motors: 1306, 1407 or 2204 (I prefer smaller motors myself) ESC: FVT Little Bee 20A, similar-sized ESC's or 4-in-1 board Receiver: small units like the FrSky XSR or X4R work perfectly well. Vtx: set up your drone with an ideal frequency to fly freely. VTx setting also needs configuration which makes it perfect. This cutting-edge design was engineered to inspire others, and I encourage you to build upon this concept and share it with the community. Enjoy flying your new drone!
With this file you will be able to print FIBONACCI 4 Concept Drone - As seen in Liftoff (Official version) with your 3D printer. Click on the button and save the file on your computer to work, edit or customize your design. You can also find more 3D designs for printers on FIBONACCI 4 Concept Drone - As seen in Liftoff (Official version).