FiGo - Dog Wheelchair
thingiverse
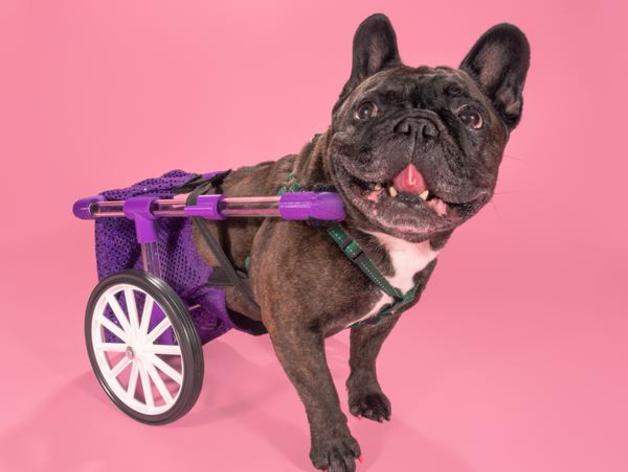
** FiGO has been updated and published here http://www.thingiverse.com/thing:1397964 Wheelchairs for domestic animals are very expensive and often inaccessible to many pet owners. This is not always the most welcoming solution for individuals who need a pet wheelchair for their animals at short notice, on a budget, at a remote location, or perhaps for temporary purposes. This project empowers individuals to build their pet’s wheelchair with the combination of digital fabrication (3D printing) and traditional making. This device uses parametrically designed 3D printed joint pieces that fit into acrylic tubing, which can be easily customized to the dog for both fit and style purposes. This is currently my second prototype. I redesigned the pieces in this second prototype to be more geometric so that they are much easier to print. I wanted to make sure that all materials used in the fabrication of this chair would be widely accessible to anyone regardless of your location. The wheelchair consists of roller blade wheels, standard skate bearings, screws, acrylic tubing, straps, and 3D printed joint pieces. The wheelchair project started as a design for Anne Murray, a 7 year old French Bulldog. I made sure that the wheelchair accurately reflected her personality as described by her very caring owner Martha J. I printed it in bright purple and included glitter in the clear acrylic tubing used to frame the design. Print Settings Rafts: No Supports: No Resolution: .20 to .30 Infill: 20-25% Notes: Print 2x of each piece (A,B,C,D,E) if you want to print the pieces with the exact outer diameter of the acrylic tubing (0.75") I have suggested, I have made those pieces available as well ie. "pieceA_exact.stl". Since there is some slight warping that occurs while printing, you may be more comfortable printing in the adjusted size that is slightly larger to accommodate the acrylic tubing with more ease "pieceA_adjusted.stl. Just make sure to choose one format and remain consistent with all pieces. With exact sizes, you will likely need a heat gun to heat up the piece and then quickly insert it into the tube. This will fuse the two pieces together. With adjusted sizes, you might want to use glue (gorilla glue works well) to ensure the tubes will not be loose. This may not be an issue if you have a dog that weighs less than 10 pounds. My client was a 30 pound Frenchie! Post-Printing Assembling the Dog Wheelchair I used 0.75" inner diameter acrylic tubing to make the frame for the dog wheelchair. These 3D printed parts simply support this structure. The length of each tube will depend on your dog's width and height. There are three different lengths of acrylic (or aluminum) tubing needed: 2x Acrylic tube the same as your dog's width. 2x Acrylic tube the height of your dog minus the radius of your chosen wheel, minus 1" 2x Acrylic tube the length of your dog from their belly to their tail, minus 2" I have created a simple google spreadsheet that does these calculations for you as you input your dogs measurements. I am working on a web application that has this function, but this will do for the meantime! https://docs.google.com/spreadsheets/d/1OUDn9DBQ-ixo-nfdue-AFACkzlDrC4GsDhREl2hxNsc/edit?usp=sharing I also purchased two roller blade wheels and two standard skate bearings (the wheels pictured below were part of prototype #1, see photos above for new wheels). In order to support the wheels I used two screws [(1/4 - 20) x 3"] fastened with a nut to the bearing and acorn nut to the 3D printed piece E. Finally I purchased one strap from my local hardware store that is placed into piece D to support where the back legs (flanks) meet the body of the dog. I also purchased two velcro straps that feed through piece C to attach directly to your dog's existing harness. I am still working on a way to improve the connection of the piece to the harness! Assembly diagram Acrylic tubing How I Designed This I designed this wheelchair using OpenSCAD so that the models can be adjusted to the size of tubing you have access to. I'm still currently working on this document (it is rather messy and needs to be polished) but I will make it accessible to everyone once it is prepared. This way you don't have to use 0.75" inner diameter acrylic tubing exclusively (even though I have tested many sizes and concluded that it is the best size for strength/weight ratio). I am still heavily prototyping this design. I welcome all of your comments and suggestions! Thanks!!
With this file you will be able to print FiGo - Dog Wheelchair with your 3D printer. Click on the button and save the file on your computer to work, edit or customize your design. You can also find more 3D designs for printers on FiGo - Dog Wheelchair.