FiGO | Rear Support Pet Wheelchair
thingiverse
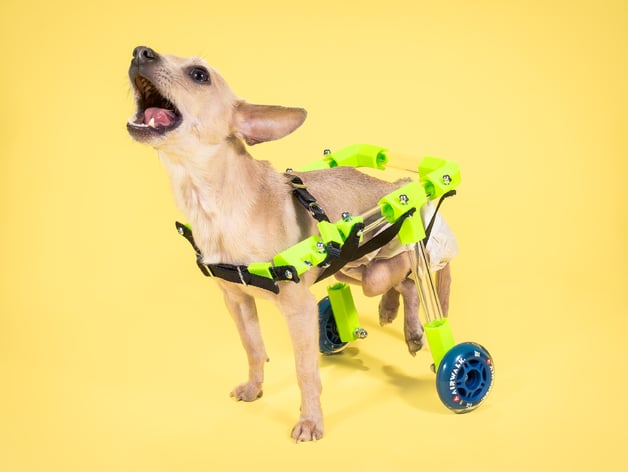
Wheelchairs for domestic animals are very expensive and often inaccessible to many pet owners. They are not always the most welcoming solution for people who need a pet wheelchair for their animals at short notice, on a budget, at a remote location, or perhaps for temporary purposes. This project empowers people to build their pet’s wheelchair with the combination of digital fabrication (3D printing) and traditional making. All materials used in the project can be sourced locally at a hardware store. This device uses parametrically designed 3D printed joint pieces that fit into acrylic tubing, which can be easily customized to the dog for both fit and style purposes. All pieces can be personalized via the Customizer application. Currently screw size, tube outer diameter, wheel angle, as well as your dog’s measurements can be input to view a rendering of your dog’s wheelchair). However, the standard pieces are available on this project page for download. I am currently working on making the pieces resizable based on your dog's weight for added strength (currently you can do this by manually scaling the pieces). Project Photos by Pete Thorne Photo The FiGO instruction manual has been translated in Romanian by Thingiverse community member Veronica. It can be downloaded in the downloads section. Thank you for your contribution Veronica! * Table of Contents How it Started Materials Tools Measuring Your Pet Instructions Testimonials Notes Update Log 1. How It Started FiGO began when I answered a call online for a friend who needed a wheelchair for their French Bulldog at short notice. They were unable to afford the costly commercial wheelchairs available online. I rose to the occasion to design something for an adorable dog, and the results were fantastic! Murray loved her chair! Since then, I've built two other chairs for dogs, and I've worked on iterating the FiGO design and documentation to encourage all dog owners to tackle this project for their pet in need. 2. Materials All materials used in the fabrication of this chair can be sourced locally at a hardware-store or online via Amazon.com. The wheelchair consists of roller blade wheels, standard skate bearings, screws, acrylic tubing, straps, and 3D printed joint pieces. 10x -- 3D Printed Pieces in Makerbot Filament (PLA or ABS) 5-6x - Acrylic Tubes (5 tubes if dog is 10 pounds or less, otherwise 6) 5-6x - Aluminum Tubes (alternative to acrylic tubes) 2x ---- Wheels (larger wheels are recommended for dogs over 15 pounds) 2x ---- Standard Skate Bearings 2x ---- Dog Collar (slightly larger than dog's size) 1x ---- Dog Leash (recommend two leashes for a large dog) 10x -- Small Screws (10/24 x 3/4", or preferred size) 2x ---- Large Screws (10/24 x 3", for securing wheels on piece E) 12x -- Acorn Nuts 1x ---- Fleece (or preferred padding material) 1x ---- Gorilla Glue 3. Tools You'll need the following tools for this project: Screwdriver Scissors Measuring Tape Access to a 3D Printer (a Makerbot Replicator 2X was used for this project) Lighter Soldering Iron (optional) 4. Measuring Your Pet In order to determine what size the wheelchair frame needs to be, you'll have to measure your pet properly. The diagram below visually depicts the three measurements that need to be taken. Measurement A is the width of your pet, measurement B is the height of your pet from the ground to the top of their shoulder bone, and measurement C is the length of your pet from their front belly back to their tail. Once you have these measurements, you'll need to do a few simple calculations to determine the size of tubing that will be required for your FiGO wheelchair! You will need: 2x tube measurement A plus 1" 2x tube measurement B minus the radius of your chosen wheel, then minus 1" 2x tube measurement C minus 2" I have created a simple google spreadsheet that does these calculations for you as you input your dogs measurements. Click on "file>save a copy" to edit the file for yourself. https://docs.google.com/spreadsheets/d/1OUDn9DBQ-ixo-nfdue-AFACkzlDrC4GsDhREl2hxNsc/edit?usp=sharing 5. Instructions Here's all you need to know about building your very own FiGO Wheelchair! First you need to gather all of the supplies, and 3D print all of the 10 joint pieces (A-E). Remember that the B piece needs to be printed mirrored as well (both files are provided in the files section). Afterwards, you're ready to start building the FiGO frame! Step 1 First, take both of your A pieces and a width tube (measurement A), slide the tube into the first A piece, and then connect the second A piece to the tube. Make sure the tabs that will be used for the straps are facing in the direction pictured below. Step 2 Next connect both A pieces to both length tubes (measurement C) Step 3 Slide both B pieces down the length tubes leaving about an inch or so between B and A (this will change depending on your chair size, and you can easily move these pieces up later to match your pet's size). Make sure that the tabs on both pieces are facing outwards, and are both pointing to the back of the wheelchair (toward piece A). Step 4 Now do the same with both C pieces, remembering that the tabs are on the outside of the wheelchair. Step 5 Cap both D pieces on the ends of the length tubes, with the tabs facing outward. Step 6 Now place both height tubes (measurement B) in both B pieces and then set your currently wheelchair frame aside. Step 7 Now take both E pieces and one final width tube (measurement A) and connect them together. This step is not required for dogs smaller than 10 pounds. In this case, use piece E with no added support bar. Step 8 Connect both E pieces to the height tubes you placed on your frame in step 6. Step 9 Add the wheels to both E pieces. Make sure you've added your bearings to your wheels if they don't already have them. Secure the wheels to the E piece with the longer 3" screw and cap it with an acorn nut. You may need to use a screw driver for this. Step 10 Finally, add the straps to the chair. Both collars will be fastened to piece D at the front of the wheelchair, and the rest of the straps will be made out of a dog leash (or any piece of vinyl webbing that you may have). Piece A will require a longer strap as it is for the dog's legs, Pieces B and C's straps are for the dog's belly and will need to be the same size. The dog collars can be cut in half, and then cut down shorter if need be. The fit will have to be very secure. For the body straps (pieces B and C), place the leash around the dog when they are standing in the chair first to see how long it needs to be. For the leg strap, make it slightly longer than the belly strap length. Cut the straps with scissors, and to prevent fraying quickly pass over it with a lighter. Once all of your straps are cut to size, cut two holes into them with scissors at each end, or use a soldering iron to burn a hole through. This is an especially useful tool as it will burn through the plastic preventing any fraying. The collar straps only need to be punctured at the ends that were cut. Secure the straps to the tabs on each joint piece with the smaller screws and make sure they are tight! Note: After the FiGO wheelchair is complete, the tube between the two A pieces, as well as the tubes connecting pieces B to E can be glued with Gorilla Glue to ensure stability of the chair. This is not as important when the dog is very light, but is recommended otherwise. 6. Testimonials Testimonials will be added very shortly! 7. Notes It is important to note that you should consult with your vet if you have any questions or concerns with the fabrication or fit of the wheelchair. You may also use the comments of this project page to ask any questions. All dogs will take time to get used to their wheelchair. Some adapt really quickly and some hate their chairs initially. It takes work to train a dog to be comfortable with their wheelchair. I've worked with three dogs so far and I've experienced: a very comfortable and quickly adapted dog, an anxious and moody dog, and a timid pup. I've learned that leaving the chair in your living space and just letting your dog approach it and sniff it themselves helps! 8. Update Log March 2016: FiGO 2.0 Release
With this file you will be able to print FiGO | Rear Support Pet Wheelchair with your 3D printer. Click on the button and save the file on your computer to work, edit or customize your design. You can also find more 3D designs for printers on FiGO | Rear Support Pet Wheelchair.