Filament Dry Box - 3D Printed Fittings and Parts with Prusa Attachments
thingiverse
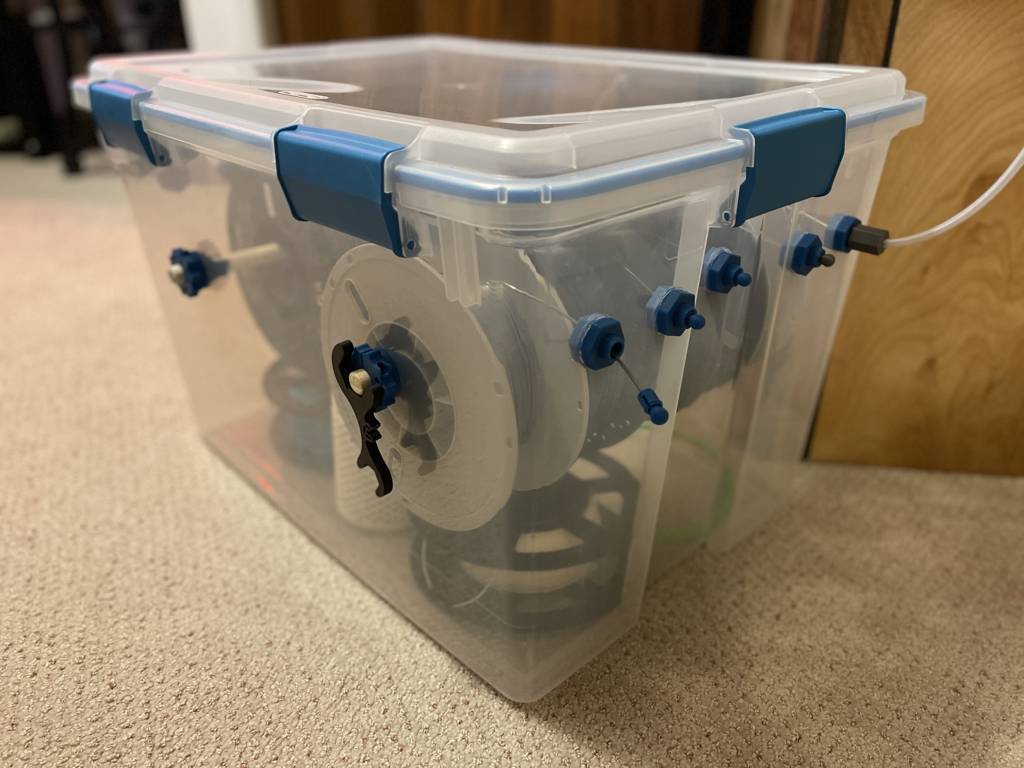
***UPDATE 27-Dec-2021 - I've added a .STEP file of the MasterAssembly so that any component can be modified or remixed*** An assembly of 3D printed fittings that can be installed into a dry-box for filament to spool out of. Check out the videos for a complete top to bottom of what this includes. See assembly drawings and pictures for reference. I used an Adafruit CLUE for the sensor/screen/controller. I will be adding some updates later with code and additional fittings for the box. In the meantime, here is the link https://www.adafruit.com/product/4500?gclid=Cj0KCQiAweaNBhDEARIsAJ5hwbdlzXbjMgUv9-mmiacDarxCsBYKvXEJYx2cGA1ZbDl88gTjonItow0aAgcIEALw_wcB Location for code is here, don't expect any beautifully commented code - https://github.com/nairck/FilamentDryBoxCircuitPython.git Check out the video of it in action - https://youtu.be/FJr6xU8A37U What you'll need: Any size sealing or dry box - mine is about 24in x 16in x 16in tall. 8 x M3x12mm Cap Head Screws per spool holder/dowel roller (16 total for mine) 2 x 17in long pieces of 5/8in dowel ~5ft x 1/4in PTFE tubing Drill bits, Dremel, knife for carving out holes RTV (Room-Temperature Vulcanizing) silicone (if you're crazy like me) Silica or Other desicant - I used the jar/container from this designer - https://www.thingiverse.com/thing:4821360 Do not print supports for anything EXCEPT PTFETubingPrinterGuideHEX.stl Please print all parts except those listed below at least .10mm layer height Please print the SpindleSpinner and PortPlug at 0.15mm Remove tabs on SpindleSpinner as shown in pictures. ***1 Spool Holder requires*** 2x - DowelHolder 2x - DowelHolderWasher 2x - SpindleSpinner 1x - HexWrenchAndTool 5x - ToolPin 1x - 17in 5/8 dowel 8x M3 ***1 Port Assembly requires*** 1x - PortBody 1x - PortPlug 1x - PortNut ***1 Hosing Assembly requires*** 1x - HoseAdapterCollet 1x - HoseAdapterNut I applied RTV on all fittings so get a good seal and it worked well. Follow the photos for some help here. It is easy to make a mess - the silicone can be easily peeled away after curing, so if you make a mistake, LEAVE IT... then peel it off the next day. To get a good ring for the port plug, apply an amount similar to that shown in the final photos. Make sure you have an even coating and no bubbles, and spin the port plug 1 turn after installing. Always leave RTV silicone at least 24hrs for a full cure. Straggly bits can be easily peeled off. Make sure the SpindleSpinner has a clear space to freely rotate if you apply silicone to the DowelHolder assembly - scrape cured silicone excess inside the groove before installing. Plug the PTFE tubing into your current setup/printer, or if you have a Prusa MK3S, the two parts below can be fitted and used as well. See the additional rending for an exploded view. *** Prusa MK3S Parts:*** PTFETubingPrinterGuideHEX fs_cover_upgrade
With this file you will be able to print Filament Dry Box - 3D Printed Fittings and Parts with Prusa Attachments with your 3D printer. Click on the button and save the file on your computer to work, edit or customize your design. You can also find more 3D designs for printers on Filament Dry Box - 3D Printed Fittings and Parts with Prusa Attachments.