Filament drybox
prusaprinters
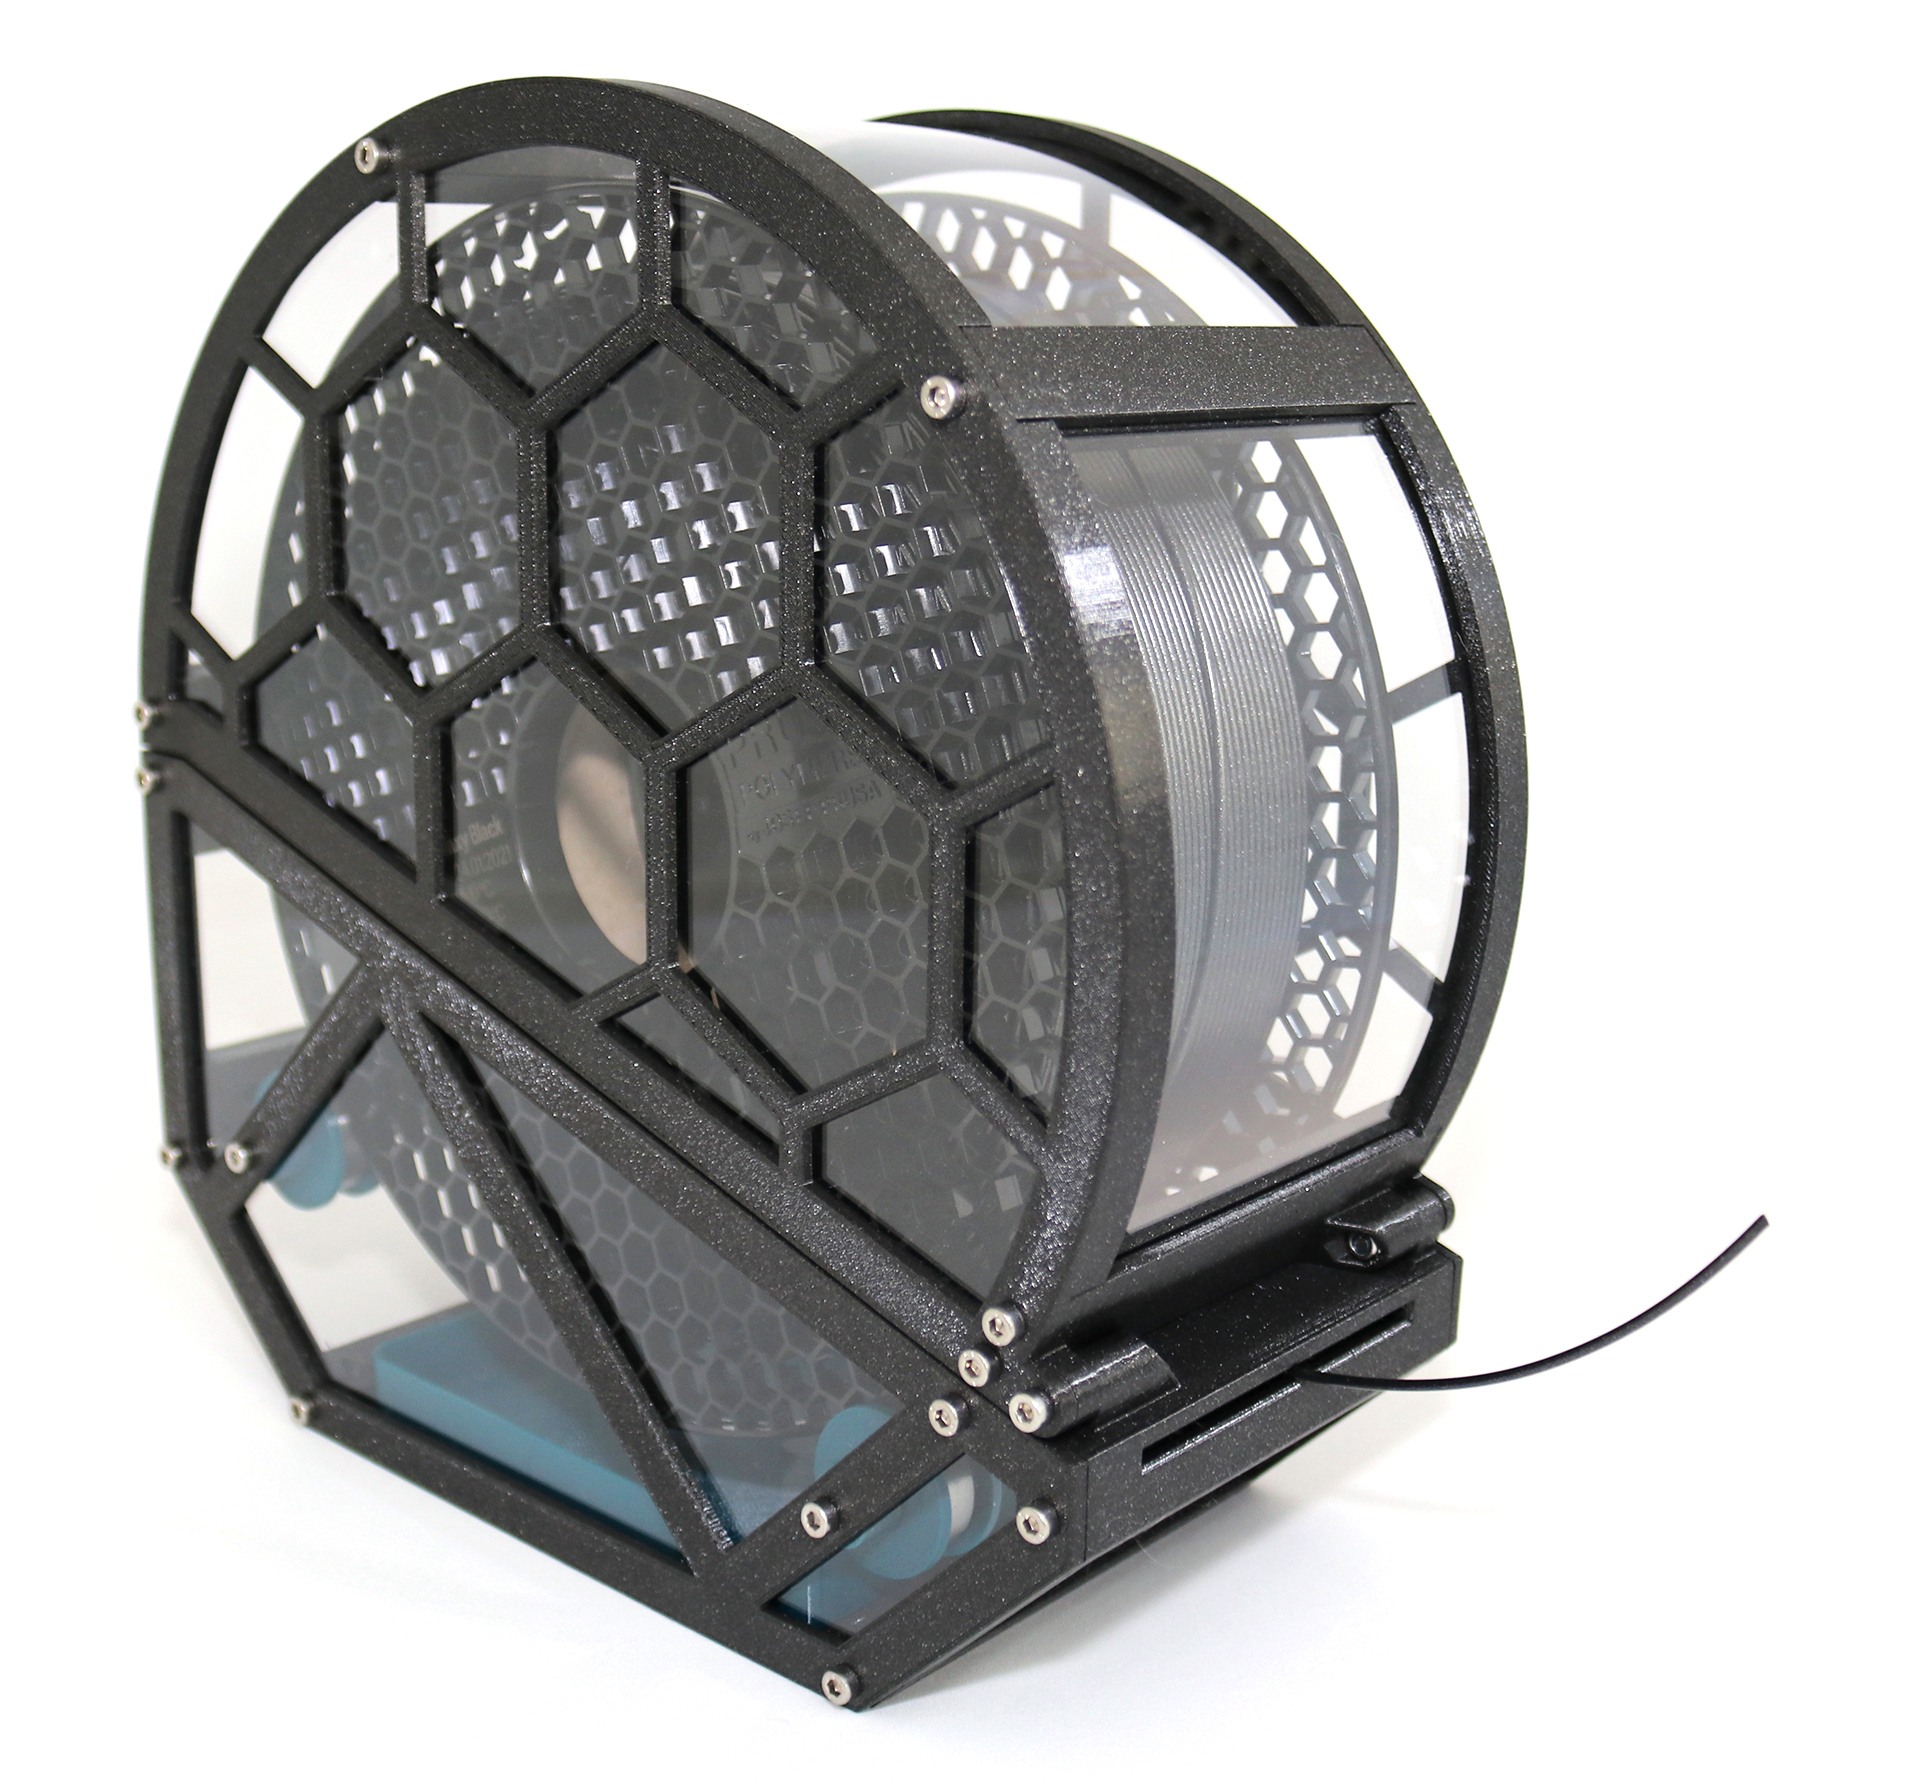
<p>Several 3d printing filaments are hygroscopic, meaning they absorb moisture from the surroundings which can lead to poor surface finish and a clogged nozzle. Depending on where you live and what material you are printing with, moisture might not be that big of a problem. Dust however can also lead to poor surface finish and can result in a clogged nozzle.</p><p>You should always keep your filament dry and free of dust for a trouble free printing experience.</p><p>This filament drybox is intended for one 200 mm diameter roll of 1.75 mm filament.</p><p> </p><h4>Printed parts needed to make this</h4><figure class="table"><table style="border:0px solid #F5F5F5;"><tbody><tr><td style="border:0px solid #F5F5F5;"><ol><li>BaseBackBottom</li><li>BaseBackTop</li><li>BaseCorner_X2</li><li>BaseFront</li><li>BaseSideLeft</li><li>BaseSideRight</li><li>BearingSpacer_X4</li><li>BearingSpacer2_X4</li><li>BearingSpacer3_X4</li><li>LidBack</li><li>LidCorner_X2</li><li>LidFront</li><li>LidSideLeft</li><li>LidSideRight</li><li>SilicaGelTray </li></ol></td><td style="border:0px solid #F5F5F5;vertical-align:top;"><figure class="image"><img src="https://media.printables.com/media/prints/281074/rich_content/5b7d8bae-79ee-4fcd-8cda-fa488b3b3426/partslist.jpg#%7B%22uuid%22%3A%226d4fb699-3518-4b08-91e2-6c23b4dce9c8%22%2C%22w%22%3A2209%2C%22h%22%3A1987%7D"></figure></td></tr></tbody></table></figure><p> </p><h4>Other parts needed</h4><ul><li>Clear PETG or acrylic for the transparent parts</li><li>4 x Bearing 608-2Z</li><li>22 x Square nut DIN 562 M3</li><li>4 x Hex nut DIN 934 M3</li><li>2 x Lock nut DIN 985 M3</li><li>22 x Screw DIN 912 12 mm M3</li><li>2 x Screw DIN 912 22 mm M3</li><li>4 x Screw DIN 912 25 mm M3</li><li>2 x Magnet neodym Ø6x2 mm</li><li>1 x Brush Seal 7x4 mm</li><li>50 g Regenerable Silica Gel</li></ul><p> </p><h4>Assembly instructions</h4><figure class="table"><table><tbody><tr><td><figure class="image"><img src="https://media.printables.com/media/prints/281074/rich_content/871d1b57-5aff-4688-8fc4-ac6368719471/1-3-1024x683.jpg#%7B%22uuid%22%3A%22222b3f12-1b34-4a19-8a59-bfe16d5224c3%22%2C%22w%22%3A414%2C%22h%22%3A405%7D"></figure></td><td><figure class="image"><img src="https://media.printables.com/media/prints/281074/rich_content/71ad8a98-3bca-4f92-b546-debd7406673a/2-1024x683.jpg#%7B%22uuid%22%3A%2228e83b42-3a4a-465e-b499-9782cee73963%22%2C%22w%22%3A422%2C%22h%22%3A447%7D"></figure></td><td>Start by inserting all the square nuts. Make sure there are no obstacles and that they are pushed all the way down. Use a small allen key or a flat head screwdriver.</td></tr><tr><td><figure class="image"><img src="https://media.printables.com/media/prints/281074/rich_content/8446e58e-711c-4c7a-b461-6162e023b392/3-1024x683.jpg#%7B%22uuid%22%3A%221f88792d-a597-4833-957d-66c8963d80be%22%2C%22w%22%3A352%2C%22h%22%3A313%7D"></figure></td><td><figure class="image"><img src="https://media.printables.com/media/prints/281074/rich_content/ef9ba044-3a5b-4f42-8fb3-e6a11b89ab3a/4-1024x683.jpg#%7B%22uuid%22%3A%22c7859ecf-d5cb-40e2-80d6-79f2d3644aaf%22%2C%22w%22%3A440%2C%22h%22%3A369%7D"></figure></td><td>Don't remove the protective foil! Insert the brush seal into the “BaseFront”. One of the ends of the hole is chamfered for easy insertion, make sure you insert it from that side. Push it all the way in and make sure the whole seal is inside the part.</td></tr><tr><td><figure class="image"><img src="https://media.printables.com/media/prints/281074/rich_content/fd93e9ef-7cfe-440c-937a-0bb221596ca0/5-scaled-e1632131184186-1024x1024.jpg#%7B%22uuid%22%3A%2223c0e941-2306-48dd-acd6-e0e73799fb51%22%2C%22w%22%3A1024%2C%22h%22%3A1024%7D"></figure></td><td><figure class="image"><img src="https://media.printables.com/media/prints/281074/rich_content/25cd7d18-2049-405f-8771-0b00863335cb/6-scaled-e1632134524977-1024x1024.jpg#%7B%22uuid%22%3A%221d8e3d86-be03-4fda-a668-c07f84c7801e%22%2C%22w%22%3A1024%2C%22h%22%3A1024%7D"></figure></td><td>Insert the laser cut clear PETG (is what I used) sides into the “LidSide” and “BaseSide” by aligning the end under the chamfer and simply dropping it in.</td></tr><tr><td><figure class="image"><img src="https://media.printables.com/media/prints/281074/rich_content/becd7448-762e-4119-af25-7354d2025f3b/7-scaled-e1632134609599-1024x1024.jpg#%7B%22uuid%22%3A%223210c3e7-6a03-4aa9-b87f-84d84b2ea3e2%22%2C%22w%22%3A1024%2C%22h%22%3A1024%7D"></figure></td><td><figure class="image"><img src="https://media.printables.com/media/prints/281074/rich_content/d837a916-9a35-426d-992b-14ccb0bfd72a/8-scaled-e1632134659281-1024x1024.jpg#%7B%22uuid%22%3A%223cb53b6c-5c35-469f-ba43-37c6416c43bf%22%2C%22w%22%3A1024%2C%22h%22%3A1024%7D"></figure></td><td>Use the 12 mm screws to assemble the parts on one side of the “LidSide” and “BaseSide”. And slide in the rest of the clear PETG parts.</td></tr><tr><td><figure class="image"><img src="https://media.printables.com/media/prints/281074/rich_content/120ece7d-4db3-40d5-8669-69ff04b52fc2/9-scaled-e1632134708253-1024x1024.jpg#%7B%22uuid%22%3A%2269cb52f9-4bac-4f99-86e3-3b7c7d5f2901%22%2C%22w%22%3A1024%2C%22h%22%3A1024%7D"></figure></td><td><figure class="image"><img src="https://media.printables.com/media/prints/281074/rich_content/ea915c71-aea5-4ed6-883f-9e4aae4b0860/10-scaled-e1632134761477-1024x1024.jpg#%7B%22uuid%22%3A%2245178ec5-cc8f-4a09-a8c0-ce621eddf63a%22%2C%22w%22%3A1024%2C%22h%22%3A1024%7D"></figure></td><td>Align the other sides and use the rest of the 12 mm screws to fasten them.</td></tr><tr><td><figure class="image"><img src="https://media.printables.com/media/prints/281074/rich_content/0ba6716f-fbd0-4558-89fc-2e829f35e92d/11-scaled-e1632134810711-1024x1024.jpg#%7B%22uuid%22%3A%2272693715-0203-4b17-9daa-f5b5b211ad85%22%2C%22w%22%3A1024%2C%22h%22%3A1024%7D"></figure></td><td><figure class="image"><img src="https://media.printables.com/media/prints/281074/rich_content/ac0f406b-b577-42f8-ad8f-59fafe0b7de5/12-scaled-e1632134862745-1024x1024.jpg#%7B%22uuid%22%3A%223936740d-911a-47ea-91bc-d4264dce2432%22%2C%22w%22%3A1024%2C%22h%22%3A1024%7D"></figure></td><td>Use the 25 mm screws and hex nuts to assemble the bearings. First insert the screw into the hole in the “BaseSide” and then start with the “BearingSpacer”. Continue “BearingSpacer2”, 608 bearing, “BearingSpacer3” and finally a hex nut.</td></tr><tr><td><figure class="image"><img src="https://media.printables.com/media/prints/281074/rich_content/96873177-71ee-4b8c-a9a0-0517afab5709/13-scaled-e1632134911986-1024x1024.jpg#%7B%22uuid%22%3A%224a0ab856-3763-4219-8892-50595edabe67%22%2C%22w%22%3A1024%2C%22h%22%3A1024%7D"></figure></td><td><figure class="image"><img src="https://media.printables.com/media/prints/281074/rich_content/896b4ac5-520e-4bd1-9144-b17ed61180e6/14-scaled-e1632134956490-1024x1024.jpg#%7B%22uuid%22%3A%22a41f3139-1eef-4f7a-87dc-4338b4e9e5e6%22%2C%22w%22%3A1024%2C%22h%22%3A1024%7D"></figure></td><td>Place the assembled lid on top of the base and use the 22 mm screws and lock nuts to lock them into place. Make sure not to overtighten the screws and that the lid can move freely.</td></tr><tr><td><figure class="image"><img src="https://media.printables.com/media/prints/281074/rich_content/59fec8c1-f0f6-4958-b005-ced9146a5c72/15-scaled-e1632135014600-1024x1024.jpg#%7B%22uuid%22%3A%228932173d-2864-4da2-a88b-b820a1951c1f%22%2C%22w%22%3A1024%2C%22h%22%3A1024%7D"></figure></td><td><figure class="image"><img src="https://media.printables.com/media/prints/281074/rich_content/6743a21c-bf8e-416b-8347-cac4a9273d93/16-scaled-e1632135076700-1024x1024.jpg#%7B%22uuid%22%3A%225379ce96-703c-4935-a801-f533399b8af7%22%2C%22w%22%3A1024%2C%22h%22%3A1024%7D"></figure></td><td>Insert the magnets into the holes in the “LidBack” and “BaseBackTop”. Make sure they are in the right direction before you push them all the way in. As a final step fill and place the “SilicaGelTray” on the bottom of the filament drybox and you are done!</td></tr></tbody></table></figure><p> </p><p>I also included a .step file so you can make your own modifications with ease. Check out the instructions in the attached PDF for cutting templates for the transparent parts.</p>
With this file you will be able to print Filament drybox with your 3D printer. Click on the button and save the file on your computer to work, edit or customize your design. You can also find more 3D designs for printers on Filament drybox.