Filament Drybox Ikea Samla 22l remix
prusaprinters
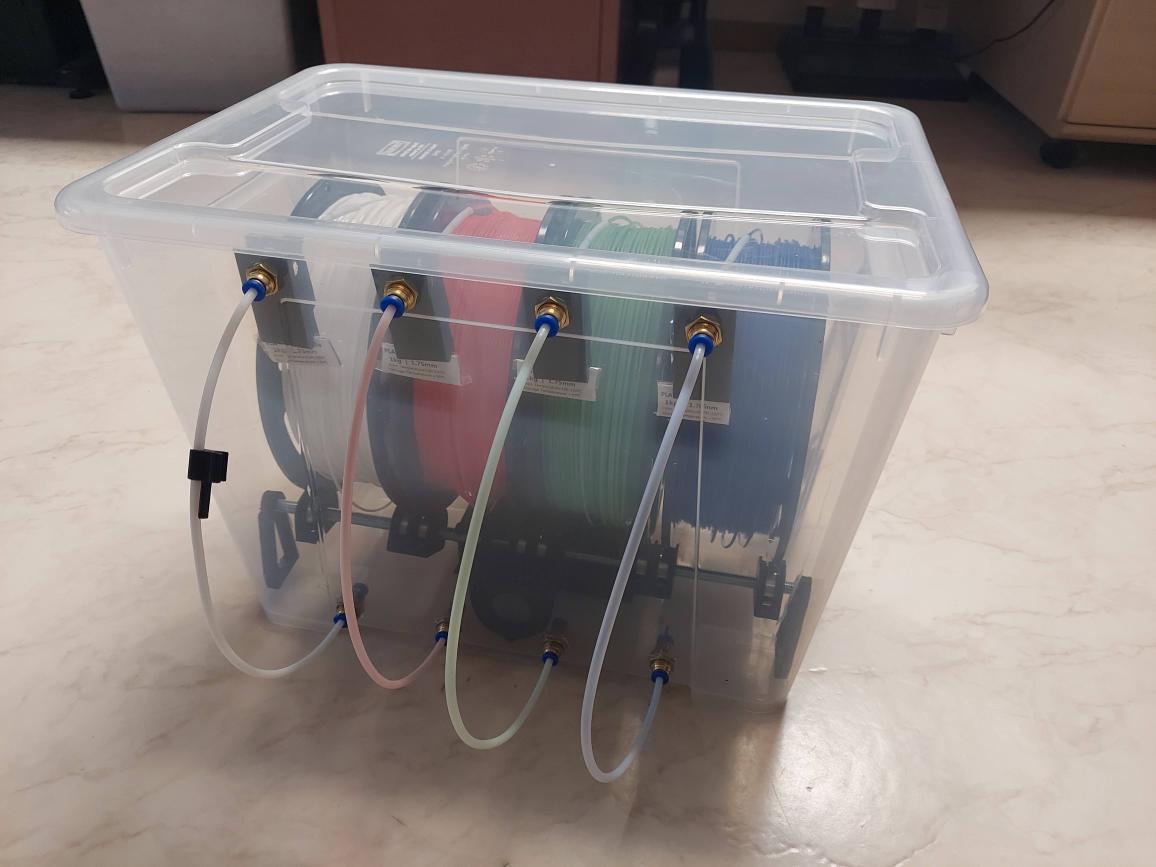
<p>This is a remix of several Ikea Samla drybox projects. Actually I liked the idea and like the 22l box size. What I did not like is that in most projects the bearing holders can cause friction on the bearing itself and the stands for the bearing rods were loosely coupled or even needed to be glued. So I changed these.</p><p>I am sharing my modified files just as-is. I might still modify them for future drybox projects. Also for the large 65l box I did not design any middle-support stands. Also my bearing holders do not include any stands where they touch the sides walls or floor of the box.</p><p>I have also reduced the amount of screwholes to drill for the sands to 1 as I believe 1 screw is sufficient here. Also my stands include a 5.5mm nut insert, so you don't need to use self-tappers (you can still though) but you can pot an M3 nut in it before mounting them (M3 nuts are typically 5.5mm).</p><p>Also my stands can be used either as top-open stands or by adding the included top-closing clips. The Clips can be pushed-on or slided in from the side. To remove them you can slide them sidewards (give them a gentle wiggle). Tolerances are tight and depending on your printer settings (I used 0.2mm layer height on my Vyper) they might be too tight to slide them into place. As written they are designed to slide in from the side and can hold the rod with bearings just fine even overhead.</p><p>Make sure to slide the top-ends on the right way around as they are not perfectly symmetrical.</p><p>The bearing holders are multi-part. The holder is available in a single (for the outer rolls) and dual (for adjacent rolls) variants. I have designed a small disc with an inset which is easy to print flat. It has an inset. The inner ring is sitting on the bearing inner ring and assuring some distance between the ring body and the bearing so it spins freely. It also has a bulge on the outside which is slightly higher than the inner ring preventing the filament roll to fall into the gap between the bearing and the holder/ring. So you will have perfectly free-spinning bearings with a guide for the roll.</p><p>I did not yet finish the drybox. I am planning to use 4mm pneumatic connectors to attach a teflon tube but you are free to use some filament guide from any of the listed projects from where I remixed.</p><p>What you need to buy:</p><ul><li>1x Ikea Samla 22l including cover</li><li>2x 8mm thread-rod, 338mm (can be cut from longer ones of course)</li><li>4x M3x8 or longer screw (head type does not really matter)</li><li>4x 5.5mm M3 nut</li><li>4x or more 608 bearings</li><li>Optionally you need some pneumatic connectors or build something yourself to get the filament to the outside</li><li>Silica gel</li><li>Optionally get some humidity sensors like <a href="https://www.aliexpress.com/item/32861882092.html">these</a></li><li>3mm drill and power tools</li></ul><p>What to print:</p><ul><li>2x left and 2x right stand, STL files include 1 set (1x left + 1x right including top caps)</li><li>4x single bearing holder</li><li>As many dual-bearing holders as you need depending on the amount of rolls you want to place</li><li>4x 608 bearing per filament roll</li><li>2x bearing disc per bearing (so at least 8 discs for a single roll on 4 bearings)</li><li>1x drill template</li><li>Optionally print some label clips</li><li>Optionally print a sensor holder</li><li>Optionally print a desiccant/silica-gel box</li><li>Print at least one of the quick connector plugs <a href="https://www.printables.com/model/162653-pneumatic-quick-connector-plug">here </a>to seal the open plug on the spool in use</li></ul><p>Optionally you can also print the M8 lock-nut to print and clip on or use M8 nuts if you need to affix your bearing holders on the rod to avoid them to slide sideways. I found that for my personal use they don't usually slide so easy on the threaded rod so I usually don't need to lock them.</p><p>The silica gel (desiccant) box is optimized for reduced weight and minimum material use. The side-walls were optimized to be printed with a 0.4mm nozzle and minimum amount of retractions needed for smooth, fast and easy printing. The box lid will clip onto the rails in the box. However if you want to secure them you can print up to 4 of the “lock ring” rings and slide them over the end of the arms on the lid in order to prevent the box from jumping off the rail.</p><p>There are 2 variants of the silica gel box. A small and a wide one. The wide one will allow you to stick the sensor directly on the box - so no sensor holder is needed. But it does not fit underneath the typical 1kg filament spools but only on wide spools (2kg and larger). So I have created a small box as well which can fit underneath the typical roll but does not feature a sensor holder. I have included a separate sensor holder for this use-case though.</p><p>How to build:</p><ul><li>buy material</li><li>print parts</li><li>use drill-mask placed on the bottom of the Samla box and drill 4 holes for the stands</li><li>put 5.5mm nuts into your printed stands</li><li>Place stands in the box and screw them on from bottom using M3 screws</li><li>assemble bearing sandwiches (place a bearing between two discs). Caution: Make sure to keep the flat side away from the bearing and put the side with the inset towards the bearing.</li><li>put bearing sandwiches in the slots on the holder</li><li>push the bearing holders onto the M8 rod cut to 338mm length</li><li>if the holders or bearing discs do not slide freely use a deburring tool to remove any excess burr from printed parts.</li><li>assure all bearings are free-spinning</li><li>place rod with bearings onto the stands on both sides of your Samla</li><li>either press-on or slide-on the printed caps to lock the rods in place</li><li>Insert humidity sensor into holder and clip it on to the front rail</li><li>Fill some silica gel into the Silica gel box and place it onto the rails - eventually locking it with a locking ring</li><li>Optionally attach the label clips to the box</li><li>enjoy</li></ul><p> </p><p>Changelog:<br>2022-05-19: Updated small silica gel box body for better slicing and better printability with less retractions.<br>2022-05-14: Uploaded a label clip.<br>2022-05-14: Uploaded Silica gel box (wide and small variants).<br>2022-05-14: Uploaded hygrometer sensor holder.<br>2022-05-14: Uploaded lock-ring for hygrometer holder and silica gel box.<br>2022-04-05: Uploaded bearing disc which I forgot to add. You need 2 of those disks per bearing to "sandwich" the bearing and assure free spin.</p><h3>Print Settings</h3><p><strong>Printer Brand:</strong></p><p>Anycubic</p><p><strong>Printer:</strong></p><p>Large Size Chiron</p><p><strong>Rafts:</strong></p><p>No</p><p><strong>Supports:</strong></p><p>No</p><p><strong>Resolution:</strong></p><p>0.2</p><p><strong>Infill:</strong></p><p>10% Gyroid</p><p><strong>Filament:</strong> Purefil PLA</p><p>black</p><p><strong>Notes:</strong></p><p>Printed with only 10% gyroid infil seems to work fine for me. You might want to print a raft or brim for the stands or more specifically for the stand heads. I printed it without any raft/brim on a LokBuild surface on my Anycubic Vyper.</p><p>No supports were needed at all. Bearing mounts can be printed upright (round side up), Stands are printed flat down (does not matter which side down) and bearing discs can be printed flat on the print plane. Should be quite obvious though.</p><p>Category: 3D Printer Accessories</p>
With this file you will be able to print Filament Drybox Ikea Samla 22l remix with your 3D printer. Click on the button and save the file on your computer to work, edit or customize your design. You can also find more 3D designs for printers on Filament Drybox Ikea Samla 22l remix.