Filament Dryer
thingiverse
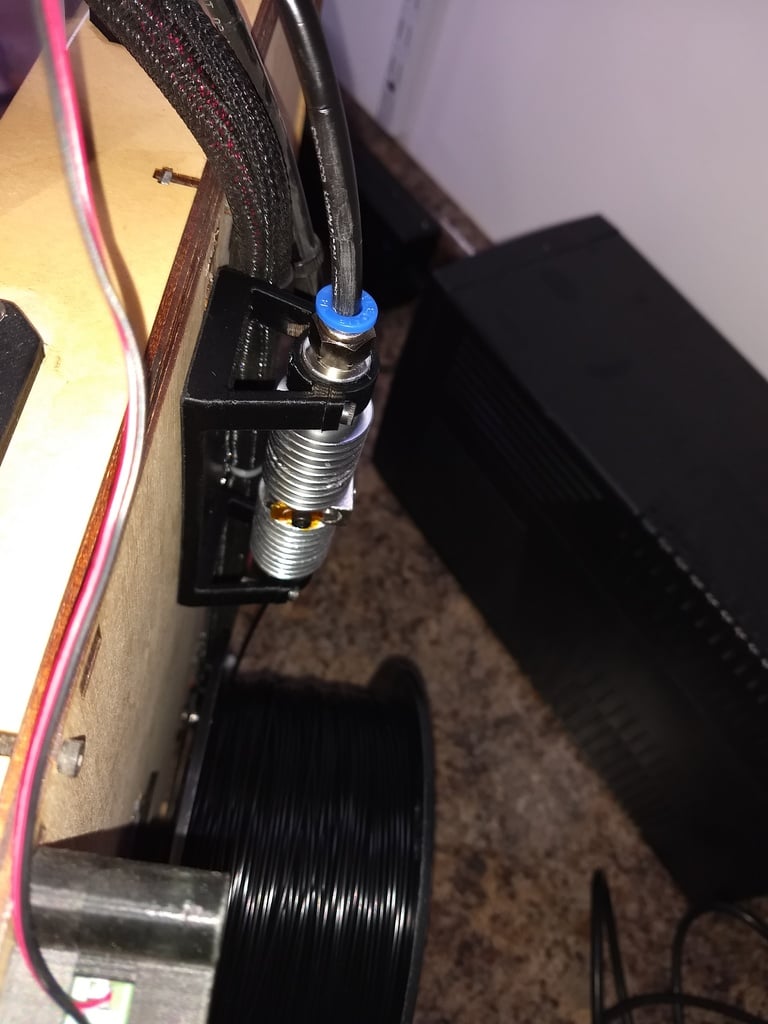
I've been working on a way to dry filament and be sure its dry before going into the extruder for a while, then it appears i was beat to the punch by a product from Thordsen 3D. I was on basically the same path as them designing something before i became aware of it, so i figured i might as well just share it with everyone now! Very low parts count... 2 - E3D V5 style heatsinks, one remote, one direct feed. 1 - Hot End Block 1 - All Metal throat, NOT PTFE Lined. 1 - Heater Cartridge 1 - Thermocouple Optional.. 1 - PID Temperature Controller 1 - Power Supply, 12 or 24v depending on your heater temperature. I have been running these connected as the second extruder on my Makerbot's, all you need to do is connect the heater and thermocouple to the second extruder output, and if you use Simplify3D you can set it to heat the second extruder at the start of a print for the drying temperature that you want, and it will shut off when the print is done. If you don't use Simplify3D or you want separate control just use a cheap PID controller off eBay, just be aware that the PID controller and the heater need to be the same voltage. Most of the cheap PID controllers are 24v units, and some of them even come with a Thermocouple, so all you need is a standard 24v 40w 3D printer heater cartridge. The only modification needed to the parts is to cut two slots to the output side heatsink, in my setup the output side has a 1/4" push fitting for the Makerbot filament feed tube to connect to, the input side is just a normal V5 heatsink thats made for direct feed for the filament coming off the spool, optionally if you wanted to put it inline somewhere else depending on the printer you have you can use two remote heatsinks and put a tube fitting on each end. The slots are cut as shown in the picture so they go roughly a third of the way into the heatsink, its not super critical, your just making two air slots for the hot air/moisture to escape from the output side as the filament feeds through. I just used a sawzall then a needle file to clean up the slots and a 6mm tap to clean out the inside to make sure there was no burrs of the aluminum sticking inward. For assembly just put the throat, all metal with no PTFE lining like the original Makerbot style, through the heater block and center the heater block on the throat. Then screw on the heatsinks to each side creating your input and output. Most of these all metal throats have one end thats flat or tapered, put that towards the output side, the other side usually has a bit of a countersink to make it easier to get the filament started into the throat. Install the heater in the heater block, if you have the style where the heater is held in by a set screw on the bottom as long as the heater set screw is flush with the surface of the block it will work, in my case i had some with a set screw on the side to hold the heater which is a better solution so the heatsinks can tighten up flat against the heater block. Attach the thermocouple and that's it. I have been running them without any insulation on the heater block, and it looks like thats how Thordsen does it also. For ABS i run it at 70C, i haven't tried it on other filaments yet but i plan to and see what temps work best. I can tell you at 70C i took a known damp roll of ABS that was printing like total trash, stringing and horrible surface finish not to mention steaming and popping, and it printed like brand new filament no issues. If you have your filament sitting on the printer a long time, or you have spools that are damp and misbehaving, this really does work! And if you would rather just buy a built unit ready to use, have a look at Thordsen3D for their product. Its not unreasonably priced at all, i have just been experimenting with this and ended up on the same path as them, didn't even know they existed until recently! Originally i was designing the same thing with different machined for this purpose heatsinks, then i ended up with some V5 heatsinks and played around with it, funny how we came to the same design conclusions. For printing the mounting base and clamps that i included with this Thing, i would use ABS for better heat resistance, but otherwise its a simple design that i tossed together when i was prototyping this setup and it works! The reason i used V5 heatsinks is i had some on hand, you could also use the V6 style, but i believe the dimensions are different and the base may not fit. If i redesign the base mount in the future i will upload a new version of it, but so far its working fine! I have tried this setup on my Rep 1's, and Rep 2/2X printers and it works great running it as the second extruder. If you need info on how to setup Simplify3D let me know and i can post my startup script that heats it up before starting a print. Happy Printing!
With this file you will be able to print Filament Dryer with your 3D printer. Click on the button and save the file on your computer to work, edit or customize your design. You can also find more 3D designs for printers on Filament Dryer.